Using Connected Objects To Keep Your Job

We keep hearing about the Internet of Things. The basic idea is simple: Everyday objects (like a watch or even a toothbrush) will soon be connected to Internet, and will be able to communicate with each other.
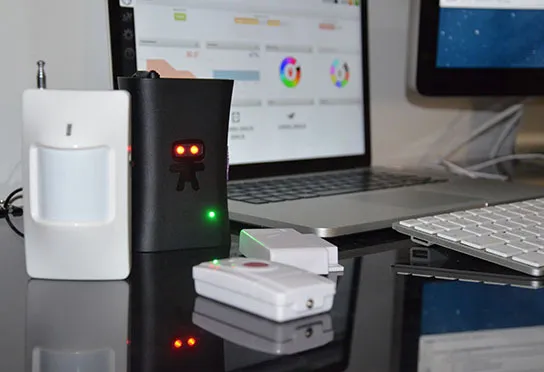
The last hack day at marmelab allowed me to learn more about this subject, using the range of objects brought by Ninja blocks
.Time for me to suit up my outfit, take my shurikens and transform into a fast & furtive Ninja. Thanks to Ninja Blocks and their multiple captors/actuators & NodeJS.
You can ensure the safety of your defense if you only hold positions that cannot be attacked (Sun Tzu - The Art of War)
Connected Objects to The Rescue of The Ninja – Almost-Perfect
A great Ninja is a ninja who cannot be detected, so when he’s working he shouldn’t be surprised by his sensei opening the door of his office. He must protect his workstation even if he’s going to the restroom.
To be able to detect theses actions, we are going to use 2 captors (proximity & movement). They are packaged in the Ninja Blocks kit. The first one is going to detect opening doors while the second will determine if the sensei is entering or if we are leaving the office.
What’s The Plan ?
Let’s imagine the a Ninja isn’t on a website related to his job. In this - very rare - case, a new tab will be opened on his favorite browser (with a more professional website, like github.com) if the sensei is coming into his office.
To prevent our sensei from discovering the page of our favorite social network, the current session will be locked when we will leave the room.
Finally, a snapshot & facial recognition functionality will be added to ensure that no other Ninja can sit at our place without our permission.
Setup Some Rules
Ninja Blocks offers a great interface to manage rules, install applications created by our fellows Ninja or handle access to the API.
A dashboard will show us the state of our sensors connected to the Block: a graph of temperature & humidity evolution, buttons to change the colors of the Blocks eyes, etc.).
A rule is created in 3 simple steps:
-
First, drag & drop paired captors (e.g. movement captor) and a threshold if needed.
-
Next, associate an action to launch when the sensor will be triggered: send an SMS, an email, POST request to a configured URL, etc.
- Finally, name the rule & define the frequency of the trigger.
All of theses actions can be natively used with services like Facebook, Dropbox, or a free sending SMS service.
Using Proximity And Movement Sensors
The proximity sensor triggers an action when both parts are separated (at least 2 centimeters). In our installation, this sensor is fixed to the door (for the first part), and to the door frame (for the other one). Each time the door opens, an action is triggered.
The movement sensor is placed in the room pointing to the door. It is used to know if a sensei is coming or if we are leaving the room.
Setup Some Code
Ninja Blocks contains a “web hook” system. In the interface, we can configure rules related to events.
Here we choose to call some URLs:
-
/detectwhen the movement sensor is triggered -
/door-openwhen someone moves in front of the movement sensor.
Node.js will gather all of theses events (with the express
module) in a “server” application:
var app = require("express")();var http = require("http");var server = http.createServer(app);var io = require("socket.io").listen(server, { log: false });app.post("/door-open", function (req, res) {});
app.post("/detect", function (req, res) {});
io.on("connection", function (socket) {  currentSocket = socket;});
io.on("disconnect", function (socket) {  currentSocket = null;});
Goal
The goal is to apply theses conditions:
-
If the door is opening and the movement sensor is triggered, then the sensei is coming
-
If the door is opening and the movement sensor is not triggered during 5 seconds, then the Ninja leaves the room.
Observation is a basic principle in the Ninja philosophy.
Then we are going to create 3 statuses in our “server” application:
doorOpened
, exitDetected & senseiDetected :
var exitDetected = 0;var senseiDetected = 0;var doorOpened = 0;var existStatusInterval = 0;
app.post("/door-open", function (req, res) {  doorOpened = 1;  existStatusInterval = setTimeout(setExitStatus, 5000);
  dispatchInfos();  res.send();});
app.post("/detect", function (req, res) {  clearTimeout(existStatusInterval);
  if (doorOpened) {    senseiDetected = 1;  }
  doorOpened = 0;
  dispatchInfos();});
function setExitStatus() {  exitDetected = 1;
  dispatchInfos();}
function dispatchInfos() {  if (!currentSocket) {    return;  }
  currentSocket.emit("status", {    sensei: senseiDetected,    exit: exitDetected,  });
  exitDetected = 0;  senseiDetected = 0;}
When the door opens, the doorOpened status is set to 1. Then, a
timeout starts to change the exitDetected status within 5
seconds.
When a movement is detected, the timeout is cleared ; and if the
doorOpened status was set to 1, the senseiDetected
status changes to 1.
The dispatchInfos() method sends theses 3 statuses to the
computer to protect.
Status Retrieving Client Side
During the hack day, my computer wasn’t able to receive data from the Internet (despite my Ninja talents, I couldn’t get access to the Wi-Fi router).
So the application server is hosted on an external service (like an Amazon EC2 instance). The Ninja’s computer is able to connect to this server via socket.io et receive the last 3 statuses:
var io = require("socket.io-client");var socket = io.connect("http://my-server");
socket.on("status", function (status) {  if (status.exit == 1) {    lockScreen();  } else if (status.sensei == 1) {    launchSite();  }});socket.on("error", function (err) {  // Do something with the error});
function lockScreen() {  exec(    "/System/Library/CoreServices/Menu\\ Extras/User.menu/Contents/Resources/CGSession -suspend",  );}
function launchSite() {  exec('open -a Google\\ Chrome "http://github.com"');}
When the distant server sends the status (via dispatchInfos()),
it’s directly processed with the socket connection. So there is no need to
create a polling system by requesting an URL each second.
When the exit status changes to 1 (“Ninja is leaving”), we launch
the command to lock his session (on OSX):
/System/Library/CoreServices/Menu\ Extras/User.menu/Contents/Resources/CGSession -suspendWhen the presence of the sensei is detected, a github.com page if opened in a new tab of Chrome (Ninja’s favorite browser):
open -a Google\ Chrome "http://github.com"Theses commands are specific to the OSX environment, a simple search allows to find alternative commands running on another environment, like on gnome:
gnome-screensaver-command -lDetect Another Ninja in Front Your Desk
To avoid bad tricks of your teammate like duck tape under our mouse or glue on the keyboard, we are going to setup a facial recognition system of the person in front of our computer.
When the alarm is armed and another Ninja sits on our chair (e.g. when the movement sensor placed next to the computer is triggered), a picture is taken with the webcam of the computer.
This picture is resized and uploaded to our server application so it can be analyzed via the Skybiometry webservice to retrieve a matching ratio (from 0 to 100).
If this ratio is under 50, a SMS will be sent to prevent the intrusion.
Enable / Disable The Alarm
The Ninja Blocks remote is used to arm & disarm the alarm..
The first thing to do is to create a rule triggered by the remote which calls
the /button URL on our server.
2 additional rules are also set up to change the color of our Ninja Block’s
eyes, in order to show if the alarm is armed or not. Theses rules will be
launched with a web hook on the /url-alarm-on &
/url-alarm-off URLs:
var alarmArmed = false;
// Called by Ninja Block when the remote button is pressedapp.post("/button", function (req, res) {  alarmArmed = !alarmArmed;
  setAlarmStatus(alarmArmed, function (err) {    if (err) {      console.log("err : " + err);    }  });
  dispatchInfos();  res.send();});
// Called to change the Ninja Blocks eyesfunction setAlarmStatus(status, cb) {  var path = status ? "/url-alarm-on" : "/url-alarm-off";
  var setAlarmOptions = {    hostname: "api.ninja.is",    path: path,    method: "POST",    headers: { accept: "text/plain" },  };
  req = http.request(setAlarmOptions, function (res) {    res.on("end", function () {      cb();    });
    res.on("error", cb);  });
  req.end();}
Detecting an Intrusion
Now we can change the method called when a movement is detected to change the intrusion status:
app.post("/detect", function (req, res) {  // ...
  if (alarmArmed) {    intrusion = 1;    alarmArmed = false;  }
  // ...});
function dispatchInfos() {  // ....
  currentSocket.emit("status", {    // ...    intrusion: intrusion,  });
  //...  intrusion = 0;}
Taking a Picture With the Webcam
Imagesnap is a command line application used to take picture with the webcam of a *nix computer. This application doesn’t include drivers, so you should have the correct drivers for your hardware already installed.
Depending your webcam quality, the picture can weight few Mb, too heavy for a Ninja - especially when it should be uploaded.
In this case, the picture is resized by ImageMagick.
Installing ImageMagic (OSX):
sudo port install ImageMagickAdding the node module in package.json:
“imagemagick”: “0.1.3”,
Then
npm installFacial Recognition
Setting up a facial recognition system during the second part of the hack day looked ambitious. A Ninja is quite productive but he can’t stop the time.
Another rule of the Ninja philosophy is to hide and seek a better opportunity to reach the victory. So I started to search an API allowing to recognize a person on a picture and I found Skybiometry
.This service brings a free API in the limit of 100 calls per hour and 5000 per day, which is reasonable for our usage.
After sign up, we should create a namespace in the administration interface of Skybiometry. This namespace is called “WorkmateProtection”.
Then we need a “tag” to recognize us. A tag allows identifying a person on a picture. So we have to send a “reference” picture of us via the webservice:
http://api.skybiometry.com/fc/faces/detect.json?api_key=xxx&api_secret=xxx&urls=http://my-server.com/reference.jpgThis service returns a temporary tag like TEMP_F@xxx.xxx.xxx
We can now associate this temporary tag to a name, in the previously created namespace “me@WorkmateProtection”:
http://api.skybiometry.com/fc/tags/save.json?api_key=xxx&api_secret=xxx&uid=me@WorkmateProtection&tids=TEMP_F@xxx.xxx.xxxWe can now use this service to retrieve a matching ratio (from 0 to 100) with the reference picture.
Setup Facial Recognition on The Application
When the intrusion status is sent, the application can take a picture with the webcam:
socket.on('status', function(status){    // ...
    if(status.intrusion){        takeSnapShotAndCompareTo('me@WorkmateProtection');    }});

function takeSnapShotAndCompareTo(tag, done){    var file;    var fileName;
    async.waterfall([        // Take a picture with the webcam        function(callback){            takeSnapShot(callback);        },
        // Resize snapshot        function(snapShotRslt, stderr, callback){            file = snapShotRslt.trim().split('...').pop();            fileName = file.split('/').pop();
            // Resize file            imagemagick.resize({                srcPath: file,                dstPath: file,                width:   512            }, callback);        },
        // Upload image        function(stdin, stdout, callback){            upload(file, callback);        },
        // Recognize it        function(stdout, stderr, callback){            getMatchValue('http://my-server/'+fileName, tag, callback)        },
        // Handle result        function(result, callback){            if(result < 50){                sendSMS(done);            }
            if(done){                done()            }        }    ], function(err, rslt){        if(err){            console.log('Err : '+err);            return;        }    });}
// Take a snapshow via imagesnapfunction takeSnapShot(cb){    var now = new Date();
    exec('imagesnap ~/Desktop/photo-'+now.getTime()+'.jpg', cb);}
// Upload a picture to the public dir of the serverfunction upload(file, cb){    exec('scp -i ~/.ssh/myPem.pem '+file+' user@my-server:/var/app/public', cb);}
function getMatchValue(url, tag, cb){    var apiURL = 'http://api.skybiometry.com/fc/faces/recognize.json?api_key='+config.skybiometry.key+'&api_secret='+config.skybiometry.secret+'&uids='+tag+'&urls='+url+'&attributes=all';
    http.get(apiURL, function(res){    content = '';
    res.on('data', function(chunk){        content += chunk;    });
    res.on('end', function(){        content = JSON.parse(content);
        // Nobody found : return 0        if(content.photos[0].tags == undefined || content.photos[0].tags.length == 0 || content.photos[0].tags[0].uids.length == 0){            return cb(null, 0);        }
        // Return the ratio of similarity        cb(null, content.photos[0].tags[0].uids[0].confidence);        })    })    .on('error', cb);}
The takeSnapShotAndCompareTo(tag, done) method takes the path of
a picture taken with the webcam.
Then, this picture is resized and uploaded to the server (using scp). Skybiometry uses only hosted pictures, no raw data.
When the uploading is done, we are going to call the webservice to retrieve the matching ratio. If this ratio is under 50, a SMS is sent to prevent the intrusion. This is done thanks to a new rule with a webhook as a trigger and a SMS sending for the action:
function sendSMS(cb) {  var sendSMSOptions = {    hostname: "api.ninja.is",    path: "/my-SMS-web-hook",    method: "POST",    headers: { accept: "text/plain" },  };
  req = http    .request(sendSMSOptions, function (res) {      res.on("end", function () {        cb();      });
      res.on("error", function (err) {        cb(err);      });    })    .on("error", function (e) {      cb(e);    });
  req.end();}
Conclusion
We have seen during this article that being a Ninja is not a small job. Thanks to the range of sensors brought by Ninja Blocks, we’ve got the ninjustu to do quick application for a more beautiful life.
Rule creation and webhooks allow to plug in every device to Ninja Blocks objects.
The application presented in this post can be enhanced by:
-
Adding a Ninja automatically to the recognition process by adding a new Tag with a picture taken from the webcam. So we can handle a list of authorized persons.
- Adding a list of trusted websites that can be launched randomly.
-
Adding a client mode when the computer is accessible directly from the Internet. So we don’t have to use a server as a proxy to retrieve sensors status.
It’s difficult to speak about all the features in an article; there are a lot of possibility with the API / applications / custom blocks. Theses other features will be discussed in another post later.
Now you can take your own Hattori Hanzō saber and start hacking this Block.
Authors
Full-stack web developer at marmelab, can learn any new language in about two hours. For real.