
Augmented Reality With HTML5: What Can Mobile Web Browsers Do?


Augmented Reality seems to be a very hard subject, yet it is possible to provide a pleasant user experience using just web technologies. Read on to see how we developed a mobile app to help you draw (or tattoo) whatever you want.
Vimeo might track you and we would rather have your consent before loading this video.
Test the app on an Android device by browsing to https://sketch-by-phone.now.sh, or check the source at https://github.com/marmelab/sketch-by-phone.
What is Augmented Reality?
We hear a lot about Virtual Reality (VR) and Augmented Reality (AR) these days. What are they, and what’s the difference between them?
Virtual Reality (VR) is a projection of a virtual world to both of your eyes, using virtual reality headsets like the Oculus Rift of cardboard glasses combined with a smartphone. It simulates a user’s physical presence in a virtual or imaginary environment, for example for a video game.
Augmented Reality, (AR) is also a projection of a virtual world, but blended with the reality. The projection doesn’t hide your environment, but rather adds or replaces some parts of the environment. Augmented Reality can thus be used to assist a user into performing certain tasks in the real world. Augmented Reality uses different devices than Virtual Reality, because VR headsets hide the environment completely. And in fact, a simple smartphone is enough to experiment with AR.
To fully understand what can be done with augmented reality, we selected this video which demonstrate an amazing usage for climbing:
YouTube might track you and we would rather have your consent before loading this video.
At marmelab, we really like to try such new technologies on real projects. Let’s see what we can do with AR.
What We’re Going to Build
What if you could draw any picture on a piece of paper perfectly, just by following a projection of the picture made by your phone? The idea is not new, an application already exists for that: SketchAR.
YouTube might track you and we would rather have your consent before loading this video.
It uses native technologies and complex computer vision algorithms. After using it for a few minutes, it turns out to be barely usable, because the entire sheet of paper must be visible at all times by the phone camera, and this forces the drawer to hold the camera very close to their eyes.
Maybe we can try to improve the idea by using a small marker for the plane detection. It seems impossible to achieve using just web technologies (JavaScript and the WebGL API). Or is it?.
Let’s start by writing some user stories:
- As Trinity, given I have taken a picture with my phone, I want to “project” it on a sheet of paper on my desk so that I can draw it more easily by following my hand through my phone camera.
- As Trinity, given I have selected my picture an it is projected on my sheet of paper, I want to zoom and/or rotate it so that I can place it where I want.
- As Trinity, given I have selected my picture an it is projected on my sheet of paper, I want to adjust its opacity so that I can see what I’m doing but still see my picture.
(You may have recognized our Persona - she lives in an alternate reality, which is a great start to experience augmented reality.)
The augmented reality experience should be comfortable enough to sketch a reasonably simple drawing. That means a refresh rate close to 60fps, and a projection that does not flicker, even when the hand carrying the mobile device shakes.
We called the application “Sketch by Phone”.
Tools Of The Trade
We first explored the JavaScript community to see if anything existed to ease web development with WebGL, AR and touch gestures. Guess what, there are multiple librairies out there already!
- Three.js: A JavaScript 3D library
- ARToolkit: A set of tools for AR using three.js
- AR.js: A thin layer on top of artoolkit to make AR even easier
- Hammer.js: A javascript library for multi-touch gestures
And since we’ll have to compose several components together and handle navigation, we’ll use our beloved React.js and make it a Single-Page Appliction. For the UI kit, we settled on material-ui - we know and use it a lot these days beacause of admin-on-rest, and it’s well adapted to mobile apps.
Time to Build
First things first, the user must choose an image from her phone. Here is the JSX template of the component we desiged for the home page:
// in FileSelection.jsimport React, { Component } from "react";import getImageDataFromDataUrl from "./utils/getImageDataFromDataUrl";import hiro from "./assets/hiro.png";import rose from "./assets/rose.jpg";import Gallery from "./Gallery";import RaisedButton from "material-ui/RaisedButton";
const styles = {  // omitted for clarity};
class FileSelection extends Component {  state = {    showGallery: false,  };
  handleChange = (event) => {    var reader = new FileReader();    reader.addEventListener(      "load",      () => {        getImageDataFromDataUrl(reader.result).then(this.props.onFileSelected);      },      false,    );
    reader.readAsDataURL(event.target.files[0]);  };
  handleFileInputClick = () => {    this.fileInput.click();  };
  handleOpenGalleryClick = () => {    setTimeout(() => {      this.setState({ showGallery: true });    }, 500);  };
  handleCloseGalleryClick = () => {    setTimeout(() => {      this.setState({ showGallery: false });    }, 500);  };
  handleGalleryImageSelected = (image) => {    getImageDataFromDataUrl(image).then(this.props.onFileSelected);  };
  storeFileInputRef = (node) => {    this.fileInput = node;  };
  render() {    const { showGallery } = this.state;
    if (showGallery) {      return (        <Gallery          onClose={this.handleCloseGalleryClick}          onSelected={this.handleGalleryImageSelected}        />      );    }
    return (      <div style={styles.container}>        <h1 style={styles.title}>          Sketch anything you want using your phone as a guide        </h1>        <hr style={styles.hr} />        <ol style={styles.list}>          <li style={styles.listItem}>            <div>              Print a{" "}              <a style={styles.a} href={hiro}>                hiro marker              </a>            </div>            <div style={styles.hiroMarker}>              <a style={styles.a} href={hiro}>                <Image                  style={styles.hiroMarkerImg}                  alt="Hiro marker example"                  src={hiro}                />              </a>            </div>          </li>          <li style={styles.listItem}>Put it on a sheet of paper</li>          <li style={styles.listItem}>            Choose something to draw            <div>              <RaisedButton                style={styles.btnFileInput}                secondary                fullWidth                htmlFor="file_input"                onTouchTap={this.handleFileInputClick}                label="From your photo library"              >                <input                  ref={this.storeFileInputRef}                  id="file_input"                  style={styles.fileInput}                  type="file"                  accept="image/*"                  onChange={this.handleChange}                />              </RaisedButton>            </div>            <RaisedButton              secondary              fullWidth              onTouchTap={this.handleOpenGalleryClick}              label="Our drawings"            />          </li>        </ol>      </div>    );  }}
export default FileSelection;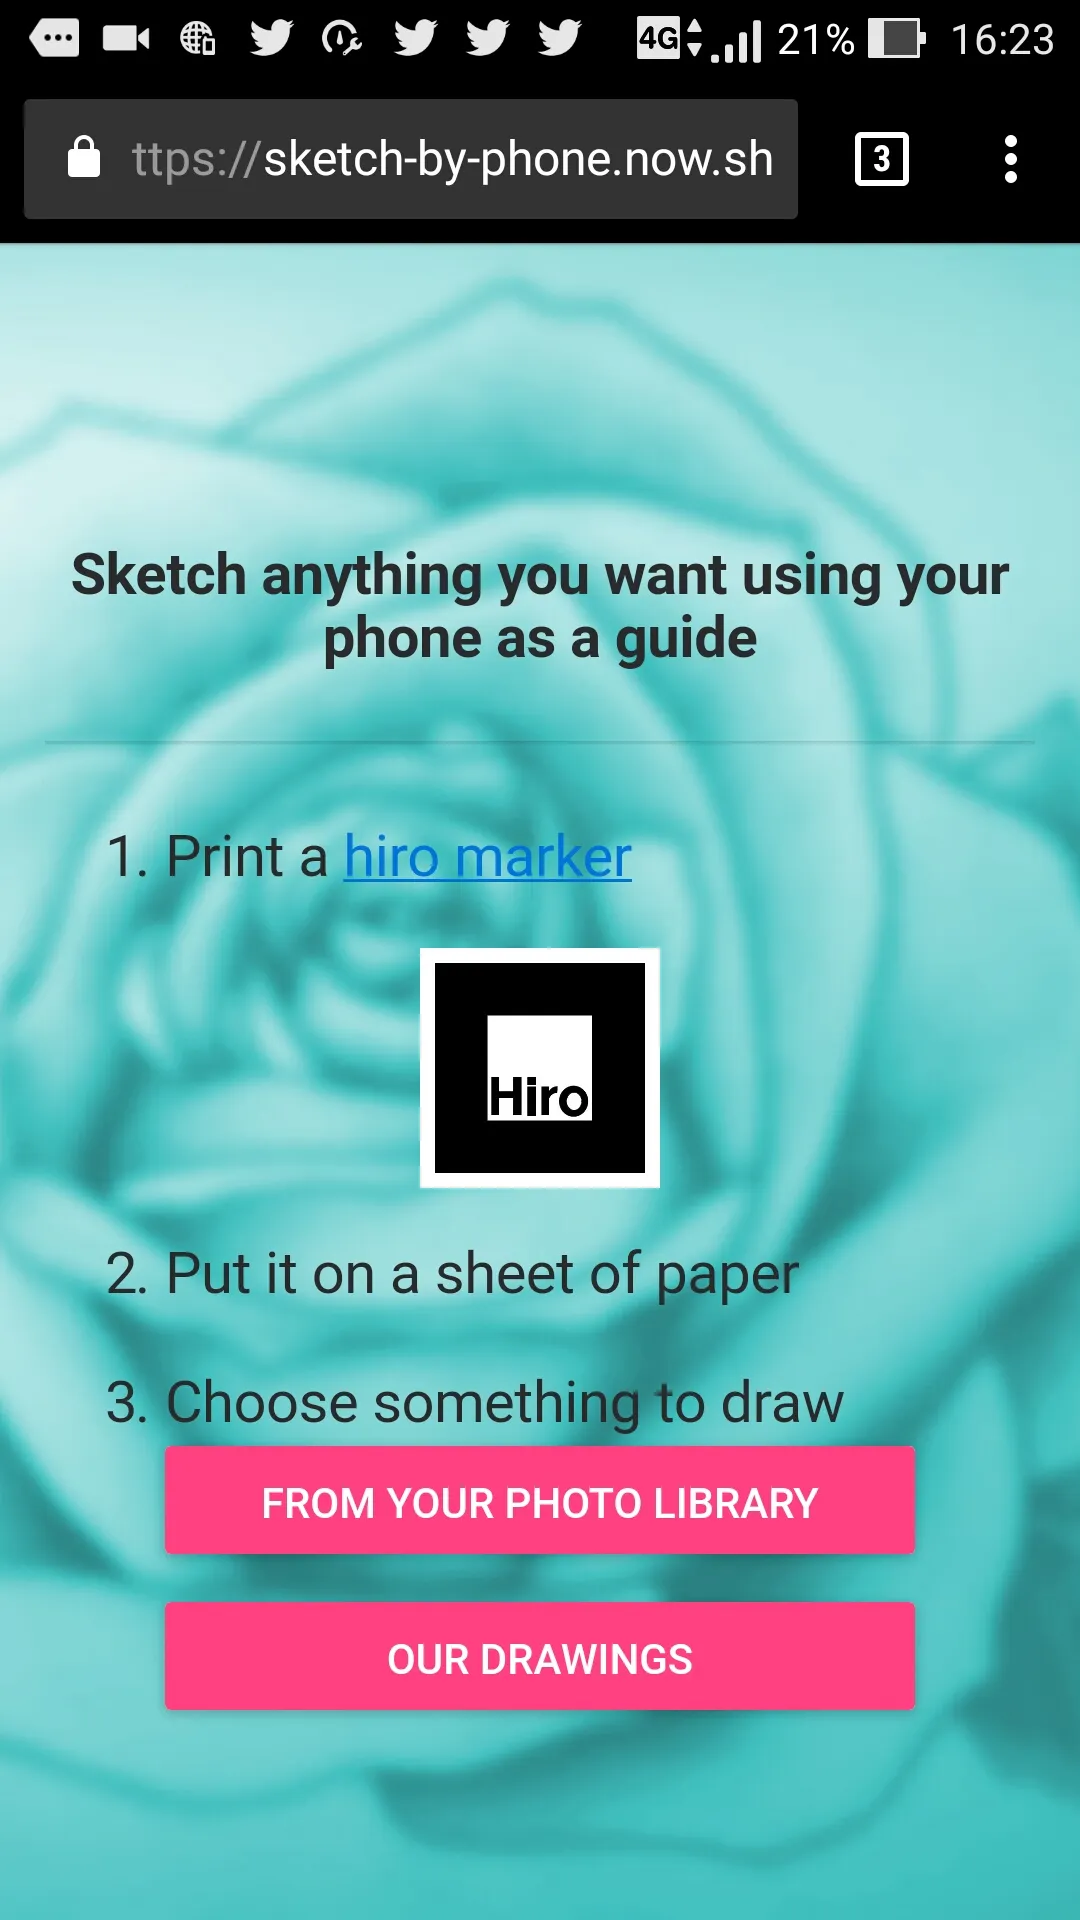
Next, let’s capture the video stream from the camera, and display it on the device.
// in utils/arToolkit.js
/* globals THREEx */// Yes, arToolkit currently exposes itself as a global variable nammed THREEx
import cameraData from "../assets/camera_para.dat";import hiro from "../assets/path.hiro";
const { ArMarkerControls, ArToolkitContext, ArToolkitSource } = THREEx;
/** * Initialize AR Toolkit from our three.js objects so that it can detect the Hiro marker * * @param {Object} renderer: the WebGL renderer from three.js * @param {Object} camera the camera object from three.js * @param {Array} onRenderFcts an array of functions which will be executed every frames * @returns {Object} An ArToolkitContext instance */export function initializeArToolkit(renderer, camera, onRenderFcts) { ArToolkitContext.baseURL = "../"; const arToolkitSource = new ArToolkitSource({ sourceType: "webcam" });
arToolkitSource.init(() => { arToolkitSource.onResize(renderer.domElement); });
window.addEventListener("resize", () => { arToolkitSource.onResize(renderer.domElement); });
// create an atToolkitContext const arToolkitContext = new ArToolkitContext({ cameraParametersUrl: cameraData, // THe hiro marker is monochrome detectionMode: "mono", maxDetectionRate: 30, // The two following settings adjusts the resolution. Higher is better (less flickering) but slower canvasWidth: 800, canvasHeight: 600, });
arToolkitContext.init(() => { camera.projectionMatrix.copy(arToolkitContext.getProjectionMatrix()); });
// update artoolkit on every frame onRenderFcts.push(() => { if (arToolkitSource.ready === false) return; arToolkitContext.update(arToolkitSource.domElement); });
return arToolkitContext;}
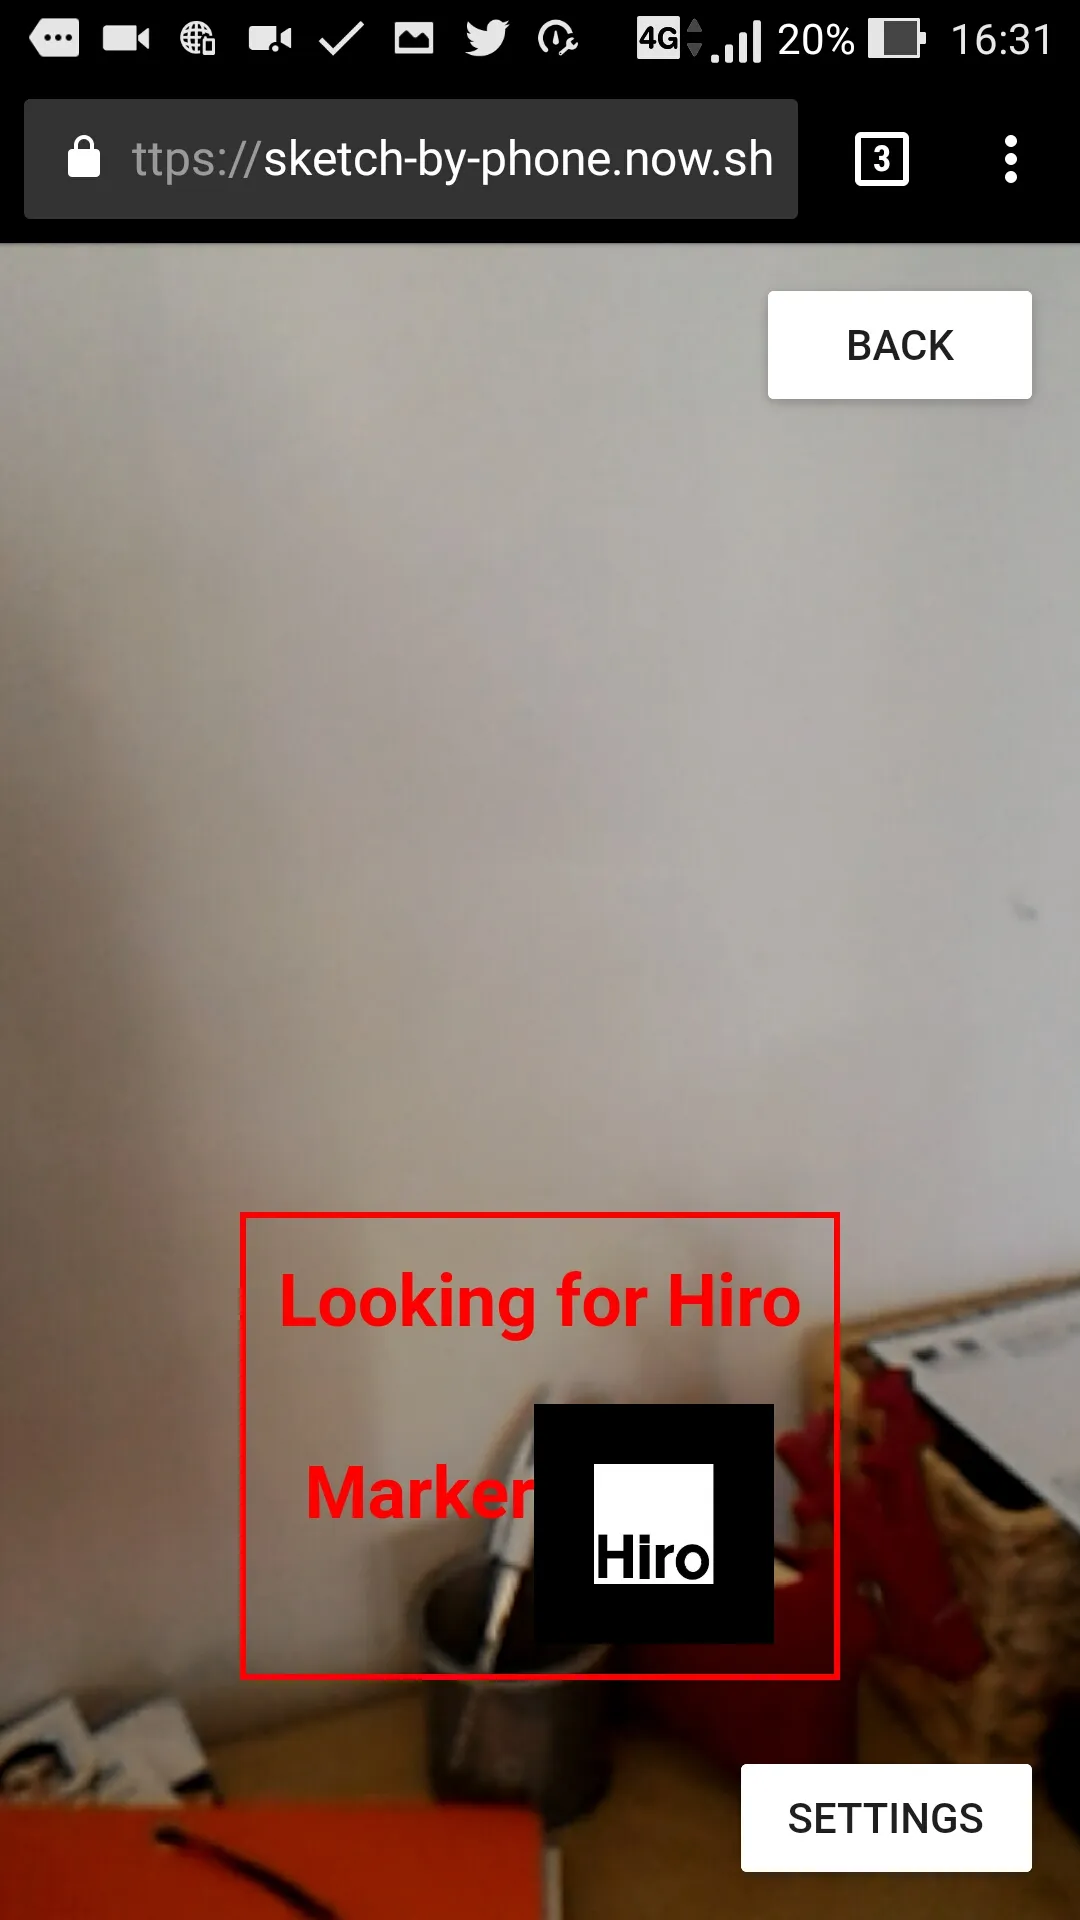
/** * Initialize AR Toolkit Hiro marker * * @param {Object} arToolkitContext: the ArToolkitContext instance * @param {Object} markerRoot a DOM element where to put the marker * @returns {Object} An ArMarkerControls instance */export function getMarker(arToolkitContext, markerRoot) { return new ArMarkerControls(arToolkitContext, markerRoot, { type: "pattern", patternUrl: hiro, });}AR.js requires a specific marker to be present: an anchor from which to augment reality. Trinity will have to print a page with this marker for now. Fair enough, let’s show her a message until the marker is found, and remind her what it looks like.
// in Sketch.jsimport React, { Component } from 'react';import SketchRenderer from './SketchRenderer';import MarkerSearch from './MarkerSearch';
class Sketch extends Component {    ...    handleMarkerFound = () => this.setState({ markerFound: true });    ...    render() {        const { markerFound } = this.state;        const { image, blackImage } = this.props;
        return (            <div>                <SketchRenderer                    image={image}                    blackImage={blackImage}                    onMarkerFound={this.handleMarkerFound}                /> {/* This is the component actually rendering our three.js scene, more about it later */}                {!markerFound && <MarkerSearch />}                ...            </div>        );    }}
This is what the screen looks like while waiting for the marker to be recognized:
We then need to configure three.js and AR.js to display the selected picture on top of the marker, or rather a bit aside, to let Trinity draw on paper. This is the job of the SketchRenderer component
/* globals THREE, requestAnimationFrame */// More global here, this time from three.js// requestAnimationFrame is from the window object though: https://developer.mozilla.org/fr/docs/Web/API/Window/requestAnimationFrame
import React, { Component } from "react";import initializeRenderer from "./utils/initializeRenderer";import { initializeArToolkit, getMarker } from "./utils/arToolkit";import detectEdge from "./utils/detectEdge";
const {  Camera,  DoubleSide,  Group,  Mesh,  MeshBasicMaterial,  PlaneGeometry,  Scene,  Texture,} = THREE;
export default class SketchRenderer extends Component {  componentDidMount() {    const {      blackImage,      coordX,      coordZ,      image,      onMarkerFound,      opacity,      scaleX,      scaleY,      rotation,    } = this.props;
    // initializeRenderer instanciate a new WebGlRenderer from three.js with some options    // for opacity, size, etc.    const renderer = (this.renderer = initializeRenderer(this.canvas));
    const scene = new Scene();    const camera = new Camera();    scene.add(camera);
    const markerRoot = new Group();    scene.add(markerRoot);    const onRenderFcts = []; // Array of functions called for each rendering frames    const arToolkitContext = initializeArToolkit(      renderer,      camera,      onRenderFcts,    );    const marker = getMarker(arToolkitContext, markerRoot);
    // This allows us to hide the MarkerSearchContainer component see before    marker.addEventListener("markerFound", onMarkerFound);
    // The fun begins: instantiate the plane on which to draw our image    // It will be oriented correctly by arToolKit depending on the marker orientation    const geometry = new PlaneGeometry(1, 1, 1);
    // Create a texture for our image    const texture = new Texture(image);    texture.needsUpdate = true; // This instruct three.js to update this object at next render
    // Create a material for our image to use on the mesh we'll create later    this.material = new MeshBasicMaterial({      map: texture,      opacity,      side: DoubleSide,      transparent: true,    });
    // From the new plane and material, instantiate a three.js mesh    this.mesh = new Mesh(geometry, this.material);
    // This rotation is necessary to have the image in front of us    this.mesh.rotation.x = -Math.PI / 2; // -90°
    // Apply the user preferences for rotation, position and zoom    this.mesh.rotation.z = rotation;    this.mesh.position.x = coordX;    this.mesh.position.z = coordZ;    this.mesh.scale.x = scaleX;    this.mesh.scale.y = scaleY;
    // Instruct arToolKit to display this image at the hiro marker position    markerRoot.add(this.mesh);
    // at each frame render, update the scene    onRenderFcts.push(function () {      renderer.render(scene, camera);    });
    // run the rendering loop    var lastTimeMsec = null;
    function animate(nowMsec) {      // keep looping      requestAnimationFrame(animate);      // measure time      lastTimeMsec = lastTimeMsec || nowMsec - 1000 / 60;      const deltaMsec = Math.min(200, nowMsec - lastTimeMsec);      lastTimeMsec = nowMsec;      // call all registered update functions      onRenderFcts.forEach((onRenderFct) => {        onRenderFct(deltaMsec / 1000, nowMsec / 1000);      });    }
    requestAnimationFrame(animate);  }
  componentWillUnmount() {    this.renderer.dispose();  }
  storeRef = (node) => {    this.canvas = node;  };
  componentDidUpdate() {    // Here we update the mesh and material from user preferences    const { coordX, coordZ, scaleX, scaleY, rotation } = this.props;
    // Apply the user preferences for rotation, position and zoom    this.mesh.position.x = coordX;    this.mesh.position.z = coordZ;    this.mesh.scale.x = scaleX;    this.mesh.scale.y = scaleY;    this.mesh.rotation.z = rotation;    this.mesh.needsUpdate = true; // Instruct three.js to update this object at next render
    const { blackImage, image } = this.props;    const { opacity, isDetectingEdge, blur, lowTreshold, highTreshold } =      this.props;
    // We added a way for Trinity to enable edge detection    if (isDetectingEdge) {      this.material.opacity = 1;      const alphaImage = detectEdge(image, { blur, lowTreshold, highTreshold });      const alphaTexture = new Texture(alphaImage);      alphaTexture.needsUpdate = true;      this.material.alphaMap = alphaTexture;      this.material.map.image = blackImage;      this.material.map.needsUpdate = true;    } else {      this.material.opacity = opacity;      this.material.alphaMap = null;      const texture = new Texture(image);      texture.needsUpdate = true;      this.material.map = texture;    }    this.material.needsUpdate = true;  }
  render() {    return <canvas id="root" ref={this.storeRef} />;  }}
In Three.js, in order to update a property (like our Texture in the example above), you must add the needsUpdate = true property after the initial render to specify that the object has changed. And then on next render, Three.js will take the added property, and update it accordingly. Note that you cannot read the current value this way.
AR.js is clever enough to adapt the projected picture according to the phone orientation and direction. Great!
All good. Now let’s use Hammer.js so that Trinity can move, zoom and rotate her picture.
/* globals Hammer */// Yes, we included Hammer as a global too just because it was faster and easierimport React, { Component } from "react";import degToRad from "./utils/degToRad";
const styles = {  // omitted for clarity};
export default class MoveControl extends Component {  state = {    pan: {      startX: 1,      startZ: 2,    },    rotation: {      start: 0,    },    scale: {      startX: 2,      startY: 2,    },  };
  componentDidMount() {    this.hammer = new Hammer(this.div);
    this.hammer.get("pinch").set({ enable: true });    this.hammer.get("rotate").set({ enable: true });    this.hammer.get("pan").set({ direction: Hammer.DIRECTION_ALL });
    this.hammer.on("panstart", this.handlePan);
    this.hammer.on("panmove", this.handlePan);
    this.hammer.on("pinchstart", this.handlePinch);
    this.hammer.on("pinch", this.handlePinch);
    this.hammer.on("rotatestart", this.handleRotate);
    this.hammer.on("rotatemove", this.handleRotate);  }
  handlePan = (ev) => {    const { coordX, coordZ, onTranslateChange } = this.props;    if (ev.type === "panstart") {      this.setState({        ...this.state,        pan: {          startX: coordX,          startZ: coordZ,        },      });    }    onTranslateChange({      x: this.state.pan.startX + ev.deltaX / 200,      z: this.state.pan.startZ + ev.deltaY / 200,    });  };
  handlePinch = (ev) => {    const { scaleX, scaleY, onZoomChange } = this.props;    if (ev.type === "pinchstart") {      this.setState({        ...this.state,        scale: {          ...this.state.scale,          startX: scaleX,          startY: scaleY,        },      });    }    onZoomChange({      x: this.state.scale.startX * ev.scale,      y: this.state.scale.startY * ev.scale,    });  };
  handleRotate = (ev) => {    const { rotation, onRotationChange } = this.props;    if (ev.type === "rotatestart") {      this.setState({        ...this.state,        rotation: {          start: rotation + degToRad(ev.rotation), // the first rotation is the angle between the two finger ignoring it.        },      });      return;    }    onRotationChange(this.state.rotation.start - degToRad(ev.rotation));  };
  storeRef = (node) => {    this.div = node;  };
  render() {    return <div style={styles.container} ref={this.storeRef} />;  }}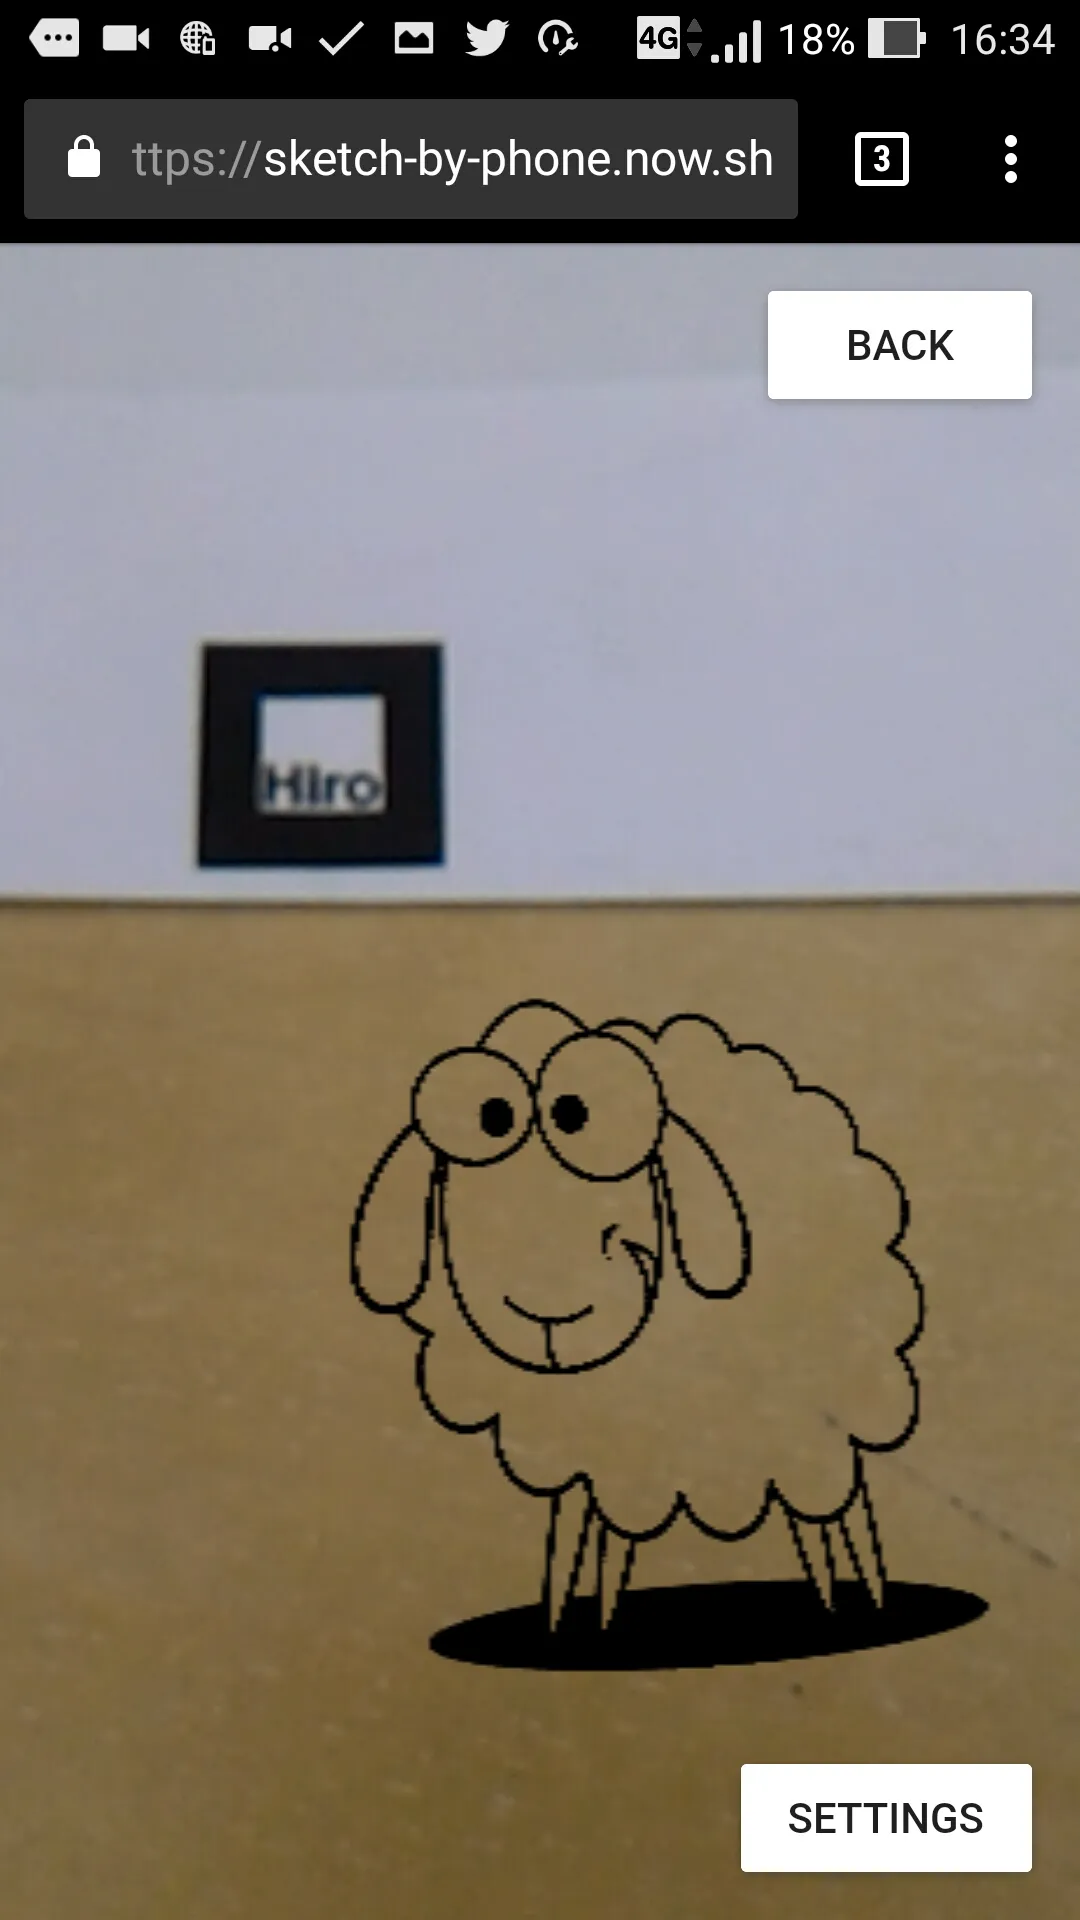
We placed all the Hammer logic inside a separate component to separate the gesture logic from the rendering.
Once enabled and when detected, we move, scale and rotate our image accordingly using three.js objects properties.
// In Sketch.jsimport React, { Component } from 'react';import SketchRenderer from './SketchRenderer';import MoveControl from './MoveControl';import MarkerSearch from './MarkerSearch';
class Sketch extends Component {    ...    handleTranslateChange = ({ x, z }) => this.setState({ coord: { x, z } });
    handleZoomChange = ({ x, y }) => this.setState({ scale: { x, y } });
    handleRotationChange = (rotation) => this.setState({ rotation });
    render() {        const {            markerFound,            coord: {                x: coordX,                z: coordZ,            },            scale: {                x: scaleX,                y: scaleY,            },            rotation,        } = this.state;
        const { image, blackImage } = this.props;
        return (            <SketchRenderer                coordX={coordX}                coordZ={coordZ}                scaleX={scaleX}                scaleY={scaleY}                rotation={rotation}                image={image}                blackImage={blackImage}                onMarkerFound={this.handleMarkerFound}            />            {!markerFound && <MarkerSearch />}            {markerFound && <MoveControl                coordX={coordX}                coordZ={coordZ}                scaleX={scaleX}                scaleY={scaleY}                rotation={rotation}                onTranslateChange={this.handleTranslateChange}                onZoomChange={this.handleZoomChange}                onRotationChange={this.handleRotationChange}            /> }            ...        );    }
After that, we added a way for Trinity to adjust the projected picture opacity with a slider input.
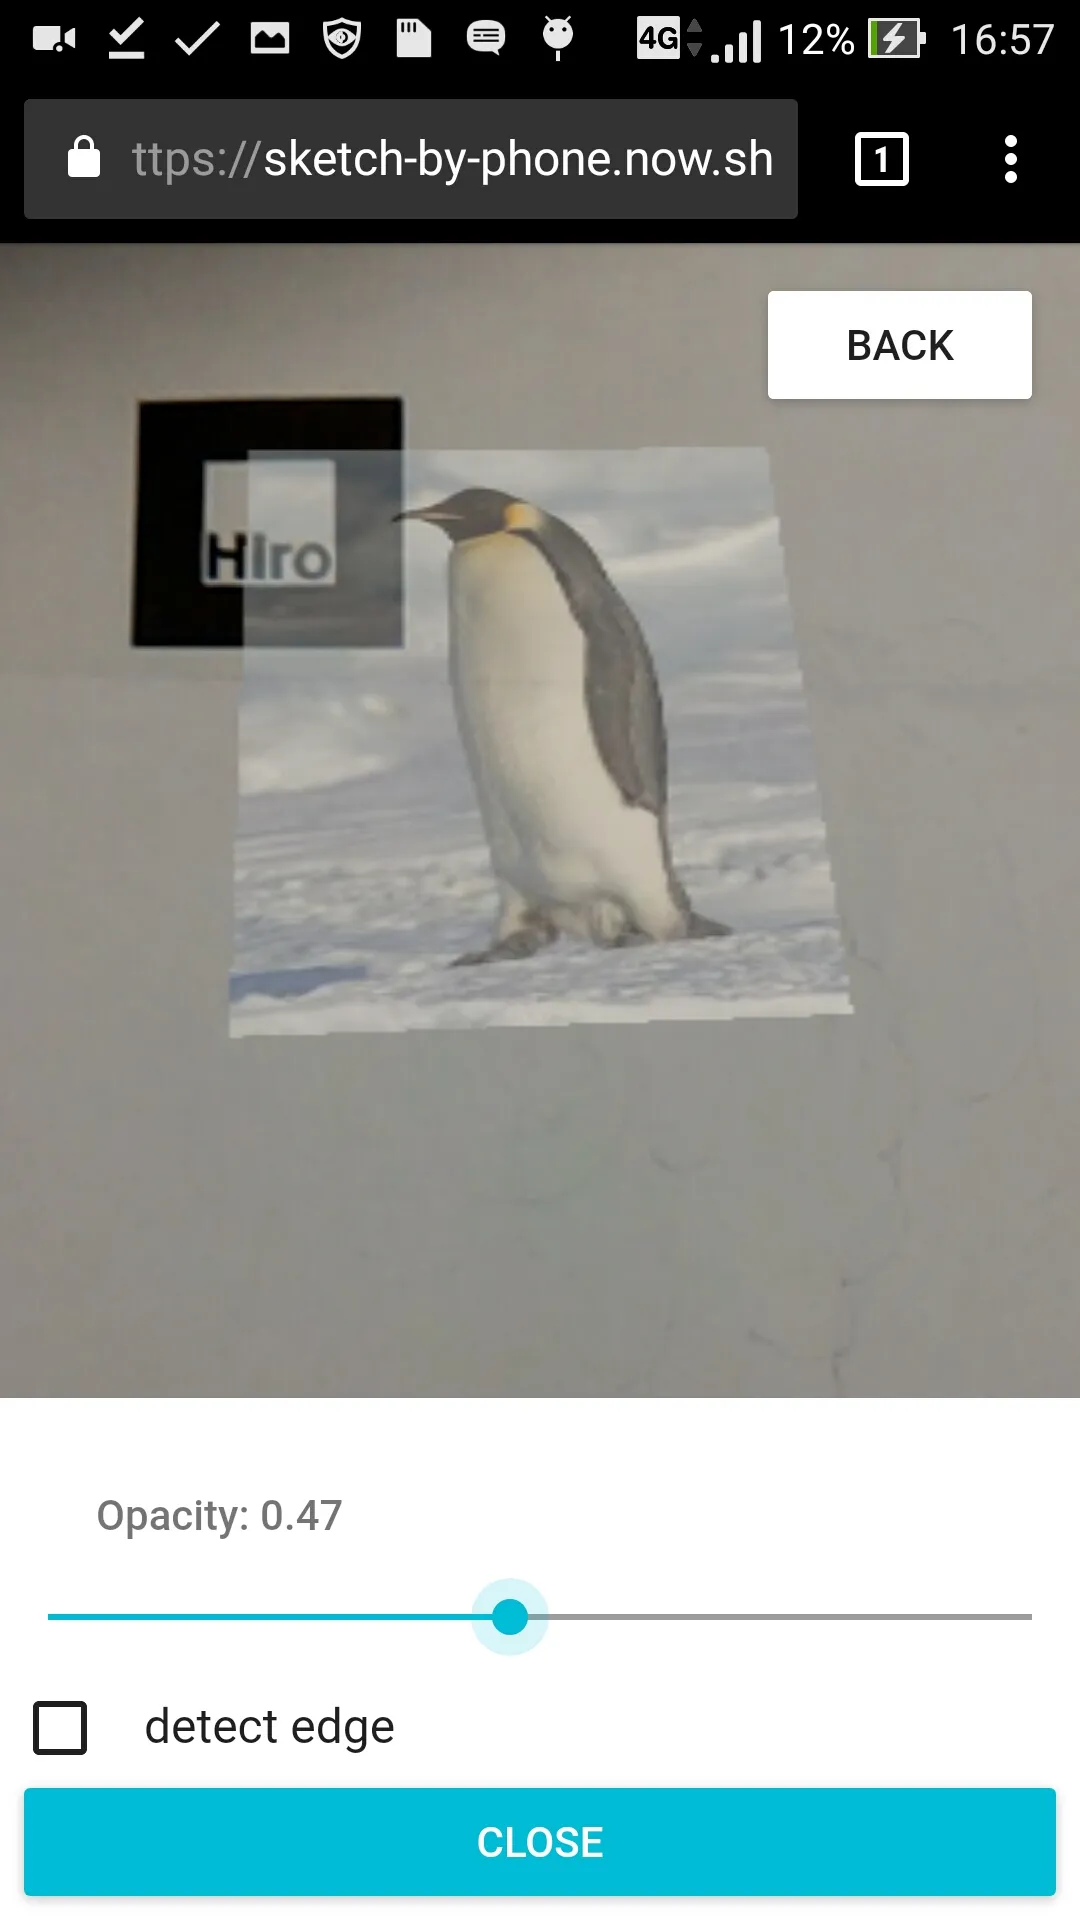
Or to detect its edge.
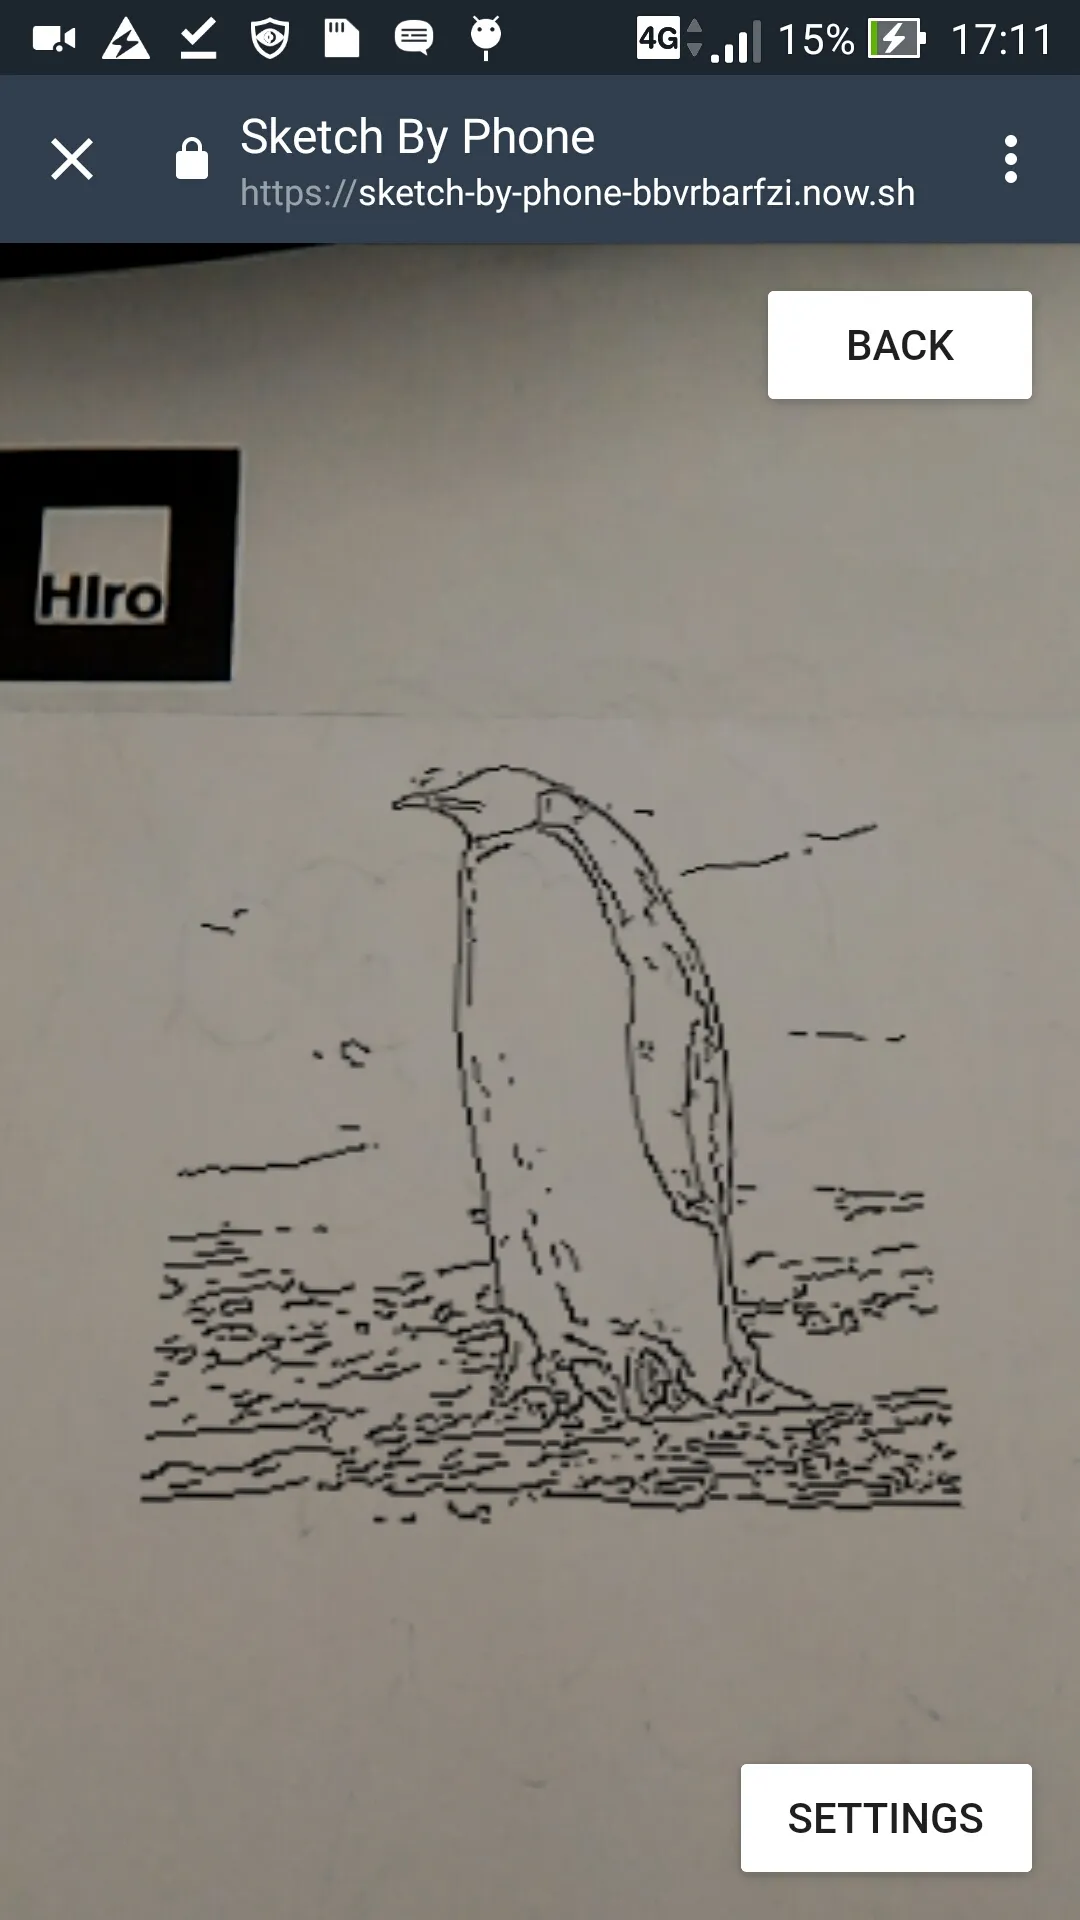
This is the job of the Settings component:
// in Settings.jsimport React, { Component } from 'react';import RaisedButton from 'material-ui/RaisedButton';import Checkbox from 'material-ui/Checkbox';import Slider from 'material-ui/Slider';import Subheader from 'material-ui/Subheader';
const styles = { ... };
class Settings extends Component {    state = {        open: false,    };
    handleOpen = () => {        // We added those timeouts so that the MUI micro animations can finish before actually showing/hiding the Settings component        setTimeout(() => {            this.setState({ isOpen: true });        }, 500);    }
    handleClose = () => {        setTimeout(() => {            this.setState({ isOpen: false });        }, 500);    }
    render() {        const { isOpen } = this.state;        if (!isOpen) {            return <RaisedButton style={styles.openButton} onClick={this.handleOpen} label="Settings" />        }
        const {            blur,            lowTreshold,            highTreshold,            opacity,            isDetectingEdge,            onBlurChange,            onLowTresholdChange,            onHighTresholdChange,            onOpacityChange,            onDetectEdgeChange        } = this.props;
        return (            <div style={styles.modal}>                { !isDetectingEdge &&                    <div style={styles.modalItem}>                        <Subheader>Opacity: {opacity}</Subheader>                        <Slider                            name="opacity"                            value={opacity}                            onChange={onOpacityChange}                            sliderStyle={styles.slider}                        />                    </div>                }                {                    isDetectingEdge && (                        <div style={styles.detectOptions}>                            <div style={styles.detectOptionItemFull}>                                <Subheader>blur: {blur}</Subheader>                                <Slider                                    name="blur"                                    value={blur}                                    max={4}                                    onChange={onBlurChange}                                    sliderStyle={styles.slider}                                />                            </div>                            <div style={styles.detectOptionItem}>                                <Subheader>low treshold: {lowTreshold}</Subheader>                                <Slider                                    name="lowTreshold"                                    value={lowTreshold}                                    max={127}                                    onChange={onLowTresholdChange}                                    sliderStyle={styles.slider}                                />                            </div>                            <div style={styles.detectOptionItem}>                                <Subheader>high treshold: {highTreshold}</Subheader>                                <Slider                                    name="highTreshold"                                    value={highTreshold}                                    max={127}                                    onChange={onHighTresholdChange}                                    sliderStyle={styles.slider}                                />                            </div>                        </div>                    )                }                <Checkbox                    name="isDetectingEdge"                    type="checkbox"                    checked={isDetectingEdge}                    onCheck={onDetectEdgeChange}                    label="detect edge"                    style={styles.detectEdges}                />
                <RaisedButton                    primary                    fullWidth                    onClick={this.handleClose}                    label="close"                />            </div>        );    }}
export default Settings;
And how we use them in the Sketch component:
// in Sketch.jsimport React, { Component } from "react";import isEqual from "lodash.isequal";
import MarkerSearch from "./MarkerSearch";import MoveControl from "./MoveControl";import Settings from "./Settings";import SketchRenderer from "./SketchRenderer";
const styles = {  backButton: {    zIndex: 1000,    position: "absolute",    right: "1rem",    top: "1rem",  },};class Sketch extends Component {  state = {    markerFound: false,    opacity: 1,    isDetectingEdge: false,    blur: 2,    highTreshold: 20,    lowTreshold: 50,    coord: {      x: 2,      z: 1,    },    rotation: 0,    scale: {      x: 2,      y: 2,    },  };
  shouldComponentUpdate(nextProps, state) {    return !isEqual(state, this.state);  }
  handleTranslateChange = ({ x, z }) => this.setState({ coord: { x, z } });
  handleZoomChange = ({ x, y }) => this.setState({ scale: { x, y } });
  handleRotationChange = (rotation) => this.setState({ rotation });
  handleOpacityChange = (event, opacity) => this.setState({ opacity });
  handleDetectEdgeChange = () =>    this.setState({ isDetectingEdge: !this.state.isDetectingEdge });
  handleBlurChange = (event, blur) => this.setState({ blur });
  handleLowTresholdChange = (event, lowTreshold) =>    this.setState({ lowTreshold });
  handleHighTresholdChange = (event, highTreshold) =>    this.setState({ highTreshold });
  handleMarkerFound = () => this.setState({ markerFound: true });
  render() {    const {      markerFound,      opacity,      isDetectingEdge,      blur,      lowTreshold,      highTreshold,      coord: { x: coordX, z: coordZ },      scale: { x: scaleX, y: scaleY },      rotation,    } = this.state;
    const { image, blackImage } = this.props;
    return (      <div>        <SketchRenderer          coordX={coordX}          coordZ={coordZ}          scaleX={scaleX}          scaleY={scaleY}          rotation={rotation}          opacity={opacity}          isDetectingEdge={isDetectingEdge}          blur={blur}          lowTreshold={lowTreshold}          highTreshold={highTreshold}          image={image}          blackImage={blackImage}          onMarkerFound={this.handleMarkerFound}        />        {!markerFound && <MarkerSearch />}        {markerFound && (          <MoveControl            coordX={coordX}            coordZ={coordZ}            scaleX={scaleX}            scaleY={scaleY}            rotation={rotation}            onTranslateChange={this.handleTranslateChange}            onZoomChange={this.handleZoomChange}            onRotationChange={this.handleRotationChange}          />        )}        <Settings          opacity={opacity}          blur={blur}          lowTreshold={lowTreshold}          highTreshold={highTreshold}          isDetectingEdge={isDetectingEdge}          onOpacityChange={this.handleOpacityChange}          onDetectEdgeChange={this.handleDetectEdgeChange}          onBlurChange={this.handleBlurChange}          onLowTresholdChange={this.handleLowTresholdChange}          onHighTresholdChange={this.handleHighTresholdChange}        />      </div>    );  }}
export default Sketch;
Finally, let’s explain to Trinity how to use the gestures by adding a Tips component:
// in Tips.js/* eslint jsx-a11y/img-redundant-alt: off */import React from "react";import pan from "./assets/pan.png";import pinch from "./assets/pinch.png";import rotate from "./assets/rotate.png";import Media from "react-media";
const styles = {  tips: {    marginLeft: "auto",    marginRight: "auto",    maxWidth: 600,    display: "flex",    flexDirection: "column",    position: "absolute",    bottom: "5rem",    left: "1rem",    right: "1rem",    padding: "1rem",    backgroundColor: "rgba(255, 255, 255, 0.75)",  },  item: {    display: "flex",    alignItems: "center",  },  text: {    marginLeft: "1rem",  },};
styles.tipsLandscape = { ...styles.tips, flexDirection: "row" };styles.itemLandscape = {  ...styles.item,  flexDirection: "column",  maxWidth: 200,};const mediaQuery = { orientation: "landscape" };
export default ({ onHide }) => (  <Media query={mediaQuery}>    {(matches) => (      <div        style={matches ? styles.tipsLandscape : styles.tips}        onClick={onHide}      >        <div style={matches ? styles.itemLandscape : styles.item}>          <img alt="How to move the image" src={pan} />          <div style={styles.text}>            Pan with your finger to drag the picture on the paper          </div>        </div>        <div style={matches ? styles.itemLandscape : styles.item}>          <img alt="How to zoom the image" src={pinch} />          <div style={styles.text}>            Pinch to zoom the picture in or out and fit the sheet          </div>        </div>        <div style={matches ? styles.itemLandscape : styles.item}>          <img alt="How to rotate the image" src={rotate} />          <div style={styles.text}>            Rotate your fingers to rotate the picture and orient it on the sheet          </div>        </div>      </div>    )}  </Media>);
And use it in the Sketch component:
import React, { Component } from "react";import isEqual from "lodash.isequal";import RaisedButton from "material-ui/RaisedButton";
import Settings from "./Settings";import SketchRenderer from "./SketchRenderer";import MoveControl from "./MoveControl";import MarkerSearch from "./MarkerSearch";import Tips from "./Tips";
const styles = {  backButton: {    zIndex: 1000,    position: "absolute",    right: "1rem",    top: "1rem",  },};class Sketch extends Component {  state = {    showTips: true,    markerFound: false,    opacity: 1,    isDetectingEdge: false,    blur: 2,    highTreshold: 20,    lowTreshold: 50,    coord: {      x: 2,      z: 1,    },    rotation: 0,    scale: {      x: 2,      y: 2,    },  };
  shouldComponentUpdate(nextProps, state) {    return !isEqual(state, this.state);  }
  handleBack = () => {    setTimeout(() => {      // We can't reset the AR.js created elements (no dispose, reset or destroy methods available)      window.location.reload();    }, 500);  };
  handleTranslateChange = ({ x, z }) => this.setState({ coord: { x, z } });
  handleZoomChange = ({ x, y }) => this.setState({ scale: { x, y } });
  handleRotationChange = (rotation) => this.setState({ rotation });
  handleOpacityChange = (event, opacity) => this.setState({ opacity });
  handleDetectEdgeChange = () =>    this.setState({ isDetectingEdge: !this.state.isDetectingEdge });
  handleBlurChange = (event, blur) => this.setState({ blur });
  handleLowTresholdChange = (event, lowTreshold) =>    this.setState({ lowTreshold });
  handleHighTresholdChange = (event, highTreshold) =>    this.setState({ highTreshold });
  handleHideTips = () => this.setState({ showTips: false });
  handleMarkerFound = () => this.setState({ markerFound: true });
  render() {    const {      markerFound,      showTips,      opacity,      isDetectingEdge,      blur,      lowTreshold,      highTreshold,      coord: { x: coordX, z: coordZ },      scale: { x: scaleX, y: scaleY },      rotation,    } = this.state;
    const { image, blackImage } = this.props;
    return (      <div>        <SketchRenderer          coordX={coordX}          coordZ={coordZ}          scaleX={scaleX}          scaleY={scaleY}          rotation={rotation}          opacity={opacity}          isDetectingEdge={isDetectingEdge}          blur={blur}          lowTreshold={lowTreshold}          highTreshold={highTreshold}          image={image}          blackImage={blackImage}          onMarkerFound={this.handleMarkerFound}        />        {!markerFound && <MarkerSearch />}        {markerFound && (          <MoveControl            coordX={coordX}            coordZ={coordZ}            scaleX={scaleX}            scaleY={scaleY}            rotation={rotation}            onTranslateChange={this.handleTranslateChange}            onZoomChange={this.handleZoomChange}            onRotationChange={this.handleRotationChange}          />        )}        {markerFound && showTips && <Tips onHide={this.handleHideTips} />}        <RaisedButton          style={styles.backButton}          onClick={this.handleBack}          label="Back"        />        <Settings          opacity={opacity}          blur={blur}          lowTreshold={lowTreshold}          highTreshold={highTreshold}          isDetectingEdge={isDetectingEdge}          onOpacityChange={this.handleOpacityChange}          onDetectEdgeChange={this.handleDetectEdgeChange}          onBlurChange={this.handleBlurChange}          onLowTresholdChange={this.handleLowTresholdChange}          onHighTresholdChange={this.handleHighTresholdChange}        />      </div>    );  }}
export default Sketch;
We also added a back button in order to select a new image.
Tadaaa! Our app is finished. You can see the full code at https://github.com/marmelab/sketch-by-phone.
Performance and Usability
You can test the mobile app live by opening the following address with a mobile device: https://sketch-by-phone.now.sh. It works only on Android, because AR.js uses WebRTC, currently not supported in Safari (but this may change later this year).
Compared to what you can do with native technologies, this is clearly lagging behind in terms of performance. You need a recent Android device, with enough CPU power to process the marker detection, video processing, and 3D projection. Some Android devices won’t even show the video stream - ARToolkit doesn’t offer a large compatibility yet. But in general, the refresh rate is acceptable, at the cost of a heating device.
After using it a bit, one thing striked us: the size of the printed marker matters a lot. If it’s too small, the geometry detection is imprecise, and the projected sketch begins to shake - its impossible to draw. If it’s too big, it is nearly impossible to capture both the marker and the sheet of paper with the phone camera - and when the marker is not in the video feed, AR.js cannot project the sketch, and it disappears.
The SketchAR app uses paper edge detection rather than a Hiro marker. It is very impractical, because you must hold the mobile very close to your eyes to let the camera encompass the whole A4 sheet of paper. In that position, drawing is close to impossible.
About AR.js and ARToolkit
Those libraries are great, really, but they currently are packaged the old way: exposing a global object, and thus making their usage through bundlers such as webpack a little more difficult. We went the easy way and simply included them in the HTML file, but it prevents our tools to do their optimization work (such as discarding unused code).
It should also be noted that AR.js is an experimental project, still missing some crucial functionalities such as clearing anything it added to the DOM when not needed anymore. Moreover, the documentation is currently missing. We had to explore the code and examples in order to understand how to use it properly. Events, for example, are not documented at all. We needed them to show the Looking for marker warning. We found them by exploring the AR.js source.
Don’t base a commercial application on these two libraries yet.
Conclusion
It was fun experimenting with AR, even though tests are really difficult. We used our laptop cameras for some tests, and mobile devices for other tests. We sketched a lot - on paper, on whiteboards, even on skin! Yes, this application can be of great use for wannabe tattooers.
Using web technologies makes the development fast - it tooks us about a week at two developers to develop the entire app. However, the performance isn’t quite what we expected, and the platform limitations (no iOS support) are clearly a blocker.
Plane and geometry detection is going to become much easier later this year, at least on iOS. Apple recently announced ARKit, with marker-less plane detection. It looks super promising.
Sketch-by-phone is open source, you can find the code at https://github.com/marmelab/sketch-by-phone.
We also enjoyed deploying it with now.sh, a great Platform-as-a-Service hosting solution designed by the guys behind Next.js.
Authors
Full-stack web developer at marmelab, loves functional programming and JavaScript.
Full-stack web developer at marmelab, Gildas has a strong appetite for emerging technologies. If you want an informed opinion on a new library, ask him, he's probably used it on a real project already.