Getting The Ball Rolling With DeviceMotion

The DeviceMotion and DeviceOrientation APIs have recently gained support by evergreen browsers. As their name suggests these allow to detect the device motion and orientation.
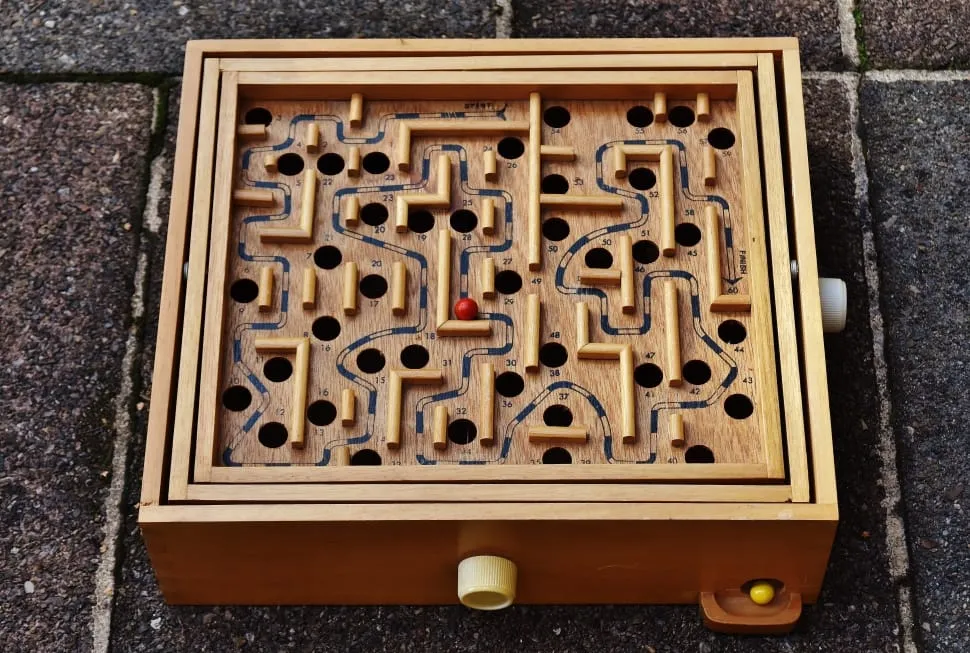
Let’s experiment with them by creating a marble maze in react using these events to move the ball.
The devicemotion and deviceorientation Events
devicemotion and deviceorientation are both events you can listen to from the window Object.
window.addEventListener("devicemotion", (event) => { console.log(event.acceleration.x + " m/s2");});The deviceorientation event fires when fresh data is available from the orientation sensor. It gives the current orientation of the device as compared to the Earth coordinate frame. This data comes from a magnetometer inside the device.
The devicemotion event fires at a regular interval. It indicates the physical force acceleration of the device at that time. It also provides information about the rate of rotation, if available.
These events will only fire on a mobile device, since they needs an accelerometer.
Additionally, to enable the feature, the page must be served in https.
Tip: To expose a local server in https during development, I use ngrok. It allows to create tunnels to expose your localhost on a https url.
Getting Acceleration Data From The Accelerometer
At first, I planned to use the deviceorientation event. It gives access to three angles based on device orientation: alpha, beta, and gamma.
window.addEventListener( "deviceorientation", (event) => { event.alpha; // rotation along the z axis event.beta; // rotation along the x axis event.gamma; // rotation along the y axis }, true,);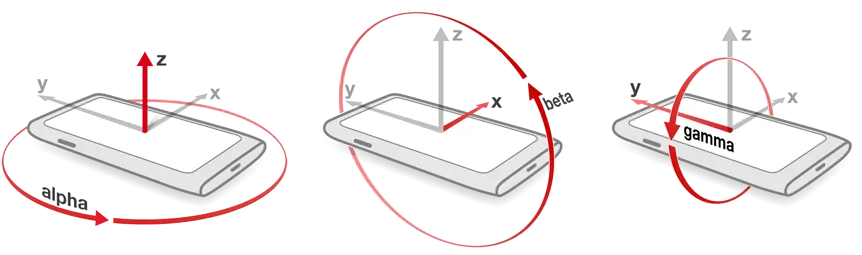
We could use beta and gamma to get the two angles that interest us. But wait: How do we convert these angles to an acceleration for our ball? The conversion would be definitely possible with some math.
Let’s take a look at the information the other event, devicemotion, provides. It turns out, it gives us a lot more than deviceorientation:
rotationRate: actually the same information asdeviceorientationacceleration: translation acceleration of the device in meter per second along x, y and z axis.accelerationIncludingGravity: Same as acceleration, but including gravity. And, gravity gives us the gravity induced by the phone inclination, a.k.a. the slope the ball will roll along. This is exactly what we need, no math needed.
window.addEventListener( "devicemotion", (event) => { event.accelerationIncludingGravity.x; event.accelerationIncludingGravity.y; }, true,);We can increment the ball coordinates with the acceleration to move it.
Using The devicemotion API To Move An Object In 3D Space
My little project uses React. Here is how I use devicemotion acceleration data in a component.
First, let’s store the acceleration with the useState hook.
const [{ xAcceleration, yAcceleration }, setMotion] = useState({ x: 0, y: 0 });
useEffect(() => {    const handleMotionEvent = event => {        setMotion({            xAcceleration: event.accelerationIncludingGravity.x,            yAcceleration: event.accelerationIncludingGravity.y,        }),    };
    window.addEventListener('devicemotion', handleMotionEvent, true);    return () => window.removeEventListener('devicemotion', handleMotionEvent)}, []);
But wait - the devicemotion event triggers continuously. We cannot rerender the whole page each time. To prevent this we can use requestAnimationFrame to update the state.
const handleMotionEvent = event => { requestAnimationFrame(() => setMotion({ xAcceleration: event.accelerationIncludingGravity.x, yAcceleration: event.accelerationIncludingGravity.y, }), );};Now that I can move the ball, I still have to display the maze, and detect the collision. I will cover the labyrinth display in another article about 3d rendering and x3dom. Stay tuned.
Debugging Motion Events
The collision is the part that took me the most time.
I needed to detect the walls so that the ball does not traverse them, and the holes so that the ball falls into them. I will not enter into details. After all this is an article about devicemotion and not collision detection. If this interests you, you can take a look at the code.
But, during develoment, it became cumbersome to test the collision with the phone. I needed a way to control the ball movement precisely.
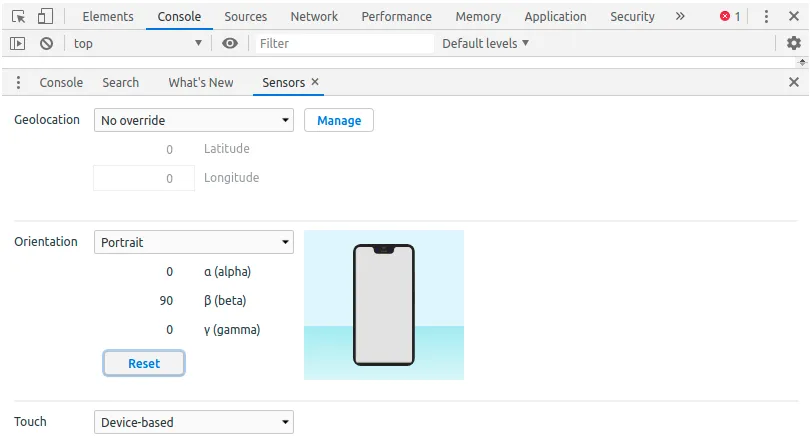
There is a sensors tab in the chrome dev tools. In the more menu named tools sensors. Sadly you can only control the deviceorientation event, and not the devicemotion.
I needed a way to control the ball acceleration in a natural way.
I decided to use the mousemove event. It give movementX and movementY, that are the number of pixels that the cursor moved. It fits well with acceleration. With this, the ball moves with the cursor, thus allowing fine control of the ball.
I toggled devicemotion and mousemove based on a debug flag:
useEffect(() => {  if (debug) {    const handleMouseMove = (event) => {      requestAnimationFrame(() =>        setMotion({          xAcceleration: event.movementX,          yAcceleration: event.movementY,        }),      );    };    document.addEventListener("mousemove", handleMouseMove);
    return () => {      window.removeEventListener("mousemove", handleMouseMove);    };  }}, []);
Conclusion
So that sums up what I learned about the deviceorientation and devicemotion.
These two events allow to do some fun stuff rather easily. I encourage you to fiddle with them.
Here is the link toward the code on github
Authors
Full-stack web developer at marmelab, loves functional programming and JavaScript.