
Programming A Space Invader In OCaml and OpenGL: Lessons Learned

During a previous hackday, I had the opportunity to try a fairly recent programming language called ReasonML. Amazed by the simplicity and power of ReasonML, I promised myself to get closer to its underlying language to give credit where it is due. Do ReasonML qualities come from OCaml?
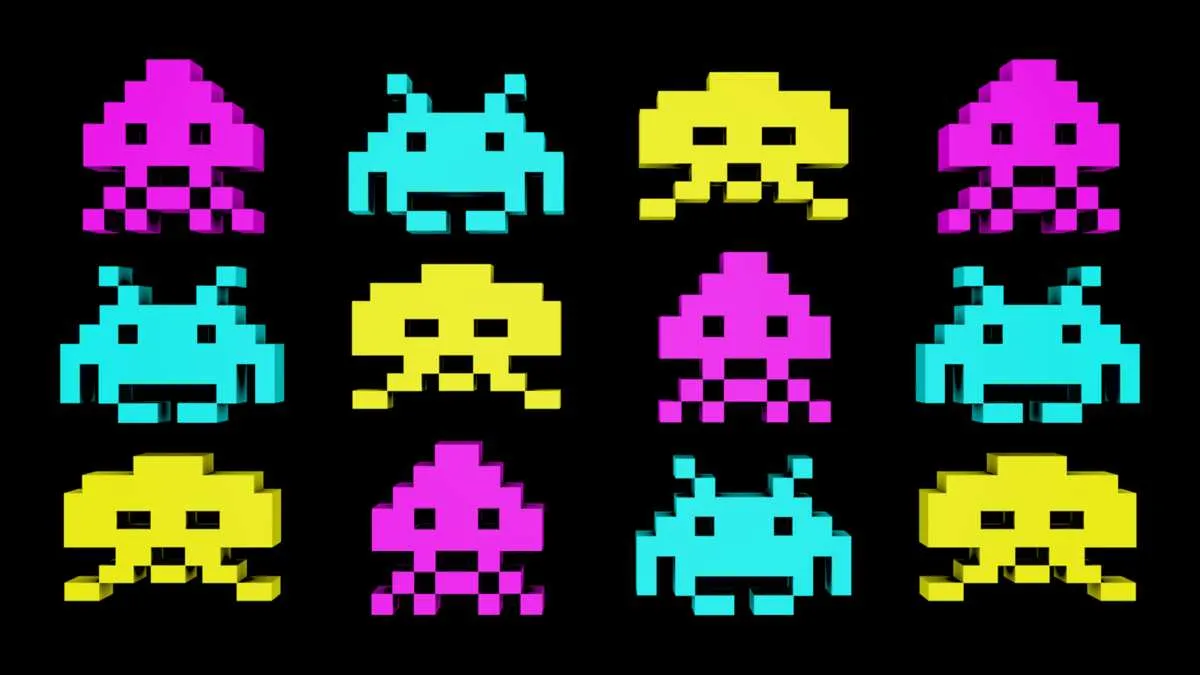
As an experiment, I took this opportunity to test OpenGL and prove that it is possible to code a humble game in OCaml! Here’s what the game looks like at the end, after a few hours of development.
YouTube might track you and we would rather have your consent before loading this video.
The purpose of this article is to determine the magnitude of the differences between ReasonML and OCaml, and to understand why ReasonML has become so popular so quickly, and why OCaml hasn’t. The aim is also to determine if it is still useful to use OCaml rather than ReasonML for future projects.

OCaml, Powerful But Discreet
OCaml is the main implementation of Caml created in 1996 by a group of researcher from the French Institute for Research in Computer Science and Automation (a.k.a. INRIA).
Even though it is known for its robustness and its large standard library, its main power lies in its strong static-typing and type inference system.
Although part of the ML (Meta-Language) family that is purely functional-oriented by nature, OCaml brings many object-oriented features that make it special. That’s mainly the reason it was named Objective Caml (aka OCaml).
So, it’s perfectly possible to work with Classes, Objects, Constructors (named “Initializers”), Inheritance and so on.
OpenGL, The Swiss Army Knife of Rendering
OpenGL (for Open Graphics Library) is a cross-platform and cross-language API that allows to render 2D and 3D vector graphics. It takes care of handling interactions between the source code and the system GPU to benefit from hardware rendering capabilities.

OpenGL was developed in 1992 by an old and famous commercial company called Silicon Graphics. Since 2006, the project has been managed under a BSD like license by a non-profit consortium called the Khronos Group. This consortium is also responsible of the WebGL and Vulkan standards that are very popular today.
Vulkan is usually refered to as the OpenGL next API for graphics rendering.
Practical Case: A Space Invader in OCaml
In this part, I’ll give you the most objective feedback about my development experience using OCaml and OpenGL on a concrete project: the Space Invader game.
Also, I’ll explain the intellectual journey that led me to design the project foundation. Then, I’ll describe the different stages of project building.
How Does it Work? What Do We Need?
As for most programming languages, we need to setup a compiler which is capable of transforming our OCaml source code to a suite of machine instructions.
According to the official documentation, the OCaml core distribution provides two compilers, ocamlc and ocamlopt.
ocamlcis the base standard bytecode compiler for OCaml. It produces bytecode files (usualy*.cmifor interfaces and*.cmofiles for implementations) that can be run usingocamlrun, the OCaml bytecode runner.ocamloptis the native code compiler for OCaml. As forocamlc, it can take*.ml(and*.mli) files as argument and generates an executable (targeting specific architectures according to the provided parameters).
Of course, I do not pretend to give you here the full functionalities of these tools, which are in fact much more complicated to understand.
I can already imagine your faces after reading these few lines… but don’t go away, I assure you that the rest will be much more exciting!
Project Setup
In practice, built-in compilers are almost never directly used on real world projects because they require a lot of work to setup and maintain. It is common to use higher level tools that also facilitate the import of dependencies (including external modules). Among these tools, we can mention Dune, Oasis and OCamlBuild.

In my case, I choose a more undisclosed tool (obuild) because of its simplicity and its brief documentation. So, the first step is to install the OCaml Package Manager (aka opam) in order to install the obuild builder.
As for every new projet, my approach consists in setting up the whole tech stack in Docker so as to avoid overloading my workstation, and to allow other people to participate easily. Therefore, I started looking for a Docker Image that includes opam on docker-hub.
Thanksfully, the ocaml/opam2 docker image exists, here is my Dockerfile configuration.
FROM ocaml/opam2:debian-10-ocaml-4.08
RUN sudo mkdir /appWORKDIR /appADD . /app/
RUN sudo apt-get update
RUN opam install obuild
Since I need to work with OpenGL to draw the game, and I won’t develop an OpenGL library from scratch, I’ll install lablgl at the same time by adding this line at the end of the Dockerfile:
RUN opam depext lablgllablgl is one of the most advanced OpenGL interfaces for OCaml. Despite its lack of documentation, it remains the most talked about library after several minutes spent on search engines…
Lablgl is based on Glut (The OpenGL Utility Toolkit). Glut takes care of all the system specific mechanisms to create windows, initializing OpenGL and capture input events.
Now I have all the ingredients, I need to build the application. I create my entry point file in src/main.ml.
.├── Dockerfile├── ocaml-invader.obuild└── src └── main.mlThen, I create the obuild config file ocaml-invader.obuild.
name: ocaml-invaderversion: 0.0.1description: Simple OCaml Invader Gamelicence: MITauthors: Julien Demangeon <julien@marmelab.com>obuild-ver: 1homepage: http://github.com/marmelab/ocaml-invader
executable ocaml-invader    main-is: main.ml    src-dir: src    buildDepends: lablgl, lablgl.glut
And a Makefile to facilitate development.
BIN = docker run -i -t --rm \  -v "${PWD}:/app" \  ocamlinvader
install: ## Install dependencies  docker build --tag=ocamlinvader .
build: ## Build project  $(BIN) bash -c "obuild configure && obuild build"
clean: ## Clean project  $(BIN) bash -c "obuild clean"
start: ## Start project  $(MAKE) build  ./ocaml-invader  $(MAKE) clean
OK, everything is set, I can now start developing the game!
Game Architecture
As with most video games, the whole system is based on a game state, some state mutations (through system inputs), and a rendering engine / loop.
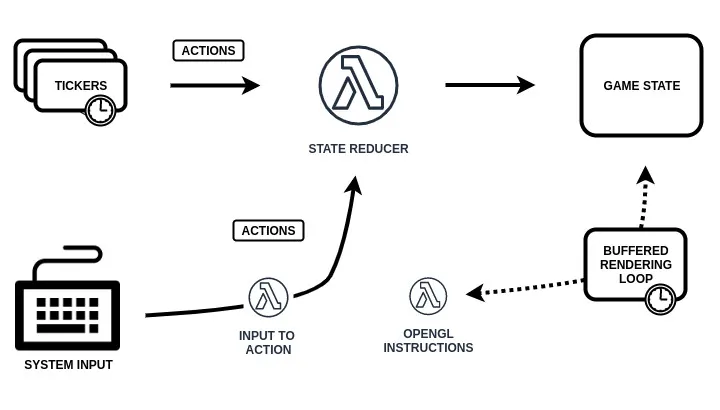
Fortunately, I won’t have to manage all these components by myself. Indeed, labgl (through its Glut module) offers most of these features out of the box:
- The windowing system through
Glut.createWindow - The rendering loop through
Glut.mainLoop,Glut.displayFuncandGlut.idleFunc - Input management through
Glut.keyboardFuncandGlut.specialFunc - The timers / tickers through
Glut.timerFunc
Therefore, I only have to care about:
- The rendering of the game in OpenGL (through the
GlmatandGldrawmodules) - Changing the game state from the input actions
Main Program
Now that the basis of the architecture is established, let’s get down to business by expanding the main function in main.ml:
(* main.ml *)
(* Declare rendering function, buffering mode, and create window *)let initDisplay ~w ~h ~title =  Glut.initDisplayMode ~double_buffer:true ~depth:true ~alpha:true ();  Glut.initWindowSize ~w ~h;  Glut.createWindow ~title;  Glut.idleFunc ~cb:(Some Glut.postRedisplay)
(* Initialize OpenGL rendering options *)let initView ~w ~h =  GlDraw.viewport ~x:0 ~y:0 ~w ~h;  GlMat.mode `projection;  GlMat.load_identity ();  GluMat.ortho2d ~x:(0.0, float_of_int(w)) ~y:(0.0, float_of_int(h));  GlMat.mode `modelview
(* Create some tickers that send actions to the Game Controller *)(* The GameController uses these actions to mutate the game state each N ms *)let initTickers ~game =  Glut.timerFunc ~ms:1000 ~cb:(invaderTicker game) ~value:0;  Glut.timerFunc ~ms:10 ~cb:(bulletTicker game) ~value:0;  Glut.timerFunc ~ms:10 ~cb:(collisionCheckTicker game) ~value:0
(* Map keyboard inputs to game actions *)(* The GameController uses these actions to mutate the game state *)let initInputs ~game =  Glut.keyboardFunc ~cb:(gameController game specialKeyToAction);  Glut.specialFunc ~cb:(gameController game commonKeyToAction)
(* Initialize each part of the game engine *)(* Then, it returns a callable mainLoop *)let initEngine ~game ~w ~h =  initDisplay ~w ~h ~title: "OCaml Invader";  initView ~w ~h;  initTickers ~game;  initInputs ~game;  Glut.displayFunc (fun () -> Game.render !game);  Glut.mainLoop
(* This is the first function executed by OCaml *)(* We init the game object reference and pass it to the engine *)let () =  ignore @@ Glut.init Sys.argv;  let game = ref (Game.init()) in  let run = initEngine ~game ~w:450 ~h:600 in    run()
Zoom In The Game Controller
Mutations on the game state are managed by the game controller. The game controller is a simple function that associates an action (with pattern matching on it) to a mutation on the game state (the whole game being declared mutable).
(* game.ml *)
type direction =    | Left    | Right
type action =    | Move of direction    | Shoot    | AdvanceInvaders    | InvaderShoot    | AdvanceBullets    | CheckCollisions
type game = {    mutable over: bool;    mutable score: int;    mutable lifes: int;    mutable invaders: Invader.invader list;    mutable invadersDirection: direction;    mutable spaceship: Spaceship.spaceship;    mutable bullets: Bullet.bullet list;}
let controller game = function    | Move(direction) ->        let op = match direction with        | Left -> (-.)        | Right -> (+.) in        let coord = op game.spaceship.x 10. in        game.spaceship.x <- min (max coord 10.) 440.;        game    | Shoot ->        (* ... mutate game ... *)        game    | InvaderShoot ->    (* ... mutate game ... *)        game    | CheckCollisions ->    (* ... mutate game ... *)        game    | AdvanceInvaders ->    (* ... mutate game ... *)        game    | AdvanceBullets ->        (* ... mutate game ... *)        game    | _ -> game
The link between the game controller and actions (tickers and keyboard inputs) is declared in the gameController function of the Main module.
(* main.ml *)
let gameController game keyToAction = fun ~key ~x ~y ->  match (keyToAction ~key ~x ~y) with    | Some(action) -> game := Game.controller !game action    | None -> ()
Rendering Logic
The entire rendering logic for the game is located in the Game module of the game.ml file. This logic is composed of a switch between two screens, a game screen, and an end screen depending on whether the game is finished or not.
(* game.ml *)
let renderHome game =    GlClear.clear [ `color ];    let endText = match game.score with        | 600 -> Printf.sprintf "YOU WIN"        | _ -> Printf.sprintf "GAME OVER" in    Utils.drawString ~font:Glut.BITMAP_TIMES_ROMAN_24 150. 290.  endText;    Glut.swapBuffers ()
(* Each module (Score, Life, Invader, Bullet, ...) has its own render *)(* So we clear buffer, draw the game and swap buffers to render it to the screen *)let renderGame game =    GlClear.clear [ `color ];    Score.render game.score;    Life.render game.lifes;    List.iter Invader.render game.invaders;    List.iter Bullet.render game.bullets;    Spaceship.render game.spaceship;    Glut.swapBuffers ()
let render game =    match game.over with        | false -> renderGame game        | true -> renderHome game
Each component of the game (Invader, Spaceship, …) has its own module and its own render method, which makes it possible to separate the responsibilities in the code. For example, here are some parts of the Invader rendering.
(* invader.ml *)
type race =    | Octopus    | ShapeShifting    | Crab
type invader = {  mutable x: float;  mutable y: float;  race: race;}
let renderOctopus () =    GlDraw.color(1., 1., 1.);    GlDraw.begins `quads;    List.iter GlDraw.vertex2 [-10., -10.; -10., 10.; 10., 10.; 10., -10.];    GlDraw.ends ()
let renderCrab () =    GlDraw.color(1., 0., 1.);    GlDraw.begins `quads;    List.iter GlDraw.vertex2 [-10., -10.; -10., 10.; 10., 10.; 10., -10.];    GlDraw.ends ()
let renderShapeShifting () =    GlDraw.color(1., 0., 0.);    GlDraw.begins `quads;    List.iter GlDraw.vertex2 [-10., -10.; -10., 10.; 10., 10.; 10., -10.];    GlDraw.ends ()
let render invader =    GlMat.load_identity ();    GlMat.translate3(invader.x, invader.y, 0.0);    match invader.race with        | Octopus -> renderOctopus()        | ShapeShifting -> renderShapeShifting()        | Crab -> renderCrab()
OpenGL In Practice
To summarize quickly, OpenGL is a large state machine on which it is possible to send instructions. Once all rendering instructions have been sent to it, it is possible to trigger the on-screen display using Buffer flush.
For each rendering, it may be necessary to:
- Modify state variables (anti-aliasing enabled, …)
- Define the textures (aka
Materials) to be used for the display - Send geometrical instructions (aka
Vertex) to the Buffer - Trigger the Buffer flush
In the example above, for each invader I:
- Reset the rendering matrix state with
GlMat.load_identity() - Place cursor at the invader position with
GlMat.translate3(inv.x, inv.y, 0.0); - Define a color to be used with
GlDraw.color - Declare that I’ll draw a quadrilateral with
GlDraw.begins `quads - Send 4 vertices with
GlDraw.vertex2 - Close the Invader figure (a square in my case) with
GlDraw.ends
In the case of the invaders, I used simple squares for lack of time. But I know that it is possible to make much more complex shapes, as in the Spaceship below:
type spaceship = {    mutable x: float;    mutable y: float;}
let renderAt ~x ~y =    GlMat.load_identity ();    GlMat.translate3(x, y, 0.);    GlDraw.color(0.51, 1., 0.);    GlDraw.begins `quads;    List.iter GlDraw.vertex2 [-20., -5.; -20., 5.; 20., 5.; 20., -5.];    List.iter GlDraw.vertex2 [-2., 5.; -2., 14.; 2., 14.; 2., 5.];    GlDraw.ends ()
let render spaceship =    renderAt ~x:spaceship.x ~y:spaceship.y
The Result
As a result, the game is very fast, no lag and the compilation time is almost instantaneous, what more could you ask for? If you are interested in the code (or want to play), the game is available in open-source on Github.
Conclusion
Although confused at first, I am very proud to have achieved this project. This was an opportunity for me to measure the particularities that makes OCaml so intimidating for most developers.
Indeed, it is very complicated to install the base stack to develop in OCaml. And although some tools exist to make our life easier, they are poorly documented. This lack of documentation also applies to the language itself. The documentation is scattered among many academic and research-oriented sites, making it very intimidating for a beginner.
Clearly, it is in OCaml’s weaknesses that we find the strength of ReasonML. The languages are not so different, but their communities and ways of working are clearly in contrast.
In my opinion, I would say that OCaml suffers from its original academic use, and that it deserves a little more love from mainstream developers. It is incredibly fast to compile and run, and it competes well with popular languages.
To conclude, I would still advise to prefer ReasonML over OCaml (as its community keeps growing). This way, you will adopt a functional way of coding that can be used in other derived languages such as F# or Scala.
This post was published and commented on Hacker News: https://news.ycombinator.com/item?id=22383118
Authors
Full-stack web developer at marmelab, Julien loves to try and use new exotic programming languages. Proficient with Symfony, Node.js, and React, he manages to keep a quiet temper even when the web is on fire.