Implementing Path-Finding On A Hexagonal Board

Board games present unexpected programming challenges, and I learned many lessons by trying to detect the winner of a simple - yet very interesting - game of Hex.
An Integration Challenge
How did we come up with the idea of finding a path on a hexagonal board? Well of course during an integration challenge!
Let me bring a bit of context here first. Just like many other developers before us, my partner Arnaud and I were given an integration challenge, which is typical at marmelab. Check this article about the onboarding process for more details.
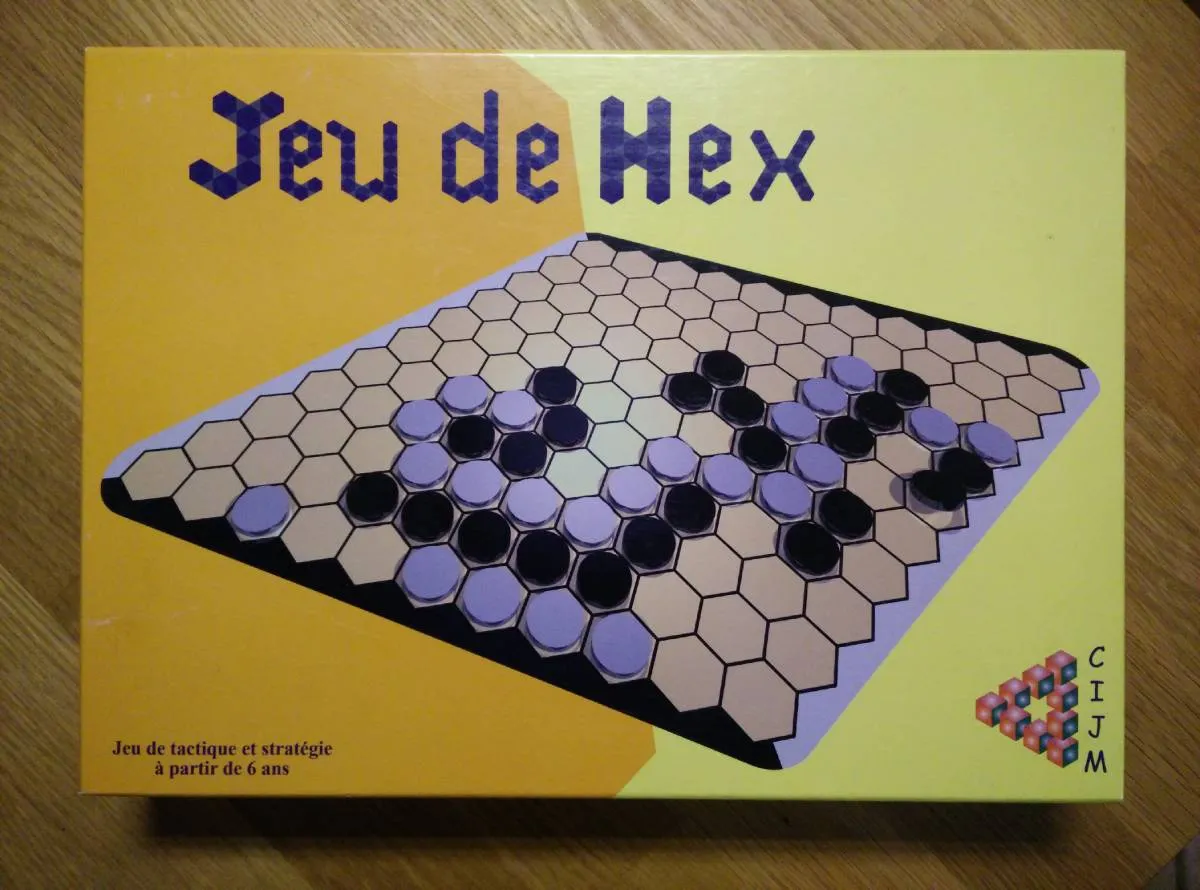
For our integration, the team offered us to work on The Hex Game, which is a two player abstract strategy board game.
To win this game, a player needs to place stones on the board, and draw a contiguous line between the two borders of the same color.
In the original game the stones are black and white, but in this article you will also see some screenshots with the color scheme of our app, that uses red and blue stones.
As you have probably guessed by now, to code this game we need a function that detects when a player has won the game. Hence, we somehow need to check if such a contiguous line exists on the board, and that’s where the path-finding comes at play.
Finding The Right Path
At first, my Google searches oriented me towards a solution consisting of two steps: mapping the hexagonal coordinates of the board to cubic ones, and then using a distance function in this 3d space to give to a simple path-finding algorithm. I was mostly influenced by this answer on StackOverflow.
However, after I presented this idea to the team, François made me realize this solution would probably introduce unnecessary complexity, hurting the code readability and maintainability. He rather suggested me to explore how we could build a graph representation of our board, in which we could connect the cells having a stone of the same color in it. Then, we would only need to use a path-finding algorithm inside this graph, to check if a path linking two opposite sides of the boards exists. This is the solution we chose to keep in the end.
The Dijkstra Algorithm - A Star Is Born
When searching for path-finding algorithms, the first two that usually show up in the results are A* (or A-star) and Dijkstra.
From what I understand, one may consider Dijsktra as being a particular kind of A* algorithm, that uses no heuristic function to perform its search. Since we won’t have to deal with complicated cost-functions, and Hex boards typically aren’t that big (from 9x9 to 19x19), the Dijkstra algorithm turned out to be sufficient for our needs.
A quick look at this wikipedia page learns us that this algorithm was conceived by computer scientist Edsger W. Dijkstra in 1956, hence the name.
To summarize, the Dijkstra algorithm will go over each node in a graph, and update a value stored on each node called a tentative distance, equal to the shortest distance the algorithm has found to reach this node so far. It also makes use of a set of unvisited nodes, enabling it to keep track of the nodes it has already scanned, and allowing it to know when the search is over.
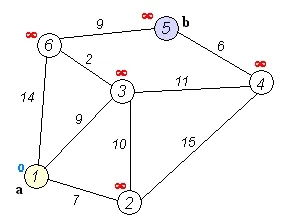
When this is finished, the algorithm will either return the shortest path it has found between the start and end nodes, or it may return something like null if no such path exists.
Building A Graph For An Hexagonal Grid
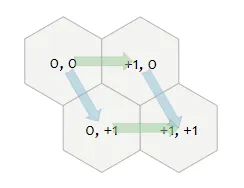
So far, our board was stored as a 2-dimensional array, as if the board was rectangle-shaped, using the Axial coordinates system.
The Dijsktra algorithm is nice, but it needs a graph representation to work. Therefore, we needed to build a graph based on our 2-d array, highlighting the connection between the cells.
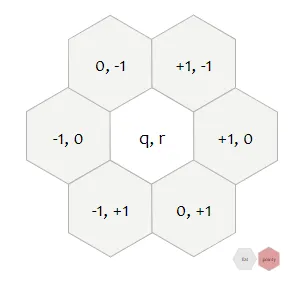
One of the challenging parts of this exercice, was to work with an angled hexagonal board. This meant we had to handle a connectedness with 6 possible neighbors, instead of 4 in the case of a square board.
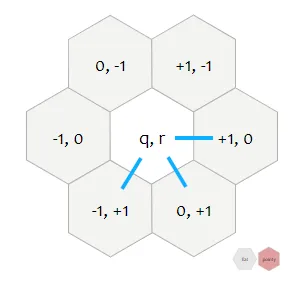
Hence, to populate the list of edges, we had two choices:
- For each cell, create a directed edge with all of its 6 possible neighbors
- For each cell, create a bi-directional edge with all of its 3 possible next neighbors, in order of the route used to travel along the board.
We chose the latter.
Travelling along our board from top to bottom, left to right, we could restrict to create a bi-directional edge with only the following 3 possible neighbors, whithin our coordinate system: (x+1, y), (x, y+1) and (x-1, y+1).
The last thing we had to do, was to create virtual nodes, representing the black and white borders of the board, that the players will aim at linking. For those, since we will try to traverse them from start to end, only a single-directional edge is needed.
The Jkstra Library
Dijkstra beeing a well known and studied algorithm, there already exists many libraries implementing it for us, in many languages. Our game being written with TypeScript, I went ahead and searched for a JavaScript implementation, and came by this one, called jKstra.
I chose this one because it seemed simple enough, lightweight, and still actively maintained - the latest commit dating from the 28th of November 2021, at the time of writing.
It uses vertices and edges as its model, which are identified with an id and can also hold custom parameters, such as a label for instance. It is recommended to use an array or a map to keep references to the node objects been created by the library, which is what we did.
Creating The Vertices
Below is an exemple of how we created a vertex for each cell in our board.
// create an object holding both the graph and the vertex mapconst hexBoardGraph: HexBoardGraph = {  graph: new jkstra.Graph(),  vertexMap: new Map<string, jkstra.Vertex>(),};
// Add node for each cell on the boardgameState.board.forEach((row, y) => {  row.forEach((_cell, x) => {    addVertex(hexBoardGraph, `${y}-${x}`);  });});
function addVertex(hexBoardGraph: HexBoardGraph, id: string) {  hexBoardGraph.vertexMap.set(id, hexBoardGraph.graph.addVertex(id));}
We also needed to create vertices for our start and end nodes, so we created them the same way.
// Add start and end nodesaddVertex(hexBoardGraph, "black-start");addVertex(hexBoardGraph, "black-end");addVertex(hexBoardGraph, "white-start");addVertex(hexBoardGraph, "white-end");Creating The Edges
The Jkstra library offers the ability to create directed edges between two vertices, or to create bi-directional edges, that are called an edge pair. Here is the function we used to create a bi-directional edge between two connected cells on our board, being identified by a string serving as identifier.
function addBidirectionalEdge( hexBoardGraph: HexBoardGraph, vertex1: string, vertex2: string,) { hexBoardGraph.graph.addEdgePair( hexBoardGraph.vertexMap.get(vertex1), hexBoardGraph.vertexMap.get(vertex2), 1, );}With this function, we could create all the edges between our connected stones, applying the neighbor logic we described earlier.
// Add edge pair for all nodes with one of its 3 possible neighbors// if the stone color matchesgameState.board.forEach((row, y) => { row.forEach((cell, x) => { if (cell.value == stoneColor) { const currentCell: Coordinates = { y: y, x: x }; let neighbor: Coordinates; // 1st possible neighbor neighbor = { y: y, x: x + 1 }; createEdgePairForNeighbor( gameState, hexBoardGraph, stoneColor, currentCell, neighbor, ); // 2nd possible neighbor neighbor = { y: y + 1, x: x }; createEdgePairForNeighbor( gameState, hexBoardGraph, stoneColor, currentCell, neighbor, ); // 3rd possible neighbor neighbor = { y: y + 1, x: x - 1 }; createEdgePairForNeighbor( gameState, hexBoardGraph, stoneColor, currentCell, neighbor, ); } });});For the start and end nodes, it was bit simpler, since we didn’t have to check for the stone color. We only needed to connect these vertices to the cells that are located on the corresponding board’s edge, like so.
// Add edges for start and end nodesgameState.board.forEach((_, i) => { addEdge(hexBoardGraph, "black-start", `${i}-0`); addEdge(hexBoardGraph, `${i}-${gameState.board.length - 1}`, "black-end"); addEdge(hexBoardGraph, "white-start", `0-${i}`); addEdge(hexBoardGraph, `${gameState.board.length - 1}-${i}`, "white-end");});Using The Algorithm
Once all this is done, we only needed the following lines to compute the shortest path between two edges:
const dijkstra = new jkstra.algos.Dijkstra(hexBoardGraph.graph);const shortestPath = dijkstra.shortestPath( hexBoardGraph.vertexMap.get(startNodeId), hexBoardGraph.vertexMap.get(endNodeId),);The shortestPath is populated with an array of vertices if a path has been found (guaranteed to be the shortest), or null if no such path exists.
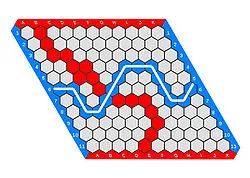
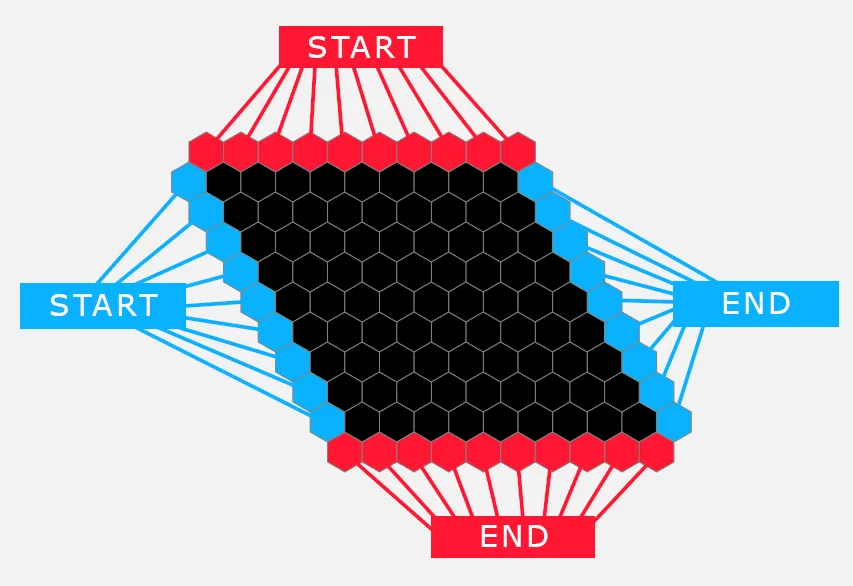
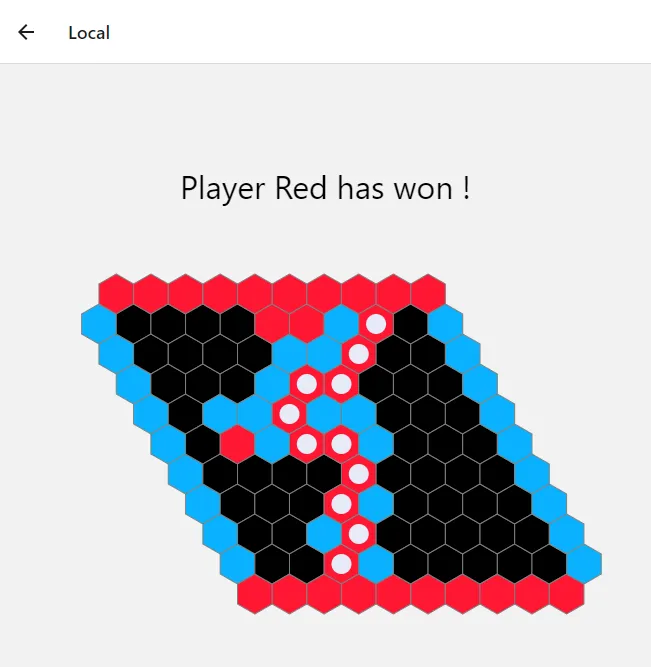
Below is an example of the path found on a game won by the red player.
Conclusion
Eventually, using the graph approach in conjunction with this library turned out to be a good solution for our problem, being a good balance between ease of implementation and efficiency. Later on, it enabled us rather easily to display the winning path on the board, since we already had the vertices array at hand.
That being said, there are still things that we might have done differently in our implementation. For instance, we do not use the notion of cost at all (if we provide no cost function, all edges are considered to have a cost of 1), and we do not create edges for empty cells. This proved to be problematic later on, when we tried to reuse this algorithm to create an AI, in charge of suggesting moves to get the player closer to victory. That’s why, later on, we added another way to create the graph for our board, this time declaring all the edges, and attaching them with different costs according to the presence or absence of a stone in the cell.
If you want to go further, feel free to check out the source code in our Github repository.
Authors
Full-stack web developer at marmelab, JB is a Software Engineer with a strong Java experience. He plays the piano and runs fast, and not only because he has long fingers and tall legs.