Deploying A Web App With Docker And AWS Fargate

At Marmelab, deployment is one of the skills that developers must master quickly, and this was not something I was used to doing. I knew Docker and AWS by name, but I have never used them before. For my integration, I had to learn how to deploy a web application with Docker and AWS Fargate.
When I reached the AWS homepage, a lot of information overwhelmed me. There are many services, many acronyms, and it’s not easy to find what we need. After deploying an application with AWS Fargate, I am now more comfortable with it. Let’s see what I’ve learned.
Context: Deploying a Web App
During our second sprint integration at Marmelab with Guillaume , we needed to develop an online game based on the board game Aqualin. It was a Nest.js application. You can check the source of this integration projects at marmelab/aqualin.
We also had to deploy this game like a real customer project.
Docker and Containers
The tech requirements were to use Docker and AWS.
Docker is a set of the platform as a service (PaaS) products that use OS-level virtualization to deliver software in packages called containers. I will not explain more about it but the Docker overview and how to get started was helpful.
When running a container, it uses an isolated filesystem provided by a container image. Docker can build images automatically by reading the instructions from a Dockerfile.
This is our Dokerfile example:
FROM node:16-alpine
ADD . /app
WORKDIR /app
RUN yarn install
EXPOSE 3000
WORKDIR /app/aqua-webapp/
RUN yarn build
CMD yarn start:prod
Now that Docker can build our image, let’s have a look at how to run containers with AWS.
Docker On AWS
First, I found the AWS documentation about Docker and how their collaboration makes things easier for developers. There are many AWS container services. We finally opted for AWS Fargate.
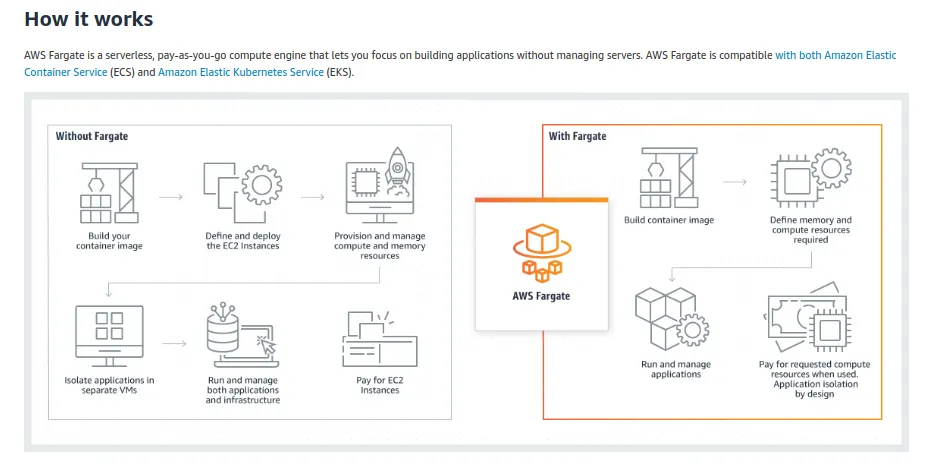
Fargate runs containers without managing servers. In the first approach, this looked simple but will see the various issues we encountered and the solutions we implemented.
Setting Up AWS Fargate
First, we need an AWS account to use AWS Fargate then we can click on Get started with AWS Fargate to access the ECS service.
Elastic Container Service (ECS)
On the right panel, there are three services:
- Amazon ECS: Amazon Elastic Container Service, to run, stop, and manage containers on a cluster.
- Amazon ECR: Amazon Elastic Container Registry, to manage container image registry.
- AWS Marketplace

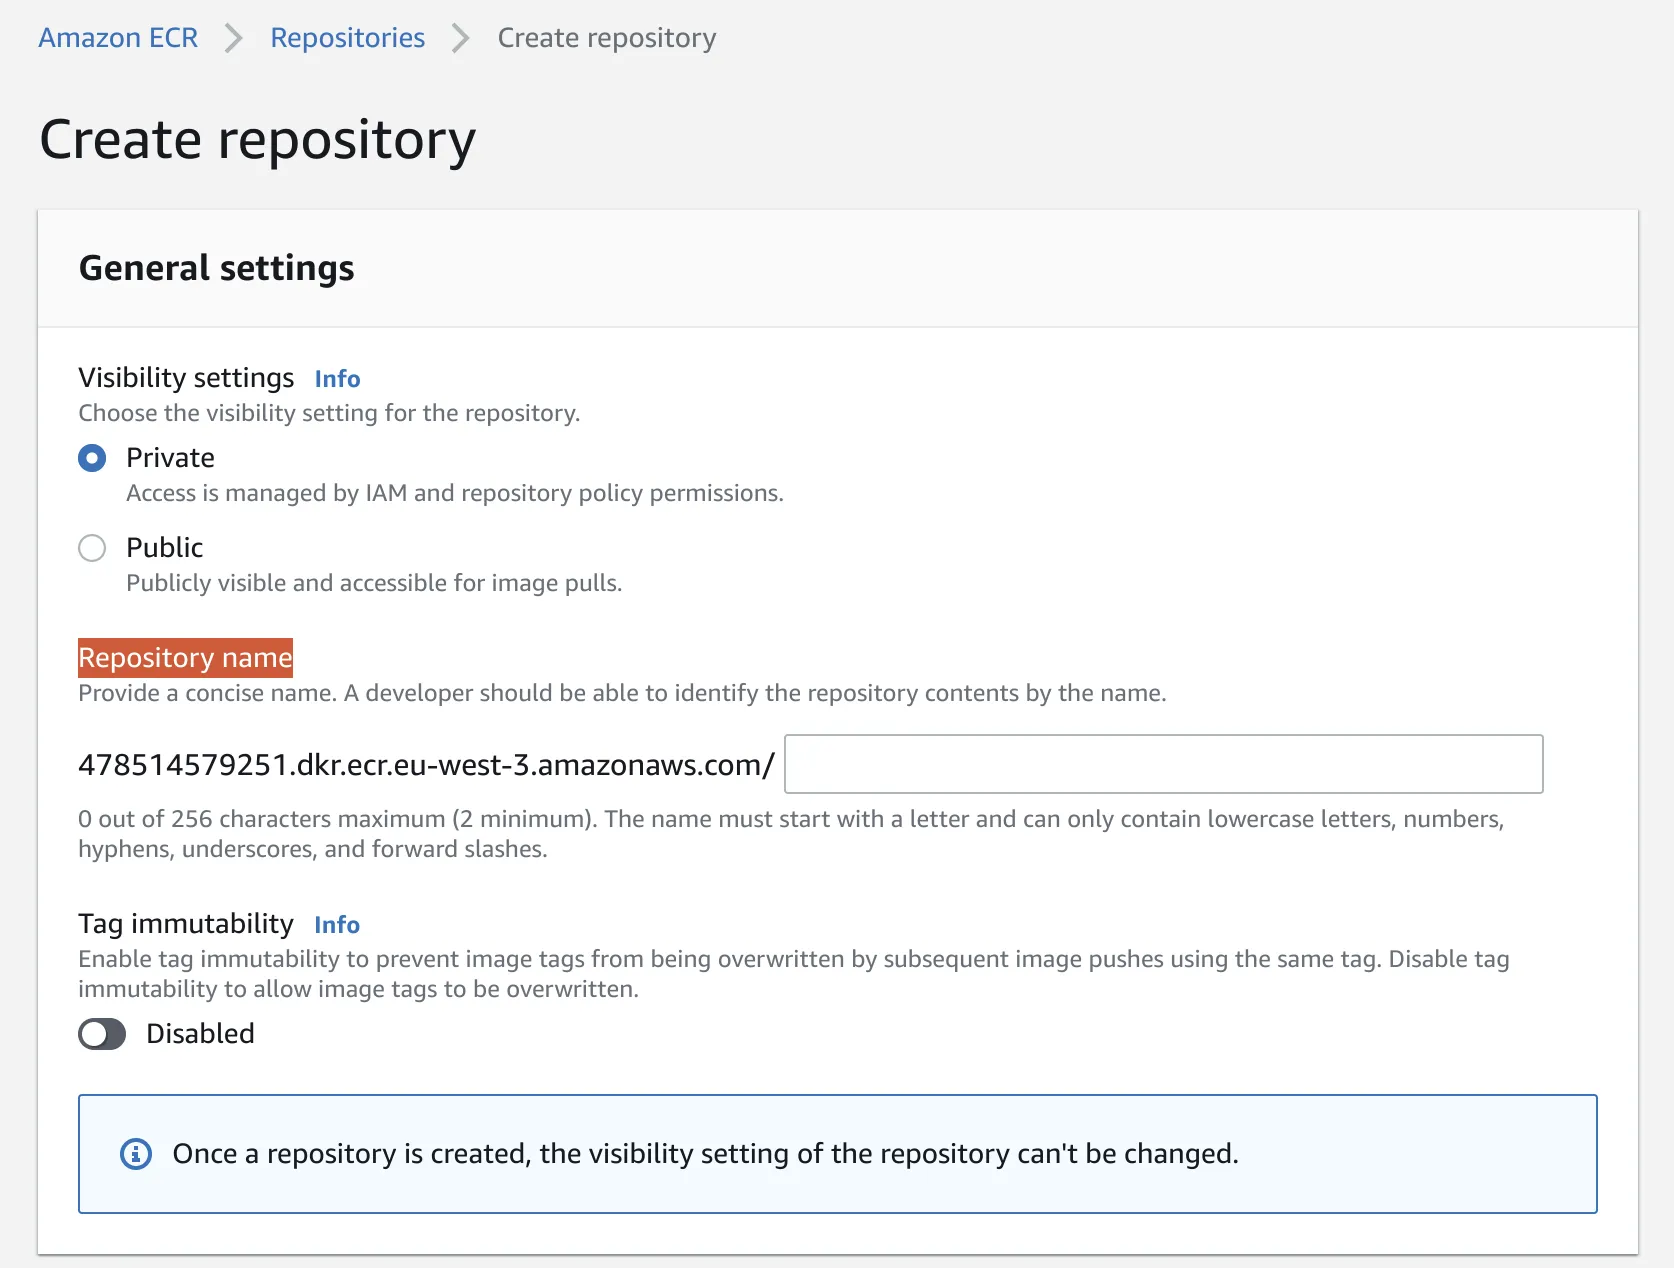
Before we can run our container, we need our Docker image in Amazon ECR, let’s click on Repositories.
Amazon Elastic Container Registry (ECR)
At this step, we create a repository and then push an image on it.

1. Create a repository
After we click on Create repository, we just need to provide a unique Repository name and click on Save at the bottom of the form.
On the ECR homepage, let’s click on our created repository.
2. Push our Docker image
We already have our dockerfile in our project, the View push commands button will show us all commands we have to run :
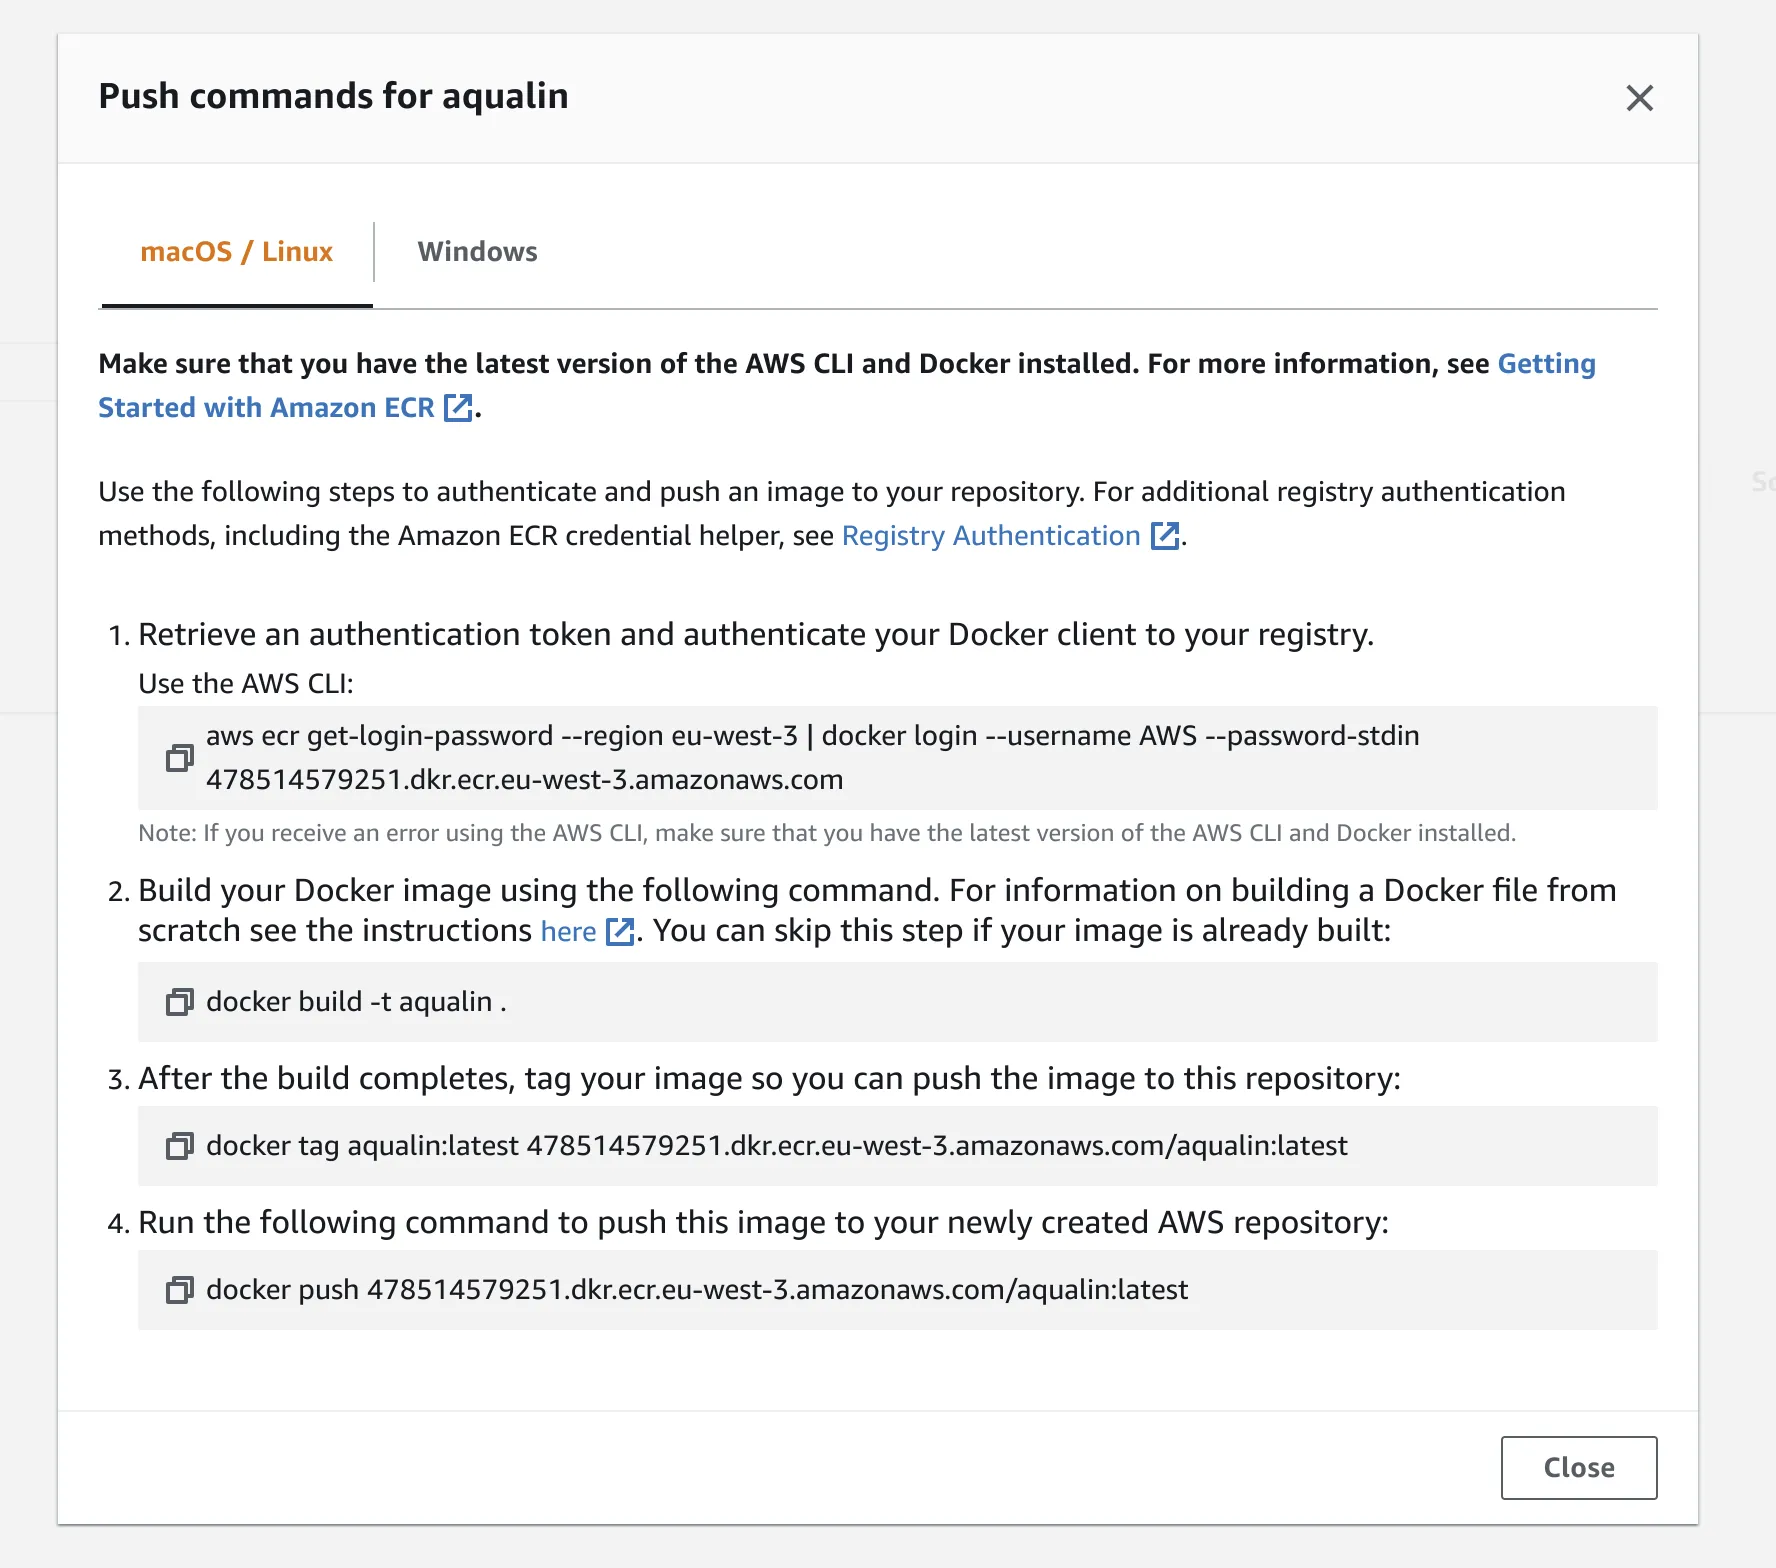
Tips:
- we need the AWS Cli on our project,
- when we run AWS push commands, we have to make sure that we run them the same way as we run
aws configure(if we used sudo, we have to use sudo to run push commands). It’s the same for the docker commands at each step.
Our web application image is now available in our repository, we click on the image and copy the Image URI for the next step.

AWS Fargate
In our project, we choose to use the AWS console interface, but all these steps can be done with the AWS Cli. We go back to the ECS Clusters page and click on Get started to actually use AWS Fargate.
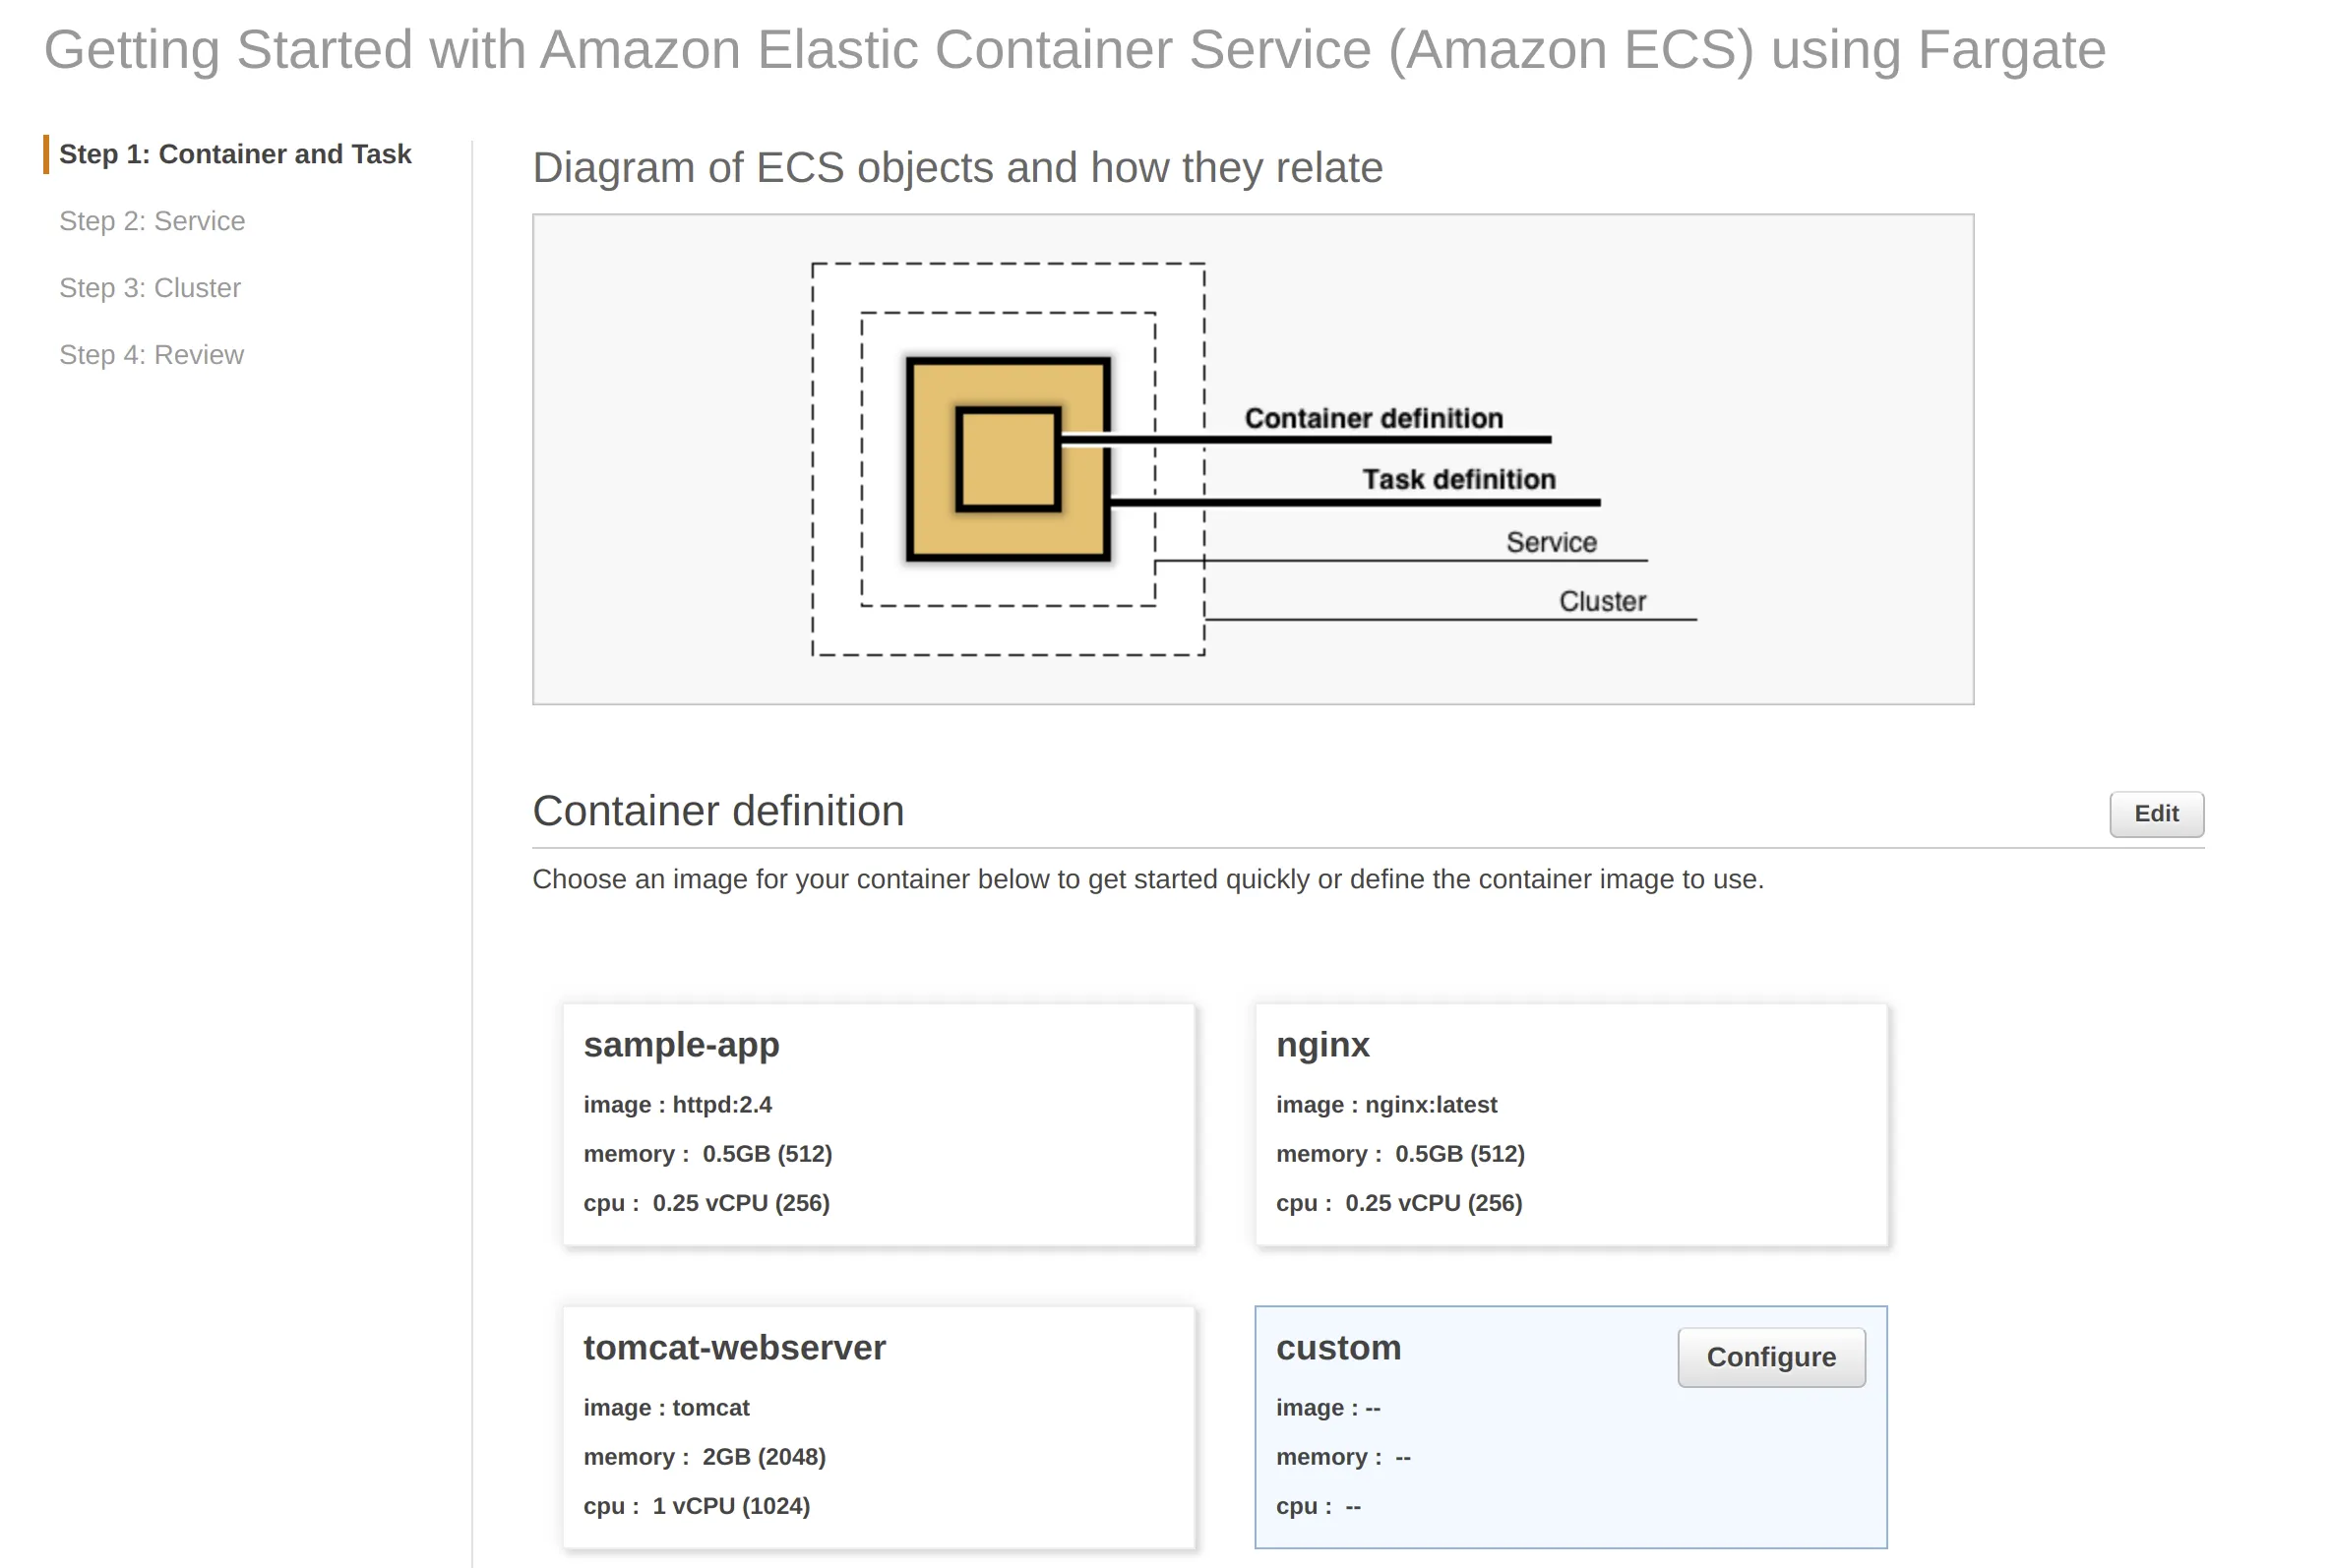
1. Container and Task
- Container
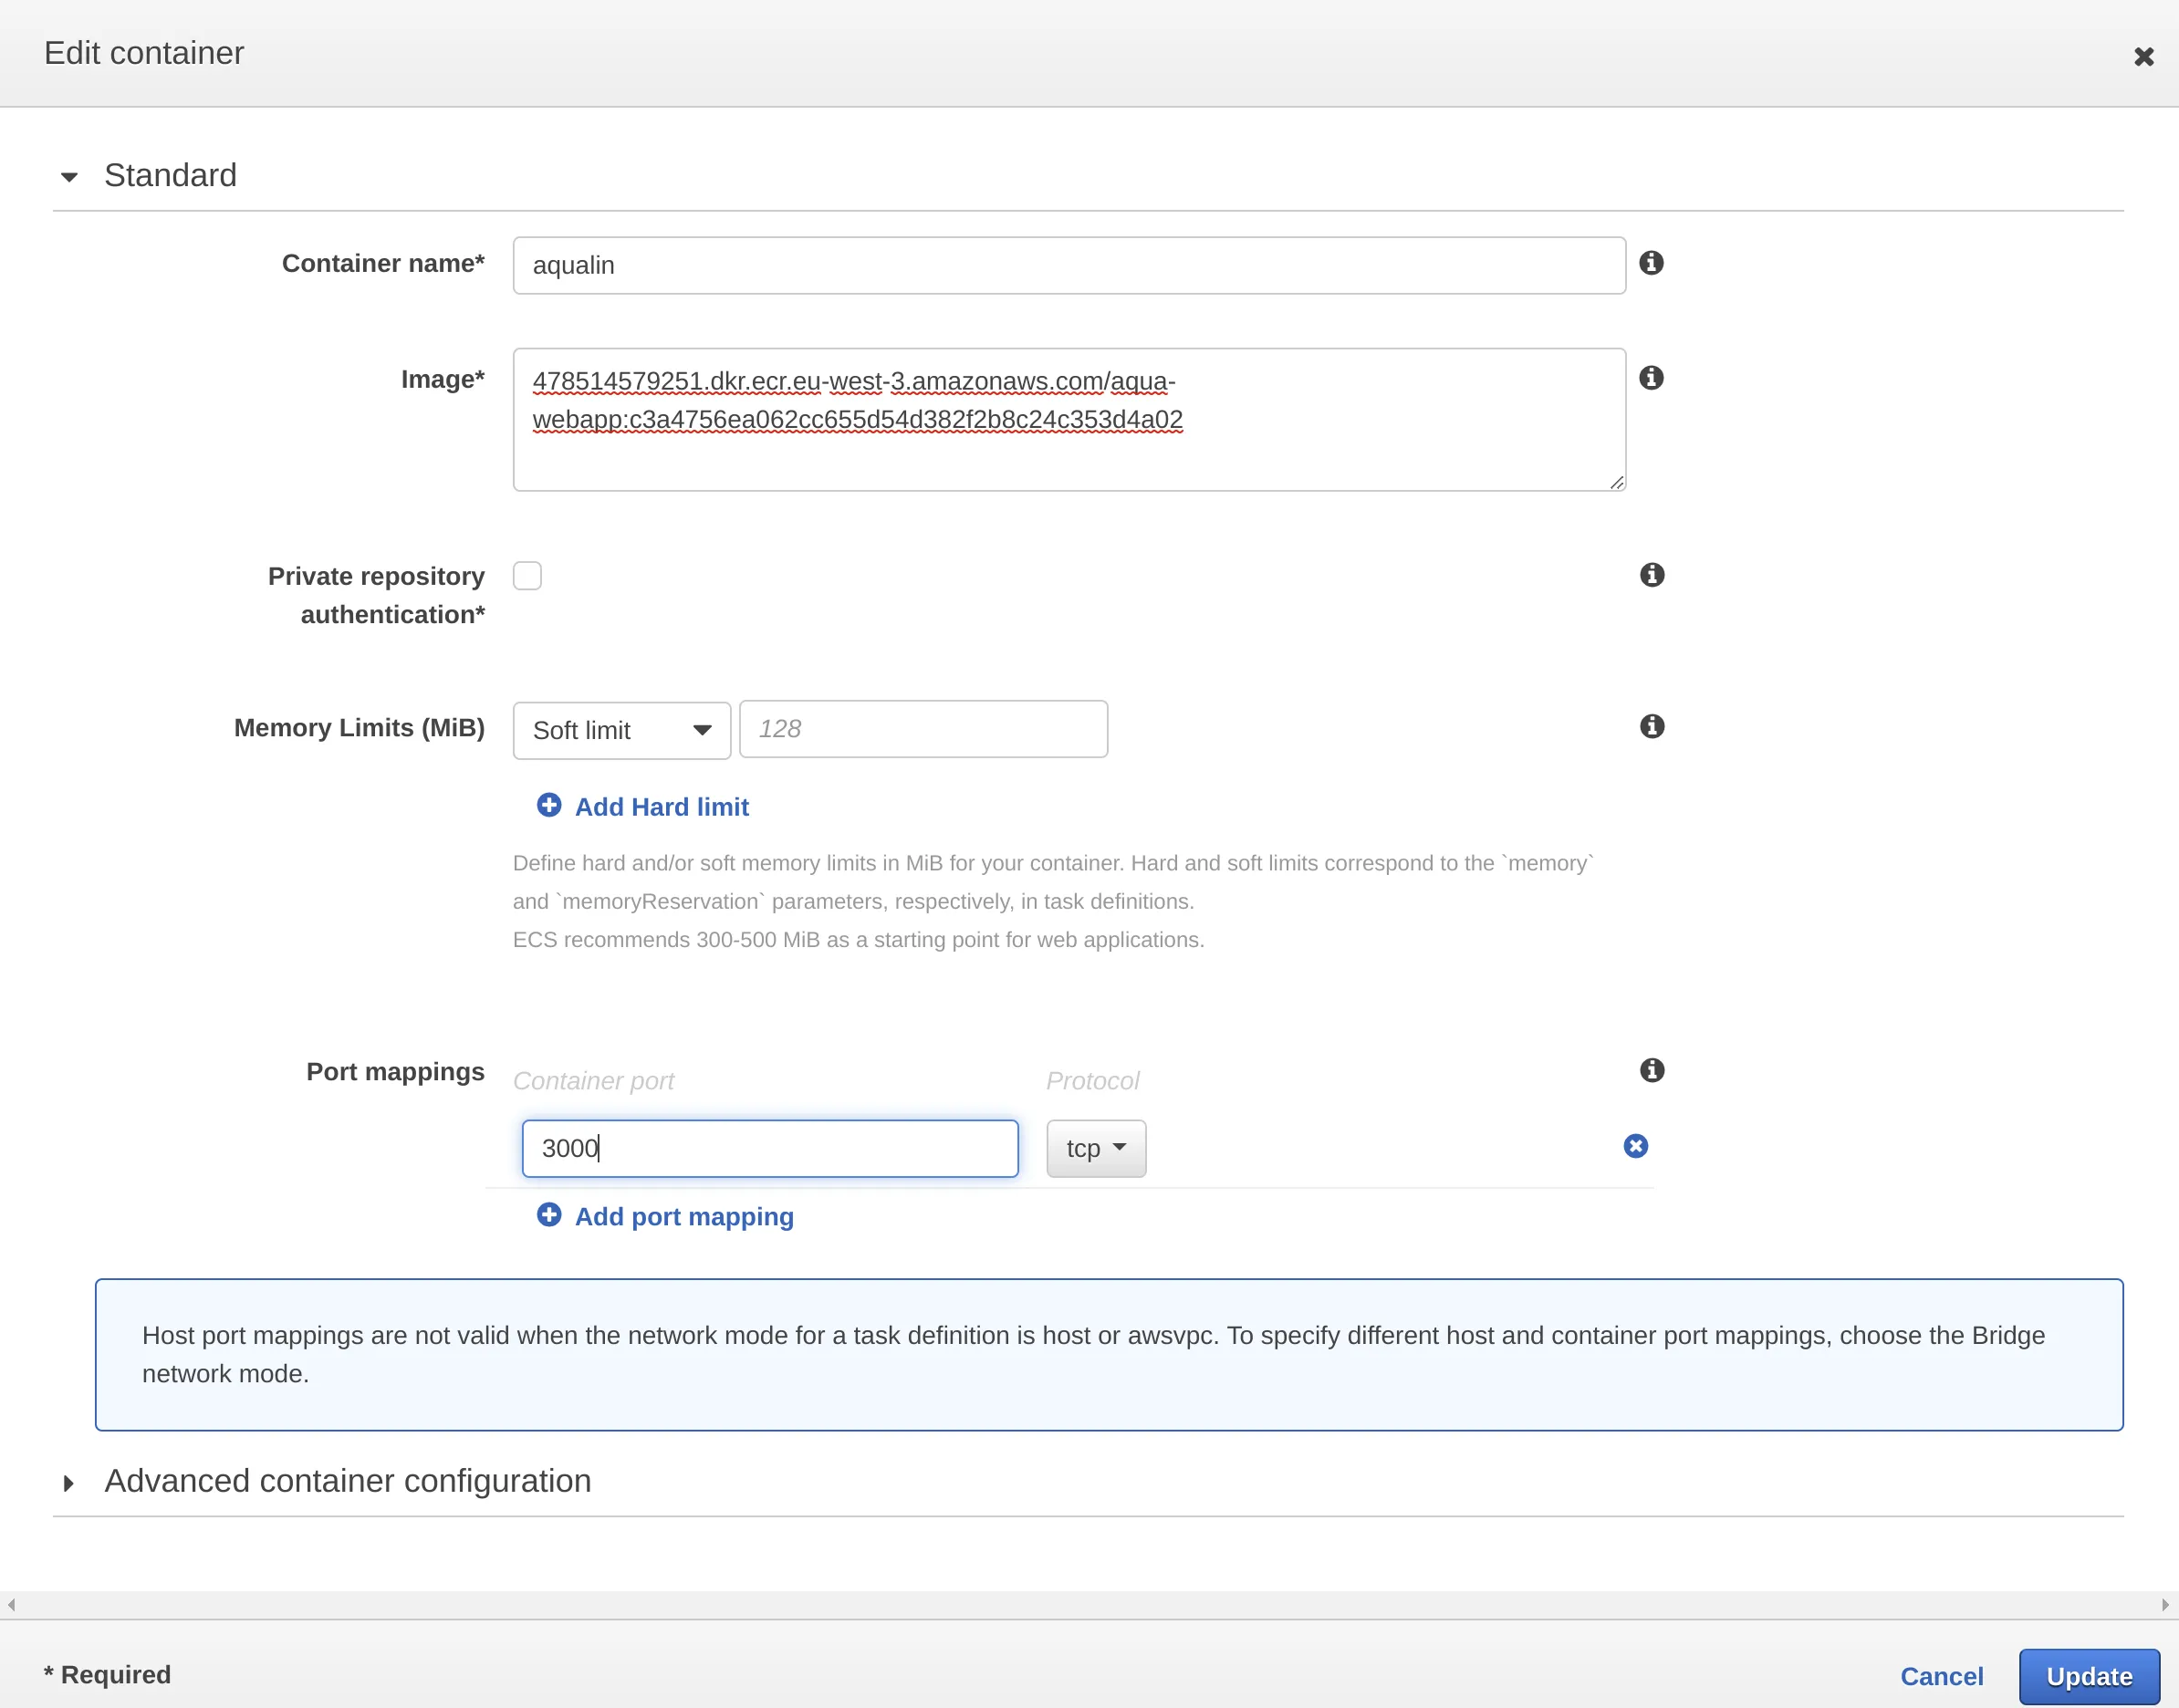
On the Step 1: Container and Task page, we click on the Configure button on the Custom container definition:
We paste the previously copied URI on the Image field and provide the Container name and the Container port that we want to expose. We can also add environment variables in the Advanced container configuration section.
- Task
Now, we edit the task and define the task definition name then click on Next.
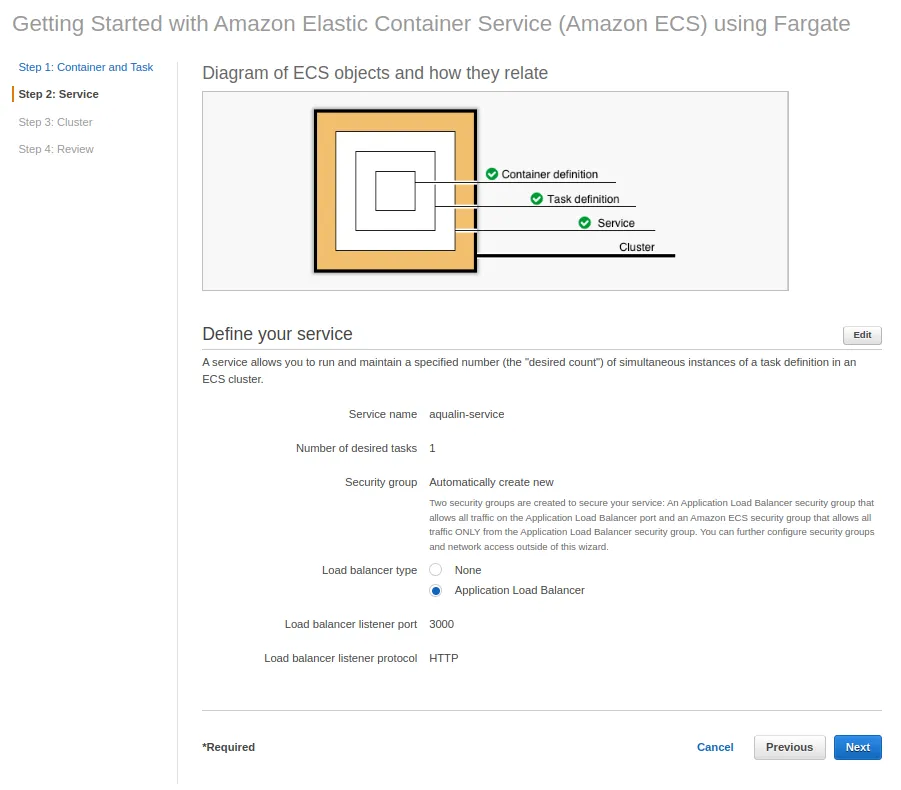
2. Service
We edit the service and define the Service name.
The first time we used AWS Fargate, I let the Load balancer type to the default check None. However, every time the application was deployed in our continuous deployment, the IP address of the app changed. So the next iteration, we check Application Load Balancer on the Load balancer type field. This creates a Fargate Service with an Application Load Balancer (more details here.
3. Clusters
We change the name of the cluster ; next, we review the ECS configuration, and finally, click on Create.
4. Ressources creation
Now we can observe resource creation.
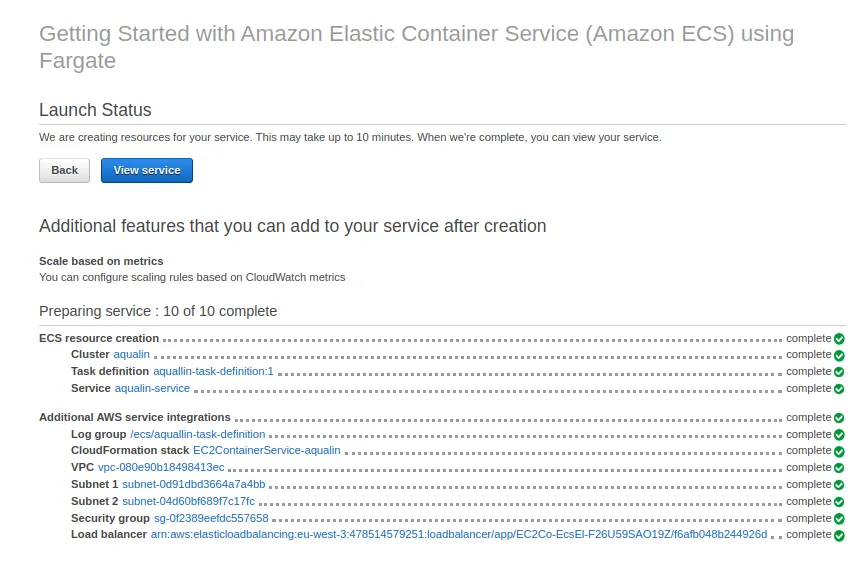
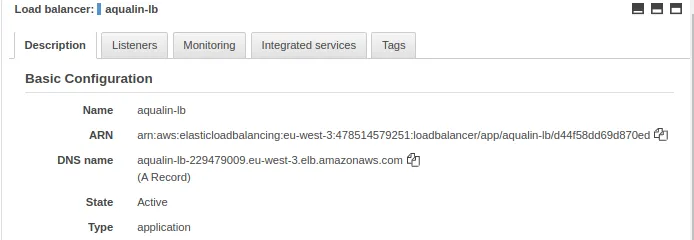
We click on the load balancer link to add more configuration. On the Description panel, we can actually open our application with the DNS name link.
Congrats!
Wait a minute, the first time we did this, it didn’t work 🫤 . That was because only the port 3001 was listening. To fix this, on the Listeners panel, we add one on port 80 and forward the request to the target group.
AWS Fargate and Github actions
One goal of our integration challenge was to set up continuous delivery pipelines in our code repository on GitHub, using Github Actions.
In our GitHub repository, we click on the Action tab and configure a new workflow using Deploy to Amazon ECS. This will create an aws.yml file with explanations about how to use it.
This configuration will use a task-definition file in our repository. If we want to use the task definition from Fargate instead, we have to download it before the step Fill in the new image ID in the Amazon ECS task definition.
We used this code:
  ECS_TASK_DEFINITION:    aqualin_webapp_task.json # set this to the path to your Amazon ECS task definition    # file, e.g. .aws/task-definition.json  ECS_TASK_DEFINITION_NAME: aqualin_webapp_task
 - name: Download task definition        run: |          aws ecs describe-task-definition --task-definition ${{ env.ECS_TASK_DEFINITION_NAME }} --query taskDefinition > ${{ env.ECS_TASK_DEFINITION }}
Each time we push on main in our project, this workflow runs and deploys our application with AWS Fargate.
Conclusion
We finally managed to deploy our web application game with Docker and AWS. AWS is vast, the documentation and the community also. AWS Fargate creates and configures a lot of things by itself. I like that we can run containers without managing servers. Somehow it saves time and effort to use it.
However, there are many things to learn, even writing this article, and there are still points I don’t understand clearly. It took some iterations to have our web app properly configured.
AWS Fargate is a great service if we know how to use it. An alternative is to deploy with Amazon EC2 (Amazon Elastic Compute Cloud). This AWS article about these two ECS launch types will probably help you to choose.
Authors
Before choosing full-stack development, Cindy was a dentist. No kidding. You can imagine that she's a fast learner.