
Create a CRUD API In Minutes With PostgREST

When You Need An API, Fast
At Marmelab, we mainly carry out innovation missions. These missions aim at solving business uncertainties with short sprints. Speed is a key success factor here: the sooner we start, the faster we get feedback from actual users and start to accumulate validated learning.
Because of this, we like to use web technologies, and to start our developments by the frontend - closer to the users. In our initial sprints, the backend is often reduced to a basic CRUD API in front of a relational database. That’s enough to build custom user experiences with a frontend B2B framework like react-admin.
Over the years, we’ve looked for the perfect tool to build a CRUD API in front of a relational database in no time. And we found it: it’s called PostgREST..
PostgREST To The Rescue
PostgREST is an open-source web server that provides a feature-complete REST API on top of any PostgreSQL database.

The API endpoints are generated based on the underlying database schema (tables and views). The permissions come from database roles. To put it simply, PostgREST exposes each table as an HTTP resource, on which a client can perform Create, Retrieve, Update and Delete operations using fetch().
PostgREST is a mature and maintained project, used in super popular services like Supabase.
A REST API In 30 Seconds
To build a REST API, all we need is a PostgreSQL database with the PostgREST server in front. Let’s install them both via docker-compose:
version: "3"
services:  api-postgrest:    image: postgrest/postgrest    ports:      - 3000:3000    depends_on:      - database-postgres    environment:      - PGRST_DB_URI=postgres://${DATABASE_USER}:${DATABASE_PASSWORD}@database-postgres:5432/${DATABASE_NAME}      - PGRST_DB_SCHEMA=${PGRST_DB_SCHEMA} #public      - PGRST_DB_ANON_ROLE=${PGRST_DB_ANON_ROLE} #web_anon
  database-postgres:    image: postgres:14    ports:      - "5432:5432"    environment:      - POSTGRES_USER=${DATABASE_USER} #postgres      - POSTGRES_PASSWORD=${DATABASE_PASSWORD} #postgres      - POSTGRES_DB=${DATABASE_NAME} #postgres    volumes:      - pgdata:/var/lib/postgresql/data
volumes:  pgdata:
Then we can start the two services with:
DATABASE_USER=postgres DATABASE_PASSWORD=postgres DATABASE_NAME=postgres PGRST_DB_ANON_ROLE=web_anon docker-compose -f docker-compose.yaml upThis spins up a database on port 5432 and an REST API on port 3000, with OpenAPI support. But the API has no endpoints, because the database has no tables.
Populating The API
Let’s populate the database to allow a frontend app display actual data.
docker-compose -f docker-compose.yaml up -dsudo docker exec -it database-postgres psql -U postgresThis launches the psql client, where we can enter SQL statements:
create table public.heroes (  id serial primary key,  name text not null);
insert into public.heroes (name) values  ('Batman'), ('Superman');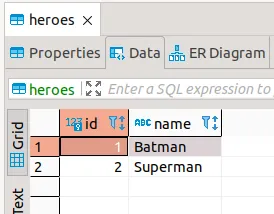
Expose A Table In REST
Next, we need to create a role to use for anonymous web requests. When a REST request comes in, PostgREST will use this role to run queries in the database.
CREATE ROLE web_anon NOLOGIN;GRANT USAGE ON SCHEMA public TO web_anon;
ALTER DEFAULT PRIVILEGES IN SCHEMA publicGRANT SELECT, INSERT, UPDATE, DELETE ON tables TO web_anon;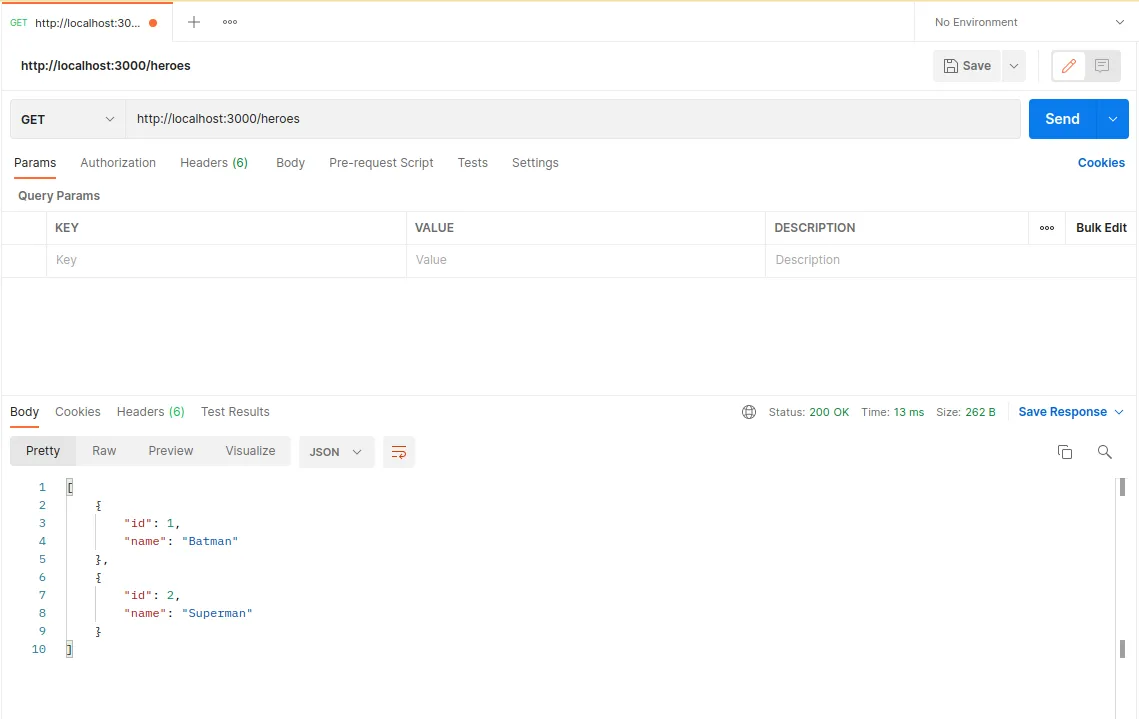
And now our API is ready to be used!
curl -X GET http://localhost:3000/heroes[ { "id": 1, "name": "Batman" }, { "id": 2, "name": "Superman" }]curl -d '{"name":"Flash"}' -H "Content-Type: application/json" -X POST http://localhost:8000/heroesWe can now do CRUD via GET/POST/PUT/PATCH/DELETE requests.
Tip: You can improve the security of your API via roles/user. I’ll let you look at the PostgREST documentation for details.
Adding Business Logic
PostgREST only handles CRUD requests. If your client needs server-side business logic, you’ll have to implement it in additional endpoints.
You can put this business logic in serverless controllers (that’s what Supabase does), or you can create another REST API, and use it as a Proxy for PostgREST. That’s the solution I will describe here.
I’ll use NestJS in this tutorial. It’s a framework based on Node.js that allows me to quickly build a REST API. If you want to discover how to start a NestJS application, I invite you to follow its documentation. However, the principle I will demonstrate next can be reproduced with other frameworks in other languages.
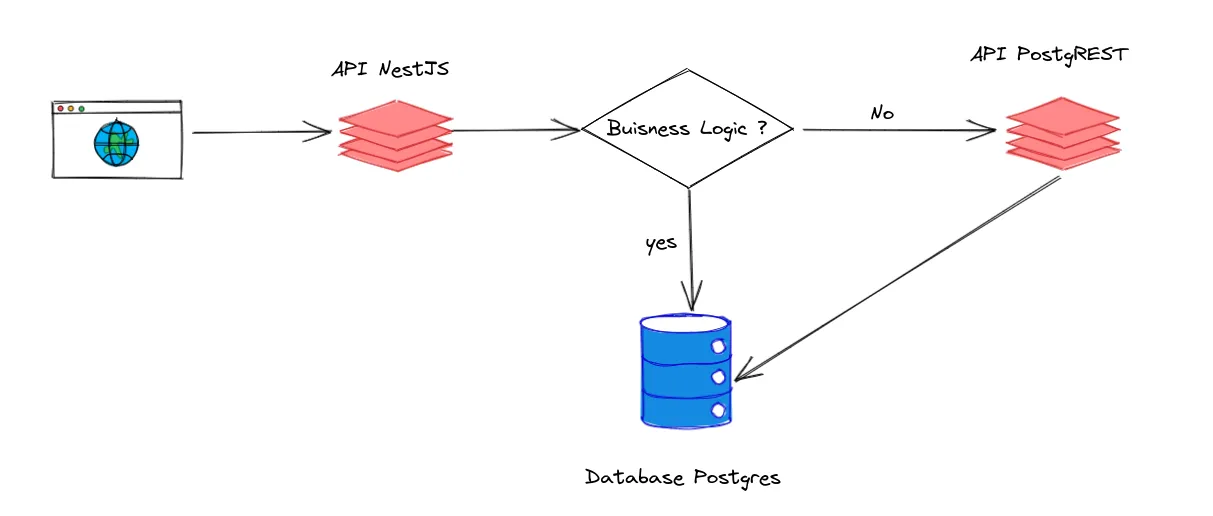
Here is the architecture:
- The NestJS API is exposed publicly (but not the PostgREST API).
- When the client queries a CRUD endpoint, NestJS forwards the call to PostgREST.
- When the client queries a business endpoint, NestJS answers directly, using an ORM (in our case, Prisma) to communicate directly with PostgreSQL.
To pass our CRUD requests from NestJS to PostgREST, we create a middleware that our app.module will use.
export class AppModule implements NestModule { configure(consumer: MiddlewareConsumer) { consumer .apply(PostgrestMiddleware) .exclude('/') .forRoutes('*'); }}@Injectable()export class PostgrestMiddleware implements NestMiddleware { constructor(private readonly httpService: HttpService) {}
async use(req: Request, res: Response) { try { const { data, headers } = await this.httpService.axiosRef({ method: req.method, url: `http://{{POSTGREST_API_URL}}${req.originalUrl}`, data: req.body, headers: req.headers as AxiosRequestHeaders, }); res.set({ 'Content-Range': headers['content-range'] }).json(data); } catch (error: any) { throw new HttpException(error.response.data, error.response.status); } }}With this code, we catch all called routes and pass them to PostgREST.
If we create a business-specific endpoint, we exclude it from our middleware:
consumer .apply(PostgrestMiddleware) .exclude({ path: "/customEndpoint", method: RequestMethod.GET }) .forRoutes("*");Conclusion
PostgREST allows us to create a full-featured REST API for CRUD operations. The only remaining server-side code is the real business logic, that uses an ORM. This approach works well during prototyping, but it also scales beautifully. We’ve used it in many projects, either with NestJS as described here, or with Supabase, and the result is very satisfying. In fact, that’s exactly whan many Backend-as-a-Service propose - except that with PostgREST, it’s free.
One of the weak points I have encountered is the lack of resources about PostgREST on search engines. A search for PostgREST mostly returns results about Postgres, because the search engine thinks it is a typo. To get help about PostgREST, I suggest taking a look at this PostgREST chat room.
If you intend to expose your API publicly (using an OpenAPI / Swagger schema), stitching the CRUD schema and the business-side schema will require some work.
User management on the business logic API will also require some additional work - unless the business logic API relies on PostgREST, too.
Apart from that, we love the speed of implementation and ease of use of PostgREST. It’s a great fit for our missions!
Now, couple this with React-admin, and you’ll be able to create a B2B app in no time!
Authors
Full-stack web developer at marmelab, Anthony seeks to improve and learn every day. He likes basketball, motorsports and is a big Harry Potter fan