
Convert GIF to WebM Files to Reduce the Carbon Footprint of Your Website

At Marmelab, we are convinced that we can use digital innovation to make the world a better place. By providing open-source tools like GreenFrame, we want to help developers reduce the carbon footprint of their websites.
Following this pledge, we also want to reduce the carbon footprint of our own websites. In this article, we will explain how we reduced the size of the video assets of the React Admin documentation by 62%!
We will also explain how we built a CLI tool to make the process easier.
Reducing Carbon Footprint By Using A Better Video Format
With more than 300k views and almost 50k visitors in the last 30 days, the React Admin website receives a lot of traffic. Most visitors come for React Admin documentation, with more than 15k monthly views for the Tutorial page alone. The documentation includes 87 screencasts at the time of writing. These videos use the GIF format, as it allows easy embedding and has no video compression artifacts. However, it is far from being the most efficient format in terms of size.
A common web performance optimization practice is to replace animated GIFs with video for faster page loads. Experiments with GreenFrame taught us that carbon emissions of websites are correlated with their web performance. That’s why we figured that reducing the size of the video assets of the react-admin documentation, e.g. by converting them to WebM files, would be a simple way to reduce its carbon footprint.

However, provided that we manage to convert the videos to WebM, we would still need to update the documentation to use the new videos. With 233 Markdown files at the time of writing, this would be a very tedious task to do it manually. Hence, the first challenge was to find a way to automate this process.
Scripting Markdown Updates
At this point, we decided to build a CLI tool to automate the process.
This tool would need to:
- Find all the Markdown files in the documentation
- Find the GIF files inclusions in the Markdown files
- Replace the GIF files inclusions with an HTML
<video>tag, with the WebM file as source
To solve these challenges, we used the replace-in-files lib (which internally uses glob, another great tool!) to quickly replace patterns inside multiple files. We then used a regular expression (yeah, I know! 😅) to find the GIF files’ inclusions.
The difficulty here was to set up the lib to deal with multiple pattern replacement in a single pass, and to avoid returning promises for each file to execute in parallel. Otherwise, the concurrent accesses to the Markdown files would lead to file corruption.
For the <video> tag, we decided to use a template like the one below, which would be used to replace the GIF file inclusion:
<video controls autoplay muted loop width="100%"> <source src="%webm_file%" type="video/webm" /> Your browser does not support the video tag.</video>This template is of course overridable in the CLI. 🙂
The result is a classic Node.js script:
import { glob } from "glob";import { ReplaceInFileConfig, replaceInFile } from "replace-in-file";import fs from "fs";
export const getRegExp = (gifFileName: string) =>  `!\\[[^\\[]+\\]\\((\\S+${gifFileName?.replace(".", "\\.")})\\)`;
const findDocFiles = async (sourceFolder: string, pattern: string) => {  return (    await glob(pattern, {      cwd: sourceFolder,    })  ).map((file) => `${sourceFolder}/${file}`);};
export const replaceLinks = async (  sourceFolder: string,  pattern: string,  template: string,  gifFiles: string[],) => {  const docFiles = await findDocFiles(sourceFolder, pattern);  const gifFileNames = gifFiles.map((file) => file.split("/").pop());  const templateAsString = fs.readFileSync(template, "utf8");  const from = gifFileNames    .filter(Boolean)    .map((gifFileName) => RegExp(getRegExp(gifFileName!), "g"));  const to = gifFileNames    .filter(Boolean)    .map((gifFileName) => (match: string) => {      const previousLink = match.match(RegExp(getRegExp(gifFileName!)))?.[1];      return templateAsString.replace(        "%webm_file%",        `${previousLink?.split(".").slice(0, -1).join(".")}.webm`,      );    });  const options: ReplaceInFileConfig = {    files: docFiles,    from,    to,  };  return replaceInFile(options).then((results) =>    results.filter((file) => file.hasChanged).map((file) => file.file),  );};
Converting GIF To WebM Using FFmpeg
Next, we had to convert the GIF files to WebM files. To do so, we decided to use FFmpeg, a very powerful tool to manipulate videos. And, as always with powerful tools, it is not the easiest to use.
The first challenge was to find the best way to call FFmpeg from Node.js. We initially planned to use the fluent-ffmpeg lib, which provides a nice API to call FFmpeg from Node.js, and seemed to be the most popular lib for this purpose. However, we quickly ran into a bug, making it impossible to convert multiple GIF files in a batch.
We managed to work around this issue by using another lib, js-ffmpeg, which is clearly not as user-friendly as fluent-ffmpeg, but at least worked in our case.
The second challenge was to find the best set of options to use with FFmpeg. With some trial and error, we eventually came down to the following options:
- Codec: VP9. We decided to use VP9 because it is a very efficient codec, and is supported by all major browsers, contrary to AV1 which is not supported by Safari and iOS.
- Quality: Variable Bitrate (VBR) with Constant Rate Factor (CRF). We decided to use the Constant Quality mode to ensure the screen recordings would remain free of visible artifacts even when there is much activity on the screen, while allowing for a low bitrate when there is not much activity. We decided to use an average CRF value of 23, which is a good compromise between quality and size.
- Two-Pass: We decided to use the two-pass encoding mode with the hope of improving the quality of the video without increasing its size. This comes at the cost of a longer encoding time, but we figured it was not a problem in our case.
- FPS limit: For screen recordings, it is often not useful to have more than 15 - 20 FPS. We decided to limit the FPS to 15, which is enough to have a smooth video, while significantly reducing the size of the video.
- Resolution limit: Likewise, it is often not useful to have a resolution higher than 1080p for screen recordings. We decided to limit the resolution to Full HD, which is enough to show even the most complex UIs.
Here are the typical final commands we use to convert a file:
# 1st passffmpeg -i file.gif -c vp9 -b:v 0 -crf 23 -pass 1 -an -f null /dev/null# 2nd passffmpeg -i file.gif -c vp9 -b:v 0 -crf 23 -pass 2 -an -vf scale='min(1920,iw)':min'(1080,ih)':force_original_aspect_ratio=decrease,fps=15 file.webmAgain, most of these options (CRF, FPS limit, and Resolution limit) can be overridden in the CLI. 🙂
Making The CLI More Versatile
At this point, we had a CLI tool that could convert GIF files to WebM files, and update the documentation files to use the new videos. However, we quickly realized that we could make it more versatile by adding the following features:
- Ability to delete the GIF files after conversion
- Ability to skip the video conversion step, and only update the documentation files
- Ability to skip the documentation update step, and only convert the video files
- Further customization of the file search, like file name patterns and omit patterns
This was a great opportunity to leverage commander.js, a Node.js framework for command-line interfaces.
In the end, here are all the options supported by our CLI:
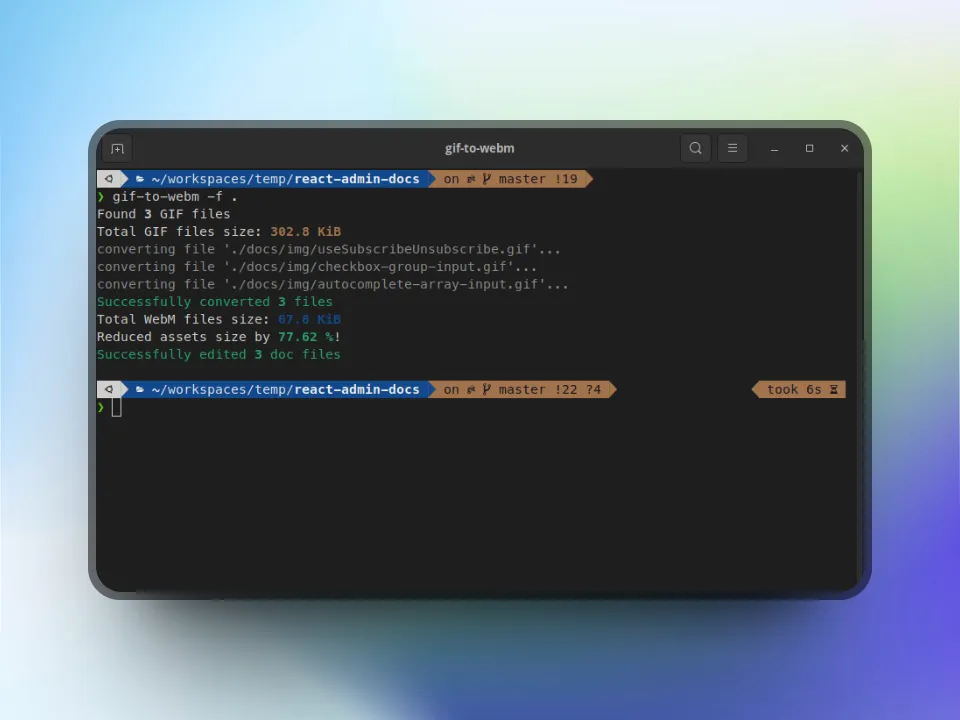
Options: -f, --folder <path> source folder -e, --exclude-pattern <pattern> exclude pattern from source folder search (separate multiple patterns with comma) (default: "node_modules/**") -p, --pattern <pattern> doc files pattern (default: "**/*.md") -t, --template <path> template file holding the WebM player html code (default: "./template.html") -q, --quality <number> output quality, ranges between 0-63, lower means better quality (default: "18") -c, --skip-gif-conversion set this flag to skip the conversion of GIF files to WebM (default: false) -r, --skip-doc-replace set this flag to skip the doc search and replace step (default: false) -d, --delete-gif-files set this flag to delete the original GIF files after conversion (default: false) --max-fps <number> maximum FPS (default: "15") --max-width <number> maximum video width (default: "1920") --max-height <number> maximum video height (default: "1080") -h, --help display help for commandWhen you choose to convert the video files, the CLI will also tell you how much space you saved by converting the GIF files to WebM files.
Other Possible Improvements
We are pretty happy with the current state of our CLI, however, there are still a few possible improvements we could make.
First of all, we could add the ability to encode the videos in multiple formats and multiple resolutions and use the appropriate video depending on the user’s browser. This would allow us to provide the best possible experience to all users while keeping network usage as low as possible.
Indeed the <video> tag supports multiple sources, and will automatically pick the first source that is supported by the browser. For example, here is how we could provide a WebM video for Chrome and Firefox, and an MP4 video for Safari, while also providing the ability to download the video directly if the browser does not support HTML5 video:
<video controls> <source src="myVideo.webm" type="video/webm" /> <source src="myVideo.mp4" type="video/mp4" /> <p> Your browser doesn't support HTML video. Here is a [link to the video](myVideo.mp4) instead. </p></video>Also, we could add a poster attribute to the <video> tag, which would allow us to display a preview image when the video is not playing, or if the browser doesn’t support video playback.
Conclusion
This attempt to reduce the carbon footprint of our website was a good opportunity to learn more about video encoding and discover how to build a CLI with Node.js and TypeScript.
This allowed us to open this PR on the react-admin repo, which allowed us to reduce the video assets size by 62%, with no visible loss of quality.
If you too are interested in reducing the carbon footprint of your website, you can use our CLI tool if you’d like. It is available on GitHub: marmelab/gif-to-webm! 🙂
In any case, sharing your next screencasts as WebM videos instead of GIFs can be a simple, yet effective way to contribute to making our digital world more sustainable. So don’t hesitate to give it a try!

Authors
Full-stack web developer at marmelab, JB is a Software Engineer with a strong Java experience. He plays the piano and runs fast, and not only because he has long fingers and tall legs.