
Automate Your Workflow With Git Hooks

Are your CI tests failing because you forgot to run them locally? Have you misnamed one of your commits? If you work with Git, you’ve probably already found yourself in a similar situation. With Git Hooks, you can reduce that feeling of going back and forth to correct errors.
Understanding Git Hooks
Git provides a tool named Git Hooks. Hooks let you intercept and enhance your actions, such as commit, push, or merge. If you’ve never noticed, you can take a look at your project’s .git/hooks folder. There you’ll find files that serve as examples of hooks.
To see it together, we’re going to initialize a git project:
mkdir git-hookscd git-hooksgit init14 samples are available. You can activate them by removing the .sample extension.

The list of available hooks can be found in the git documentation: Git Hooks.
For the purpose of this article, we’ll look at how to ensure that our commits are always correctly named (according to our project’s naming convention) and that our TypeScript types exist before we can push our code.
Using Git Hooks To Force Commit Message Format
The hook that best matches our first use case is commit-msg. This hook is executed when a commit is created. It is used to check the commit message before it is validated. If the message does not respect the naming convention, the commit will be refused.
To create a commit-msg hook, we will create a file in the .git/hooks folder and give it execution rights.
touch .git/hooks/commit-msgchmod +x .git/hooks/commit-msgWe want our commit message to start with a ticket number (e.g. ‘#123: My commit message’). So the hook will be a bash script that parses the commit message and fails if it doesn’t respect the right format.
#!/bin/bash
# The commit-msg hook takes one parameter, which is the path# to a temporary file that contains the commit message.# So we can read it into a variable using the cat command.commit_message=$(cat "$1")
echo "Commit message: $commit_message"
# Check if the commit message follows the #XXX: message conventionif [[ ! $commit_message =~ ^#[0-9]+:.* ]]; then  echo "ERROR: Commit message does not follow the #XXX: message convention."  exit 1fi
So let’s try our hook.

It works! Now, before pushing the code, we want to make sure that our TS types exist. To do this, we will use the pre-push hook. This hook is executed before pushing the code to the remote server.
touch .git/hooks/pre-pushchmod +x .git/hooks/pre-pushFor this pre-push hook, we’ll use a bash script to run the TypeScript type check.
#!/bin/bashnpm run typecheck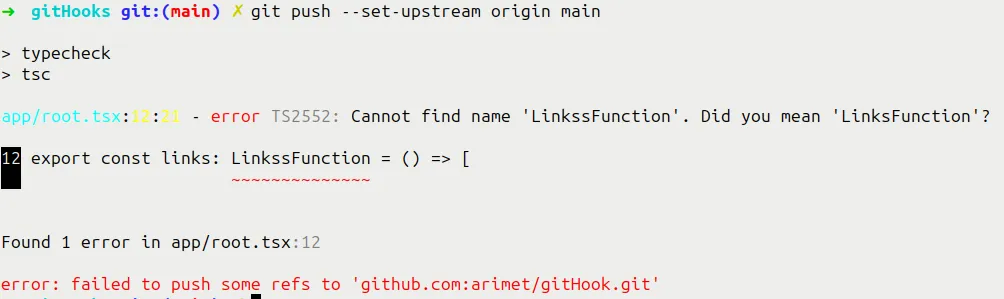
Our verifications are perfectly handled!
Sharing Git Hooks With Husky
Here’s a problem: how do we share hooks with other team members? By default, .git is not included in the folders to be shared. You can modify the project configuration to move hooks out of the .git folder. We could create a .githooks folder, and link it to our configuration with the command git config core.hooksPath .githooks.
However, this requires configuration and documentation for new team members. Another simpler solution is Husky. It’s an npm package for managing git hooks.
npm install --save-dev huskynpx husky initThese commands will create a .husky folder. Inside this folder, you can create a file for each hook you want to use, similar to the Git Hooks method. This approach allows you to version control your hooks and is easy to use.
In a previous article, Arnaud introduced us to conventional comments. This principle standardizes PR comments. Similarly, there are conventional commits. The goal is to make commit messages more readable and easier to follow. Husky will help us implement this convention.
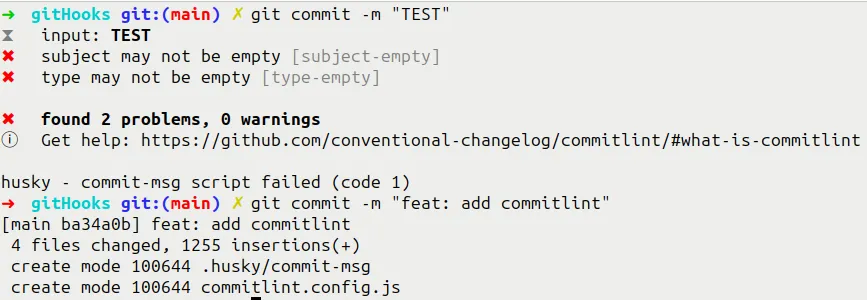
First, we will install the commitlint package, which allows us to verify that our commit messages follow the convention.
npm install --save-dev @commitlint/{cli,config-conventional}# Configure commitlint to use conventional configecho "export default { extends: ['@commitlint/config-conventional'] };" > commitlint.config.jsAnd we’re going to add a commit-msg hook to check that the commit message follows the convention.
echo "npx --no -- commitlint --edit \\$1" > .husky/commit-msgWe can do the same for checking the TS types before pushing.
echo "npm run typecheck" > .husky/pre-pushAnd now we can let our imagination run wild when it comes to automating tasks with git hooks.
For JavaScript developers like me who aren’t big fans of scripting, it’s also possible to use Husky with Bun, and with that go through Bun Shell!
Going Further
Before concluding, I wanted to mention GitHooks. It’s a site that brings together examples of hooks to help you automate your tasks. You’ll find examples for basic git hooks, but also for hooks that are more specific to certain tools, such as Prettier, ESLint and so on.
Among the tools mentioned is pre-commit. It’s a framework that lets you use a hook library in different languages, giving you very powerful hooks depending on the task at hand.
Conclusion
Git Hooks are powerful tools for automating your tasks. They can be used to launch scripts at key moments in your workflow. They can be used to check the quality of your code, automate repetitive tasks or standardize commit messages. It’s up to you to use them wisely.
I use the pre-commit hook a lot, combining the conventional commit rule with a linter. This way, I make sure my commits are easy to understand, and pull request reviews are simpler because the code is already clean.
Authors
Full-stack web developer at marmelab, Anthony seeks to improve and learn every day. He likes basketball, motorsports and is a big Harry Potter fan