
Building AI-Powered Browser Extensions With WXT

To streamline form entry on web pages, I created an AI-powered browser extension that extracts information from one tab and automatically populates form fields in another. I’ve named it FormAIdable.
Imagine you’re completing a CRM entry for a new contact. With FormAIdable, you can open their LinkedIn profile in one tab, then use the extension to intelligently extract their name, position, company, and other details to fill your form with just one click. No more switching back and forth between tabs, copying and pasting each field individually.
Building a browser extension isn’t straightforward. With conflicting standards, arcane permissions, and a poor developer experience, it can be a nightmare. But with the right tools, it can become a real pleasure. In this article, I’ll share my experience building FormAIdable using WXT, a framework that simplifies the development of browser extensions.
Tip: You can find the extension on the Chrome Web Store at FormAIdable, and the source code on GitHub at marmelab/FormAIdable
Browser Extension Development: Welcome to Hell

I have already tried to develop an extension for Chrome in the past, so I know what an adventure it can be. What starts out as a simple project quickly becomes a labyrinth of restrictions, forced updates and frustrating incompatibilities. Let me list a few of the pain points.
Manifest v2 and v3
Developing an extension always starts with a key element: the manifest. This JSON file serves as a blueprint, defining the extension’s permissions, functionality and overall behavior. Without it, it’s impossible to get anything to work.
Historically, Manifest V2 was supported by both Chrome and Firefox. But Google has decided to change their manifest format to v3, removing some features and making others more restrictive. Firefox, for its part, offers only partial compatibility with this new version.
Let’s take a concrete example: here’s what manifest V2 and V3 look like for my extension. You’ll quickly notice differences in permissions, host_permissions and actions management. And I’m using a very basic extension.
{ "manifest_v3": { "manifest_version": 3, "name": "FormAIdable", "description": "FormAIdable enhances form interactions on web pages by enabling autocomplete functionality using data from another Chrome tab.", "version": "0.0.1", "icons": { "16": "icon/16.png", "32": "icon/32.png", "48": "icon/48.png", "96": "icon/96.png", "128": "icon/128.png" }, "permissions": ["tabs", "scripting"], "host_permissions": ["<all_urls>"], "action": { "default_title": "FormAIdable", "default_popup": "popup.html" } }, "manifest_v2": { "manifest_version": 2, "name": "FormAIdable", "description": "FormAIdable enhances form interactions on web pages by enabling autocomplete functionality using data from another Chrome tab.", "version": "0.0.1", "icons": { "16": "icon/16.png", "32": "icon/32.png", "48": "icon/48.png", "96": "icon/96.png", "128": "icon/128.png" }, "permissions": ["tabs", "scripting", "<all_urls>"], "browser_action": { "default_title": "FormAIdable", "default_popup": "popup.html" } }}To develop an extension that is fully compatible with both browsers, I must provide these two manifests.
Extension APIs Are Browser-Specific
Browsers provide different global variables for accessing the extension APIs:
browser.*, used by Firefox and Safari (documentation).chrome.*, used by Chrome, Opera, and Edge (documentation)
Take a look at the Build a cross-browser extension tutorial on MDN to get an idea of the differences between the two APIs.
Testing Is Not So Fun
Once you’ve written the browser extension code, it’s time to test it.
In Chrome, you’ll need to build your code, then load the extension in developer mode via chrome://extensions/, and manually import the dist folder. Only then will you be able to access and test your extension.
And every time you make a change, you’ll have to build, delete and reload the extension.
Oh, and of course you’ll have to repeat all that on Firefox too, with its own subtleties.
In short, it’s tedious, repetitive… and quickly becomes a living hell. And I hate it.
Using the Right Tools
The first time I developed a browser extension, I used no special tools. I discovered the problems listed above the hard way, and it was not a pleasant experience.
Other developers have faced the same issues and have created tools to help us. So instead of starting from scratch, I recommend using a framework that simplifies the development of browser extensions.
Most notably, I recommend three JS libraries designed to simplify the development of browser extensions:
I used WXT to develop FormAIdable, and it completely changed my Developer Experience, making it fun and productive. I’ll show you how to use it in the rest of this article.
Bootstrapping An Extension
In my opinion, the biggest strength of WXT is that it’s based on Vite, so you can use the frontend framework of your choice. For my part, I went with React.
WXT provides a CLI that you can use to get started quickly.
npx wxt@latest initThe CLI is interactive, and it will ask you to choose a template. For this project, I chose the react template.
This generates a new Vite project with a predefined structure.
📂 {rootDir}/ 📁 assets/ 📁 entrypoints/ 📁 public/ 📄 .gitignore 📄 README.md 📄 package.json 📄 tsconfig.json 📄 wxt.config.tsYou can start the extension with the following command:
npm run devAdding An Entrypoint
An extension can be made of several pieces (a background runner, a popup that appears when clicking on the extension icon, a script that executes on certain pages, etc.), you need to define its entrypoints.
WXT uses the files inside the entrypoints/ directory as inputs when bundling your extension, kind of like what Next.js does with file-based routing.
For FormAIdable, I want a visual interface when I click on my extension’s icon. So I’m going to define an entrypoints/popup folder, and add a React component that will be used as the popup.
import { useState } from 'react';import { TabsSelect } from './components/TabsSelect';import { FormsList } from './components/FormsList';import { useFillForm } from './hooks/useFillForm';
function Popup() {    const [selectedTab, setSelectedTab] = useState<number | undefined>(undefined);    const [selectedForm, setSelectedForm] = useState<Form | undefined>(undefined);    const { fillForm, loading } = useFillForm();
    async function handleSubmit(event: React.FormEvent) {        event.preventDefault();        if (selectedTab && selectedForm) {            await fillForm(selectedTab, selectedForm);        }    }
    return (        <div>            <form onSubmit={handleSubmit}>                <TabsSelect selectedTab={selectedTab} setSelectedTab={setSelectedTab} />                <FormsList selectedForm={selectedForm} setSelectedForm={setSelectedForm} />                <button type="submit" disabled={!selectedForm || !selectedTab || loading}>                    {loading ? 'Filling...' : 'Fill form'}                </button>            </form>        </div>    );}
export default Popup;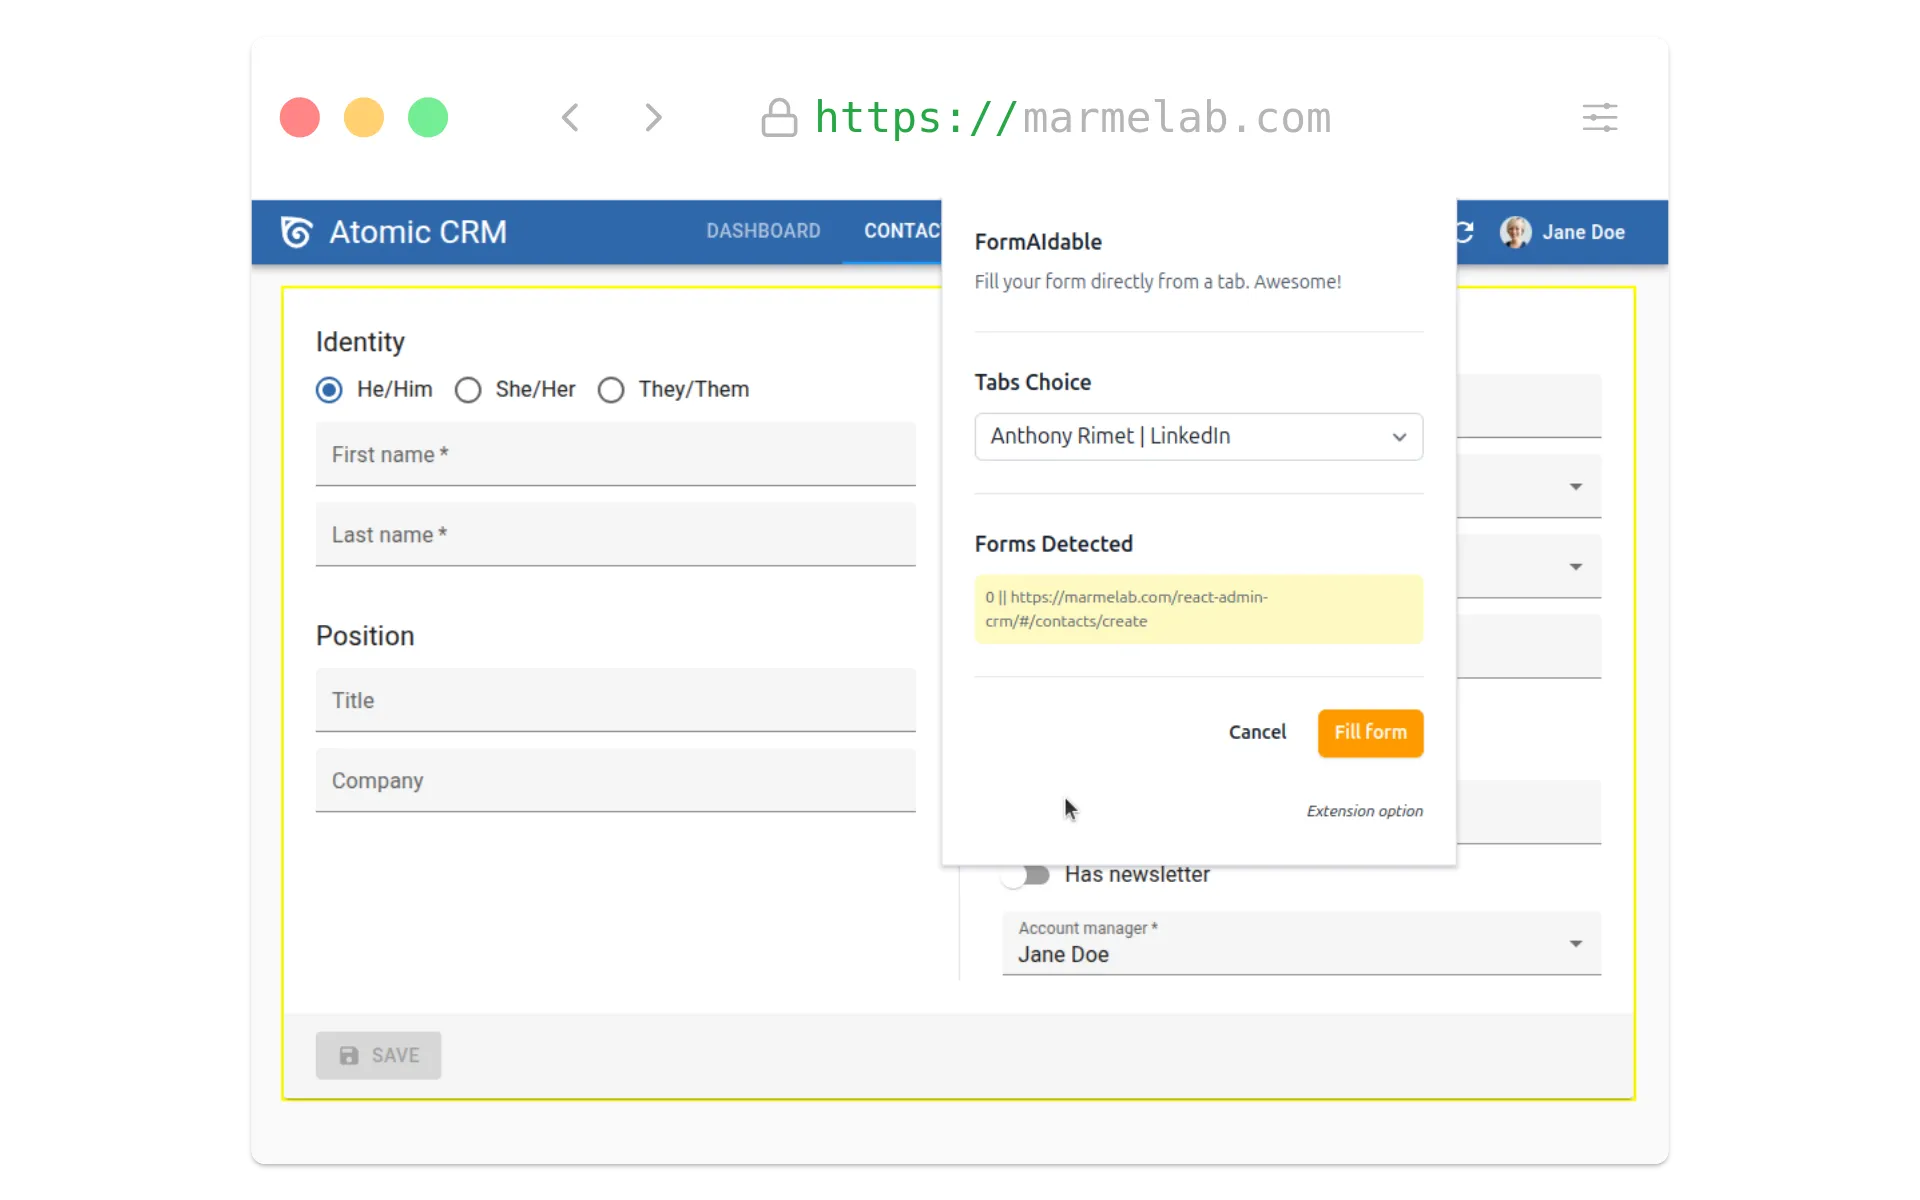
The <TabsSelect> component lets the user choose another browser tab. Once the user has chosen a tab, the fillForm function needs to get data from that tab.
Getting Data from another tab
To get the data from another tab, I’m going to use the tabs API to list all browser tabs:
useEffect(() => { browser.tabs.query({}, (tabs) => { // Filter out the current tab browser.tabs.query( { active: true, currentWindow: true }, (currentTab) => { const filteredTabs = tabs.filter( (tab) => tab.id !== currentTab[0].id, ); setTabs(filteredTabs); }, ); });}, []);WXT simplifies the access to the extension API: I always use browser and it works on all browsers. It’s added to the global scope, so you don’t need to import it.
Next, to read the content of the tab, I need to circumvent a browser security policy: they isolate and secure DOM manipulation from a popup. So I have to use the scripting API and its executeScript function to inject a script into the chosen tab and execute it.
// I will get the content of the first tab for this exampleconst tabId = filteredTabs[0].id;const result = await browser.scripting.executeScript({    target: { tabId },    func: () => {        return document.body.outerHTML;    },});if (!result[0].result) {    throw new Error('No HTML found');}
const tabHtml = result[0].result as string;
To let WXT execute this script, I need to add some permissions to my manifest.
Defining Permissions
In WXT, there is no manifest.json file in the source code. Instead, WXT generates the manifest from multiple sources:
- Global options defined in the wxt.config.ts file
- Entrypoint-specific options defined in the entrypoints
- WXT Modules added to the project can modify the manifest
- Hooks defined in the project can modify the manifest
In my case, I need to add the scripting and tab permission to my manifest manually. I do this in a wxt.config.ts file.
import { defineConfig } from 'wxt';// See https://wxt.dev/api/config.html
export default defineConfig({    extensionApi: 'chrome',    modules: ['@wxt-dev/module-react'],    manifest: {        permissions: ['tabs', 'scripting'],        host_permissions: ['<all_urls>'],    },});
Using an LLM to Extract Structured Data From Raw HTML
In the same way as the previous step, FormAIdable uses the tabs and scripting APIs to find all Form elements in the current (active) tab, let the user choose one and then extract the names of the fields in the form. I won’t show the code here as it uses the same approach as the previous step.
Next, I’m going to use an LLM (here, GPT-4o-mini from OpenAI) to find, in the source tab HTML, the content to fill the fields on the active tab form.
import { z } from 'zod';import { zodResponseFormat } from 'openai/helpers/zod.mjs';import { OpenAI } from 'openai';
const getFieldValues = async (    tabHtml: string,    fieldNames: string[],): Promise<any> => {    const tabHtmlLength = tabHtml.length;
    // cut tabHtml from being too long. We don't want to exceed 128000 tokens    const maxTokens = 100000;    if (tabHtmlLength > maxTokens) {        const ratio = maxTokens / tabHtmlLength;        const newLength = Math.floor(tabHtmlLength * ratio);        tabHtml = tabHtml.substring(0, newLength);    }
    // Call OpenAI API to get the field values    const completion = await openai.beta.chat.completions.parse({        model: 'gpt-4o-mini-2024-07-18',        messages: [            {                role: 'system',                content: `                    You are a structured information extractor.                    You will receive a raw HTML string and a list of field names.                    Your task is to extract the values associated with these field names from the HTML.                    If a field name is not found in the HTML, you can extrapolate its value based on other data in the HTML.`            },            {                role: 'user',                content: `                    Field list: ${JSON.stringify(fieldNames)}                    HTML: ${tabHtml}`,            },        ],        response_format: zodResponseFormat(EnrichedFieldsSchema, 'fieldNames'),        temperature: 0.5,        max_tokens: 3000,    });
    const enrichedFields = completion.choices[0].message.parsed;
    if (!enrichedFields) {        throw new Error('No enriched fields found');    }
    return enrichedFields as EnrichedFields;};
const EnrichedFieldSchema = z.object({    name: z.string(),    placeholder: z.string(),    id: z.string(),    associatedValue: z.string(),});
const EnrichedFieldsSchema = z.object({    fieldNames: z.array(EnrichedFieldSchema),});
The most useful part of this function for me is the response_format. It allows me to define a schema for the response. This way, I can be sure that the response will always be in the format I expect.
Filling the form
Now that I have extracted structured data from the source HTML, I’m going to use the scripting API again to fill the form in the active tab.
await browser.scripting.executeScript({    target: { tabId: tabId },    func: (formId, enrichedFields) => {        try {            const form =                document.getElementById(formId as string) ??                document.forms[Number(formId)];
            enrichedFields.formFields.forEach((enrichedField) => {                // Find the associated field in the form                {...}
                if (currentFormField) {                    const inputElement = currentFormField as HTMLInputElement;                    inputElement.value = enrichedField.associatedValue;
                    // Dispatch input event to trigger any listeners                    // Used for React controlled components. Thanks copilot!                    const event = new Event('input', { bubbles: true });                    inputElement.dispatchEvent(event);                }            });
            return true;        } catch (error) {            console.error('Error filling form:', error);            return false;        }    },    args: [selectedForm.id, enrichedFields],});
inputElement.dispatchEvent(event); is a very important line. It allows you to trigger any listeners on the input. This is very useful for React controlled components, for example.
Conclusion
I’ve always had headache developing browser extensions. But with the right tools, I found it can become a real pleasure. WXT is a great framework that simplified the development of my extension. It allowed me to use the frontend framework of my choice, and it took care of the manifest for me.
Authors
Full-stack web developer at marmelab, Anthony seeks to improve and learn every day. He likes basketball, motorsports and is a big Harry Potter fan