<CustomRoutes>
Lets you define custom pages in your ra-core application, using react-router-dom <Routes> elements.
To register your own routes, pass one or several <CustomRoutes> elements as children of <CoreAdmin>. Declare as many <Route> as you want inside them.
// in src/App.jsimport { CoreAdmin, Resource, CustomRoutes } from 'ra-core';// see below for Route import
import { dataProvider } from './dataProvider';import posts from './posts';import comments from './comments';import { Settings } from './Settings';import { Profile } from './Profile';
const App = () => (    <CoreAdmin dataProvider={dataProvider}>        <Resource name="posts" {...posts} />        <Resource name="comments" {...comments} />        <CustomRoutes>            <Route path="/settings" element={<Settings />} />            <Route path="/profile" element={<Profile />} />        </CustomRoutes>    </CoreAdmin>);
export default App;
The Route element depends on the routing library you use (e.g. react-router or tanstack-router):
// for react-routerimport { Route } from 'react-router-dom';// for tanstack-routerimport { tanStackRouterProvider } from 'ra-router-tanstack';const { Route } = tanStackRouterProvider;Now, when a user browses to /settings or /profile, the components you defined will appear in the main part of the screen.
children
Section titled “children”children of the <CustomRoutes> component must be <Route> elements from react-router-dom, mapping a path with a custom element.
// in src/App.jsimport { CoreAdmin, Resource, CustomRoutes } from 'ra-core';import { Route } from "react-router-dom";
import { dataProvider } from './dataProvider';import { Settings } from './Settings';import { Profile } from './Profile';
const App = () => (    <CoreAdmin dataProvider={dataProvider}>        <CustomRoutes>            <Route path="/settings" element={<Settings />} />            <Route path="/profile" element={<Profile />} />        </CustomRoutes>    </CoreAdmin>);
export default App;
You can learn more about the <Route> element in the react-router-dom documentation.
noLayout
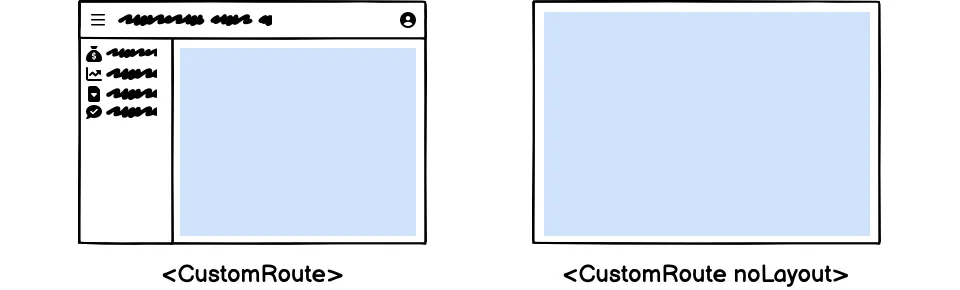
Section titled “noLayout”By default, custom routes render within the application layout. If you want a custom route to render without the layout, e.g. for registration screens, then provide the noLayout prop on the <CustomRoutes> element.
Here is an example of application configuration mixing custom routes with and without layout:
// in src/App.jsimport { CoreAdmin, CustomRoutes } from 'ra-core';import { Route } from "react-router-dom";
import { dataProvider } from './dataProvider';import { Register } from './Register';import { Settings } from './Settings';import { Profile } from './Profile';
const App = () => (    <CoreAdmin dataProvider={dataProvider}>        <CustomRoutes noLayout>            <Route path="/register" element={<Register />} />        </CustomRoutes>        <CustomRoutes>            <Route path="/settings" element={<Settings />} />            <Route path="/profile" element={<Profile />} />        </CustomRoutes>    </CoreAdmin>);
As illustrated above, there can be more than one <CustomRoutes> element inside a <CoreAdmin> component.
Securing Custom Routes
Section titled “Securing Custom Routes”By default, custom routes can be accessed even by anomymous users. If you want to restrict access to authenticated users, use the <Authenticated> component when defining the route.
// in src/App.jsimport { CoreAdmin, CustomRoutes, Authenticated } from 'ra-core';import { Route } from "react-router-dom";
import { dataProvider } from './dataProvider';import { Settings } from './Settings';
const App = () => (    <CoreAdmin dataProvider={dataProvider}>        <CustomRoutes>            <Route path="/settings" element={<Authenticated><Settings /></Authenticated>} />        </CustomRoutes>    </CoreAdmin>);
Linking To Custom Routes
Section titled “Linking To Custom Routes”You can link to your pages using react-router’s Link component. Make sure to use the same value in the <Link to> prop as in the <Route path> prop.
import { Link } from 'react-router-dom';
const SettingsButton = () => (    <Link to="/settings">        Settings    </Link>);
Since you’re using a headless setup, you have complete control over the styling of your links.
Sub-Routes
Section titled “Sub-Routes”Sometimes you want to add more routes to a resource path. For instance, you may want to add a custom page to the /posts resource, such as /posts/analytics.
To do so, add the <Route> elements as children of the <Resource> element:
import { CoreAdmin, Resource } from 'ra-core';import { Route } from "react-router-dom";
import { dataProvider } from './dataProvider';import posts from './posts';
const App = () => (    <CoreAdmin dataProvider={dataProvider}>        <Resource name="posts" {...posts}>            <Route path="analytics" element={<PostAnalytics/>} />        </Resource>    </CoreAdmin>);
// is equivalent toconst App = () => (    <CoreAdmin dataProvider={dataProvider}>        <Resource name="posts" {...posts} />        <CustomRoutes>            <Route path="/posts/analytics" element={<PostAnalytics />} />        </CustomRoutes>    </CoreAdmin>);
This is usually useful for nested resources, such as books on authors:
// in src/App.jsimport { CoreAdmin, Resource } from 'ra-core';import { Route } from "react-router-dom";import { AuthorList } from './AuthorList';import { AuthorEdit } from './AuthorEdit';
const App = () => (    <CoreAdmin dataProvider={dataProvider}>        <Resource name="authors" list={AuthorList} edit={AuthorEdit}>            <Route path=":authorId/books" element={<BookList />} />        </Resource>    </CoreAdmin>);
// in src/BookList.jsimport { useParams } from 'react-router-dom';import { ListBase, RecordsIterator } from 'ra-core';
const BookList = () => { const { authorId } = useParams(); return ( <ListBase resource="books" filter={{ authorId }}> <div> <h1>Books</h1> <ul> <RecordsIterator render={book => ( <li key={book.id}> {book.title} ({book.year}) </li> )} /> </ul> </div> </ListBase> );};Tip: In the above example, the resource="books" prop is required in <ListBase> because the ResourceContext defaults to authors inside the <Resource name="authors">.
Check the <Resource> element documentation for more information.