
React-Admin Authentication Using Active Directory

The Microsoft Authentication Library (MSAL) enables developers to acquire security tokens from the Microsoft identity platform to authenticate users and access secured web APIs. It can be used to provide secure access to Microsoft Graph, other Microsoft APIs, third-party web APIs, or your web API. MSAL supports many different application architectures and platforms including .NET, JavaScript, Java, Python, Android, and iOS.
This tutorial will show you, step by step, how to configure a React-Admin application to use Azure Active Directory as an authentication provider.
We will start by configuring a new application in Azure Active Directory. Then, we will create users and groups that will be used for our future application. Finally, we will build a new local React-Admin application with a fresh install and use ra-auth-msal to handle authentication with Active Directory.
Configuring Azure Active Directory
First of all, you need to log in (or create an account if you don’t have one yet) to the Azure portal.
If you have issues setting up your Azure Active Directory instance, you may need to subscribe to the Azure Active Directory services. Microsoft may offer free trial, feel free to check your eligibity for this.
Optional Step: Select a Tenant
If it’s your first time using Active Directory, you probably only have one tenant, so you can skip this step.
If you have access to multiple tenants, you will need to choose in which tenant you want to register the new application we are going to configure. Use the filter in the top menu, type directories or subscriptions to list the available tenants and pick one.
Create The Application
Let’s create a new application in Azure Active Directory. This application will be used to authenticate users and to provide them with access to the React-Admin application.
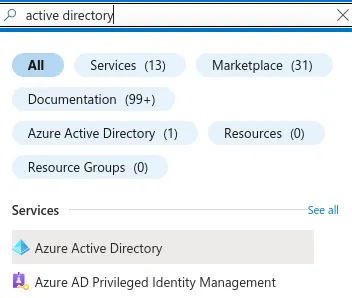
- After signing up to Azure portal, search for and select Azure Active Directory.
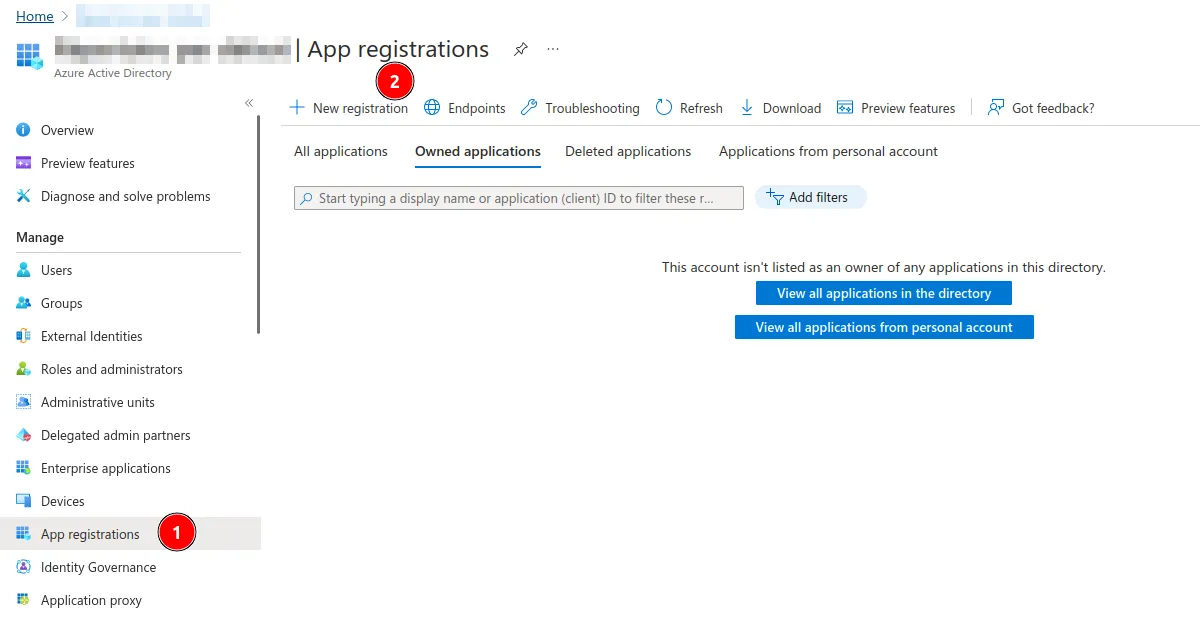
- Select App registrations under Manage and click on New registration.
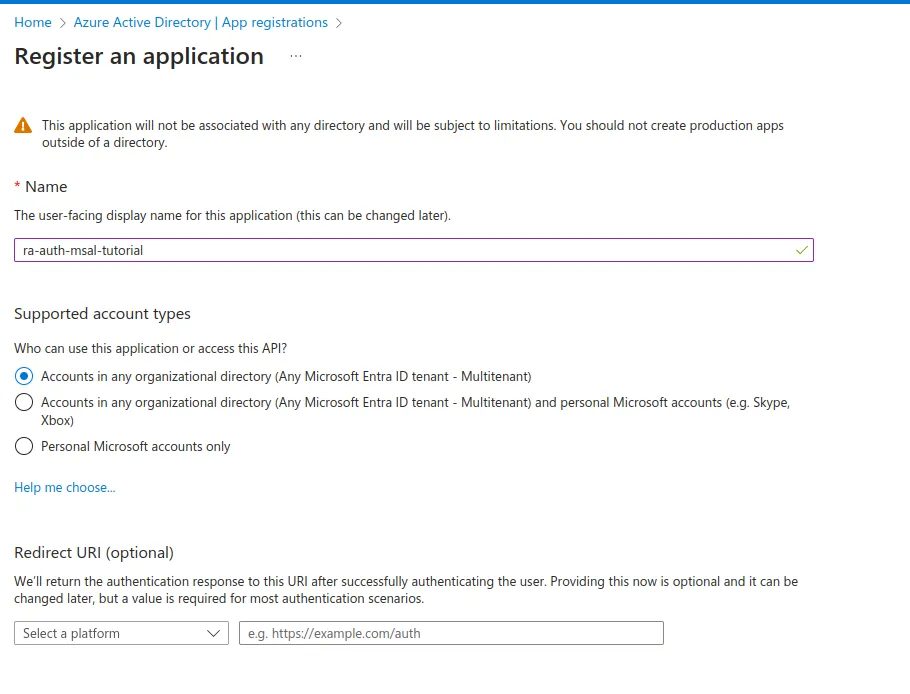
- Enter a Name for your application. Users of your app might see this name, but you can change it later. Under Supported account types, select Accounts in any organizational directory and click on Register.
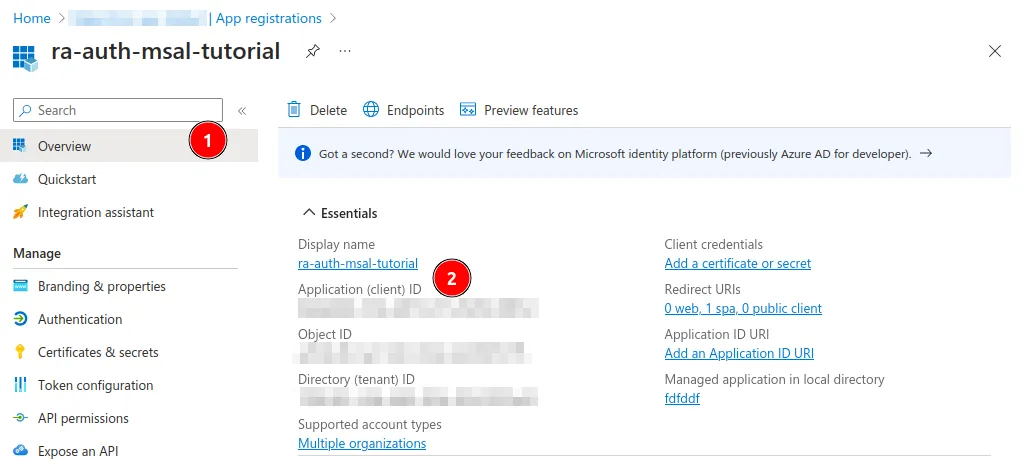
- You should be redirected to the Application Overview page. Note the Application (client) ID value to use it later.
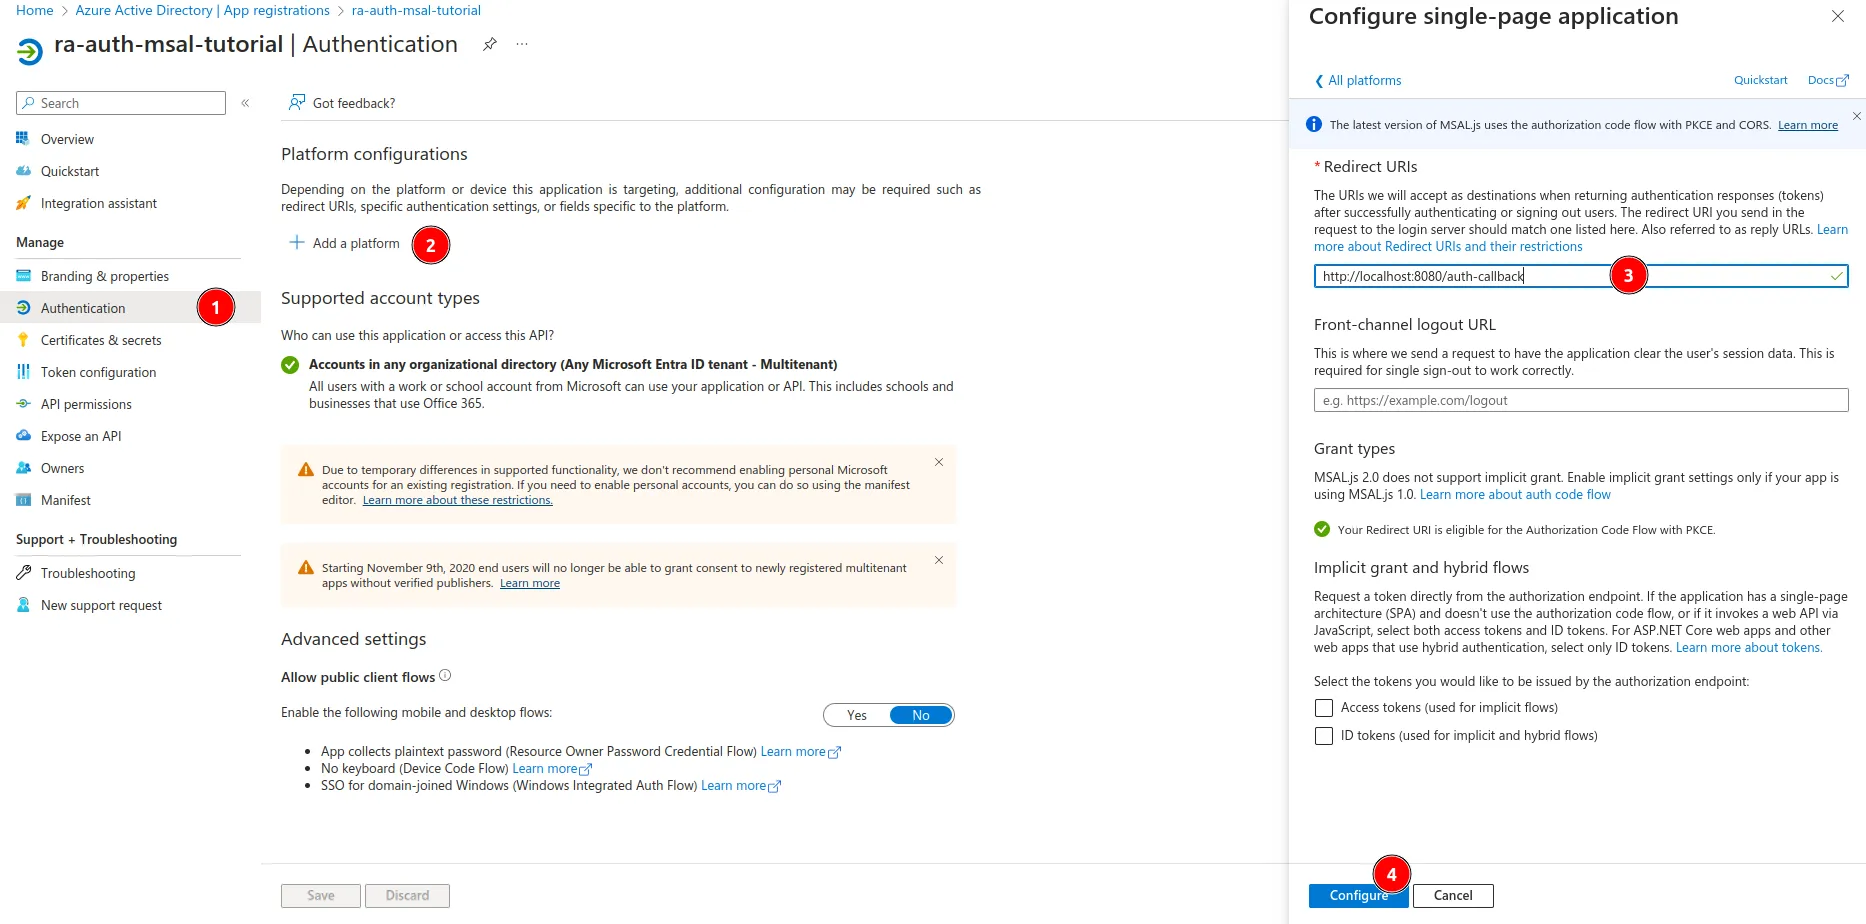
- Stay on this page and choose Authentication. Select Add a platform on the view that opens. In the left pane, select Single-page application, set the Redirect URI value to
http://localhost:8080/auth-callback(for now) and click on the Configure button.
Add Users
Now it is time to create some users and some groups, which will enable us to demonstrate the permissions feature.
-
In the top filter, search for and select Azure Active Directory.
-
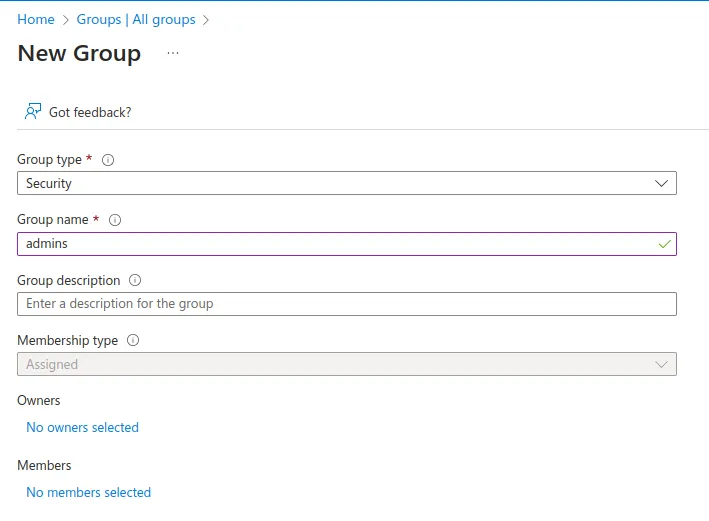
Under Groups, create a new group of type Security, called
admins. Leave all the other options to their default values.
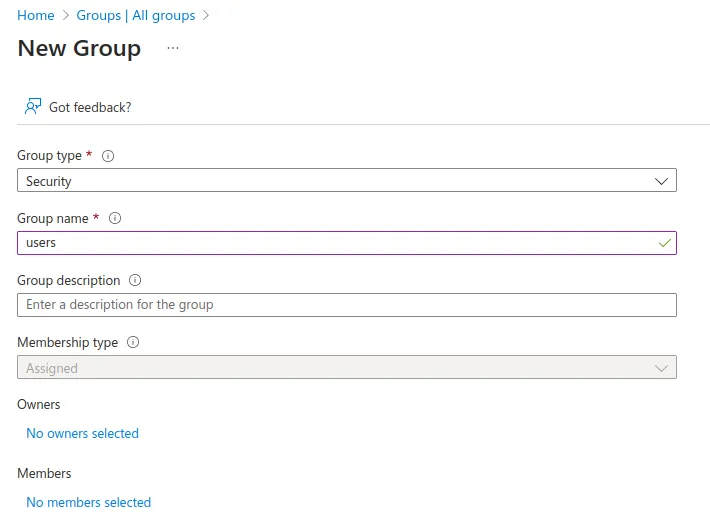
- In the same way, create a second group called
users.
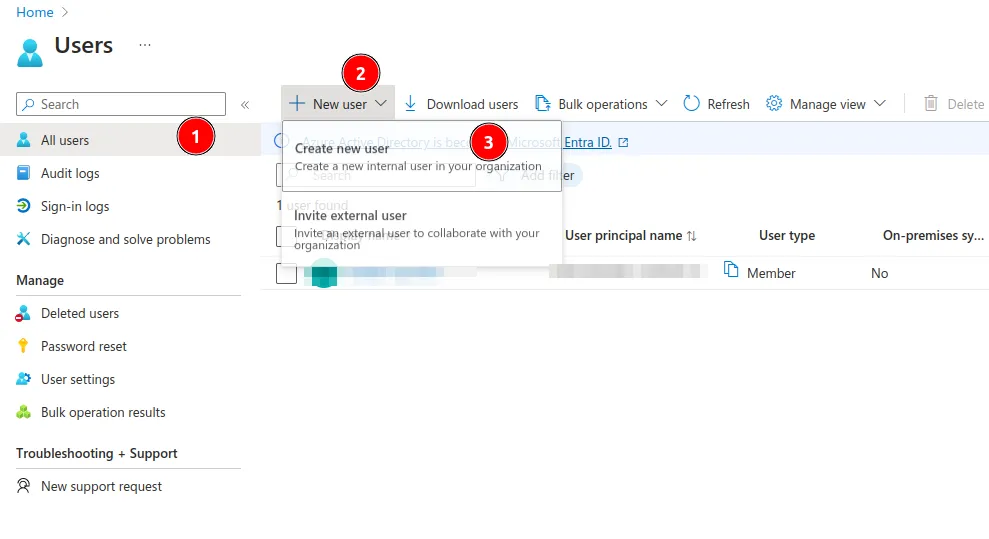
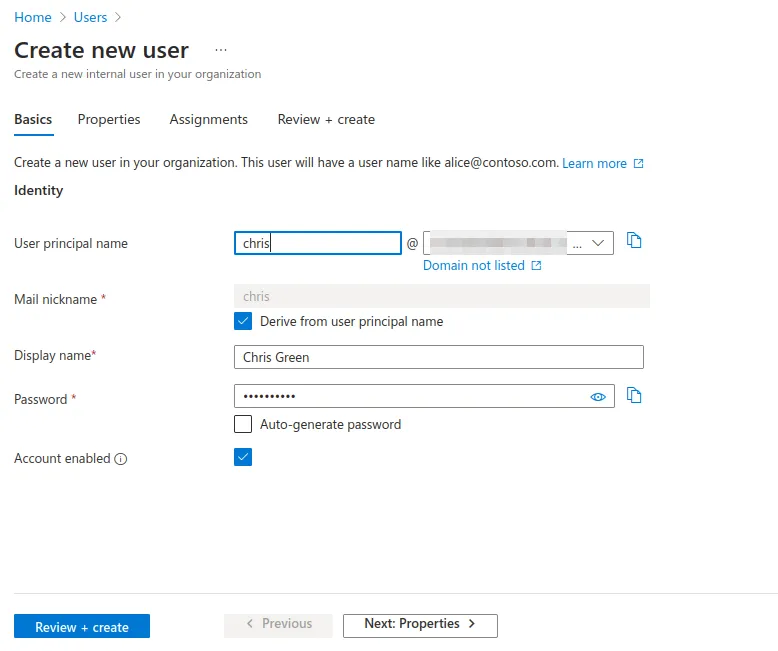
- In the top filter bar, search and choose Users, click on New user and on Create a user.
- Type
chrisin the User Name field andChris Greenin the Name field. In Password, select Allow me to create the password, choose a password of your choice and don’t forget it.
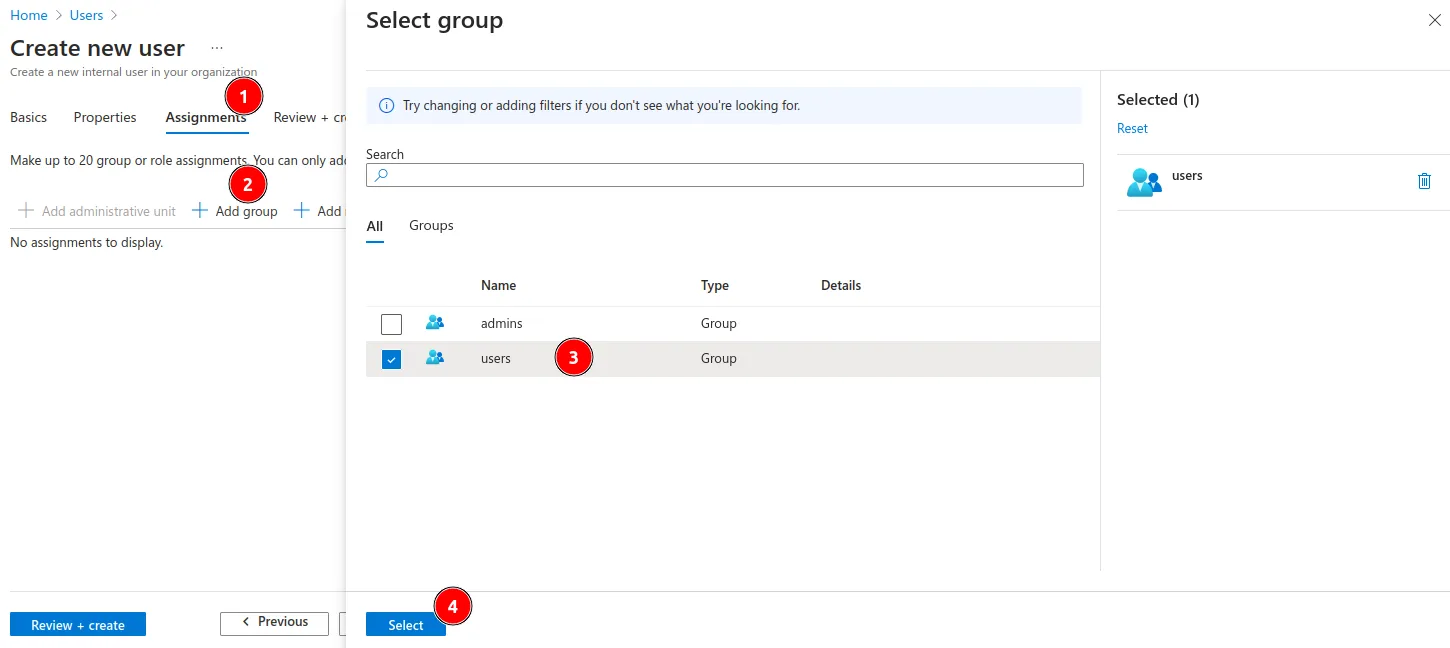
- In Assignments, select only the users group, and click Select.
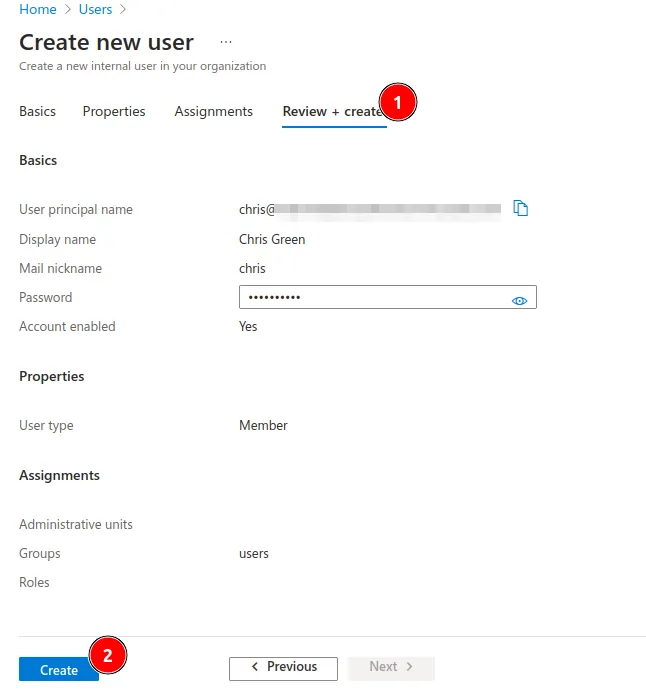
- Click on Review and Create to finish the user creation.
- Repeat the same steps to create a second user, called
John Smith, and assign it to both theusersandadminsgroups.
Include The Group Claims In The ID Token
Lastly, we need to configure the app to include the group claims in the ID token. [Group claims][https://learn.microsoft.com/en-us/security/zero-trust/develop/configure-tokens-group-claims-app-roles] are used to configure additional information that is returned in one or more tokens.
We need to configure these group claims to tell Azure Active Directory to include some additional information in the token like the group IDs. Without this information, our application will not know which group the user belongs to.
-
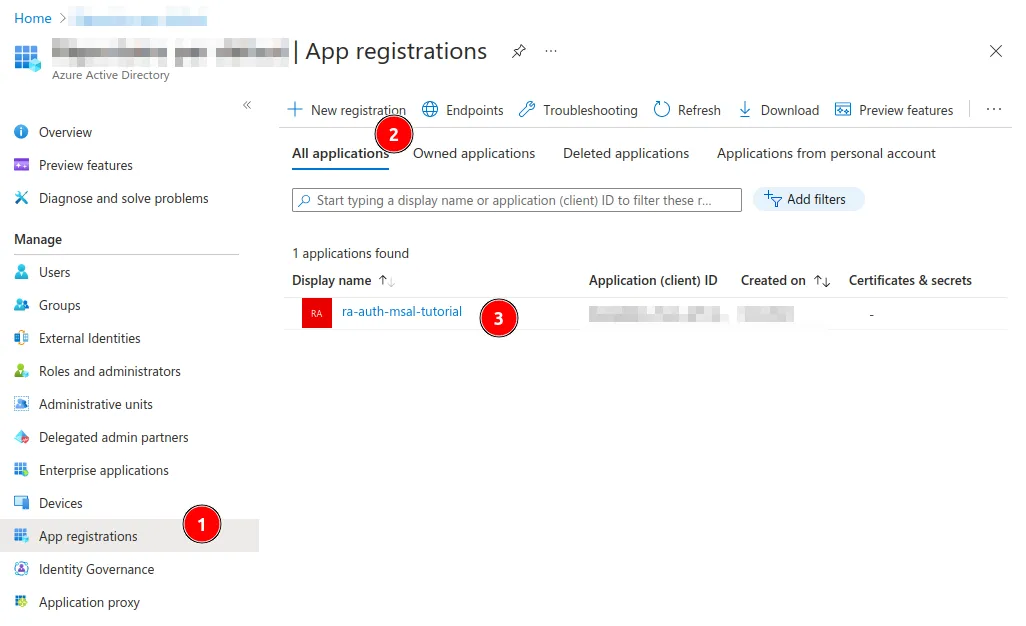
In the top filter, search for and select Azure Active Directory.
-
Select App registrations under Manage and select the application you created before.
-
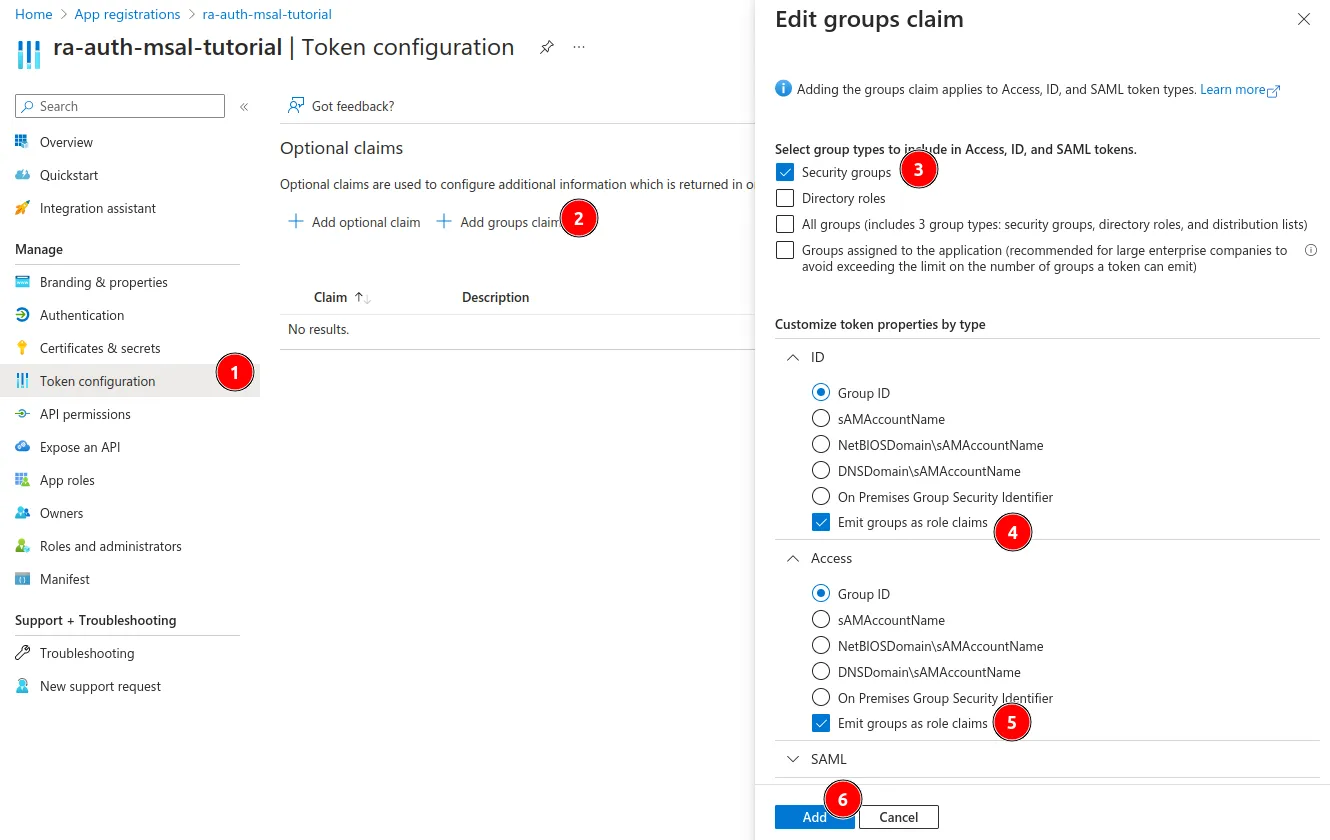
Once you have seen the application overview, select Token configuration, and click on Add groups claim.
-
In the pane that opens, select Security groups and check the Emit group claims as a role checkbox inside both the ID and Access sections. Finally, click Add.
Integrating Azure Active Directory With React-Admin
We will create a new React-Admin application using create-react-admin. Navigate to the folder of your choice, and run the following command in a terminal to create a new React-Admin application:
yarn create react-admin ra-auth-msal-tutorialChoose Fakerest as the data provider, then None as the auth provider since we will create our own.
Next, install ra-auth-msal, the MSAL auth provider for react-admin.
yarn add ra-auth-msal# ornpm install --save ra-auth-msalTo configure MSAL credentials, create a .env file at the root of the project and file the variables with the values you noted earlier:
# Please fill in the VITE_MSAL_CLIENT_ID with the Application (client) ID you noted earlier.VITE_MSAL_CLIENT_ID="12345678-1234-1234-1234-123456789012"VITE_MSAL_AUTHORITY="https://login.microsoftonline.com/common"VITE_APP_BASE_URI="http://localhost:8080"Create a file called authConfig.ts in src which will be used to configure ra-auth-msal, with the following content:
import { Configuration } from "@azure/msal-browser";
export const msalConfig: Configuration = {  auth: {    // 'Application (client) ID' of app registration in Azure portal - this value is a GUID    clientId: import.meta.env.VITE_MSAL_CLIENT_ID,    // Full directory URL, in the form of https://login.microsoftonline.com/<tenant-id>    authority: import.meta.env.VITE_MSAL_AUTHORITY,    // Full redirect URL, in form of http://localhost:8080/auth-callback    redirectUri: `${import.meta.env.VITE_APP_BASE_URI}/auth-callback`,    // We need to disable this feature because it is already handled by react-admin, and would otherwise conflict    navigateToLoginRequestUrl: false,  },  cache: {    cacheLocation: "sessionStorage", // This configures where your cache will be stored    storeAuthStateInCookie: false, // Set this to "true" if you are having issues on IE11 or Edge  },};
Create an authProvider.ts file in src with the following content:
import { msalAuthProvider } from "ra-auth-msal";import { PublicClientApplication } from "@azure/msal-browser";import { msalConfig } from "./authConfig";
const myMSALObj = new PublicClientApplication(msalConfig);
export const authProvider = msalAuthProvider({  msalInstance: myMSALObj,});
Lastly, paste the following code in src/App.tsx to configure the Admin component with the authProvider you have just created:
import {  Admin,  Resource,  ListGuesser,  EditGuesser,  ShowGuesser,} from "react-admin";import { BrowserRouter } from "react-router-dom";import { LoginPage } from "ra-auth-msal";
import { dataProvider } from "./dataProvider";import { authProvider } from "./authProvider";
export const App = () => (  <BrowserRouter>    <Admin      dataProvider={dataProvider}      authProvider={authProvider}      loginPage={LoginPage}    >      <Resource        name="posts"        list={ListGuesser}        edit={EditGuesser}        show={ShowGuesser}      />      <Resource        name="comments"        list={ListGuesser}        edit={EditGuesser}        show={ShowGuesser}      />    </Admin>  </BrowserRouter>);
Note that you need to wrap the <Admin> component in a <BrowserRouter> for the ra-auth-msal library to work. Indeed, ra-auth-msal uses a hash-based routing strategy when redirecting back to your app, which is currently incompatible with a <HashRouter>.
Thanks to the ra-auth-msal package, you can avoid an application flashlight on the login page, by using the LoginPage component it provides. Otherwise, your users would see the default Login component provided by react-admin, and right after they would be redirected to the Microsoft login page.
Finally, run your application with yarn dev --port 8080 to make it using the 8080 port and hence, match the redirectUri and auth-callback configured earlier.
Now that all is configured and running, you can browse to http://localhost:8080/ to access the React Admin App. You should be redirected to the Azure Active Directory login page.
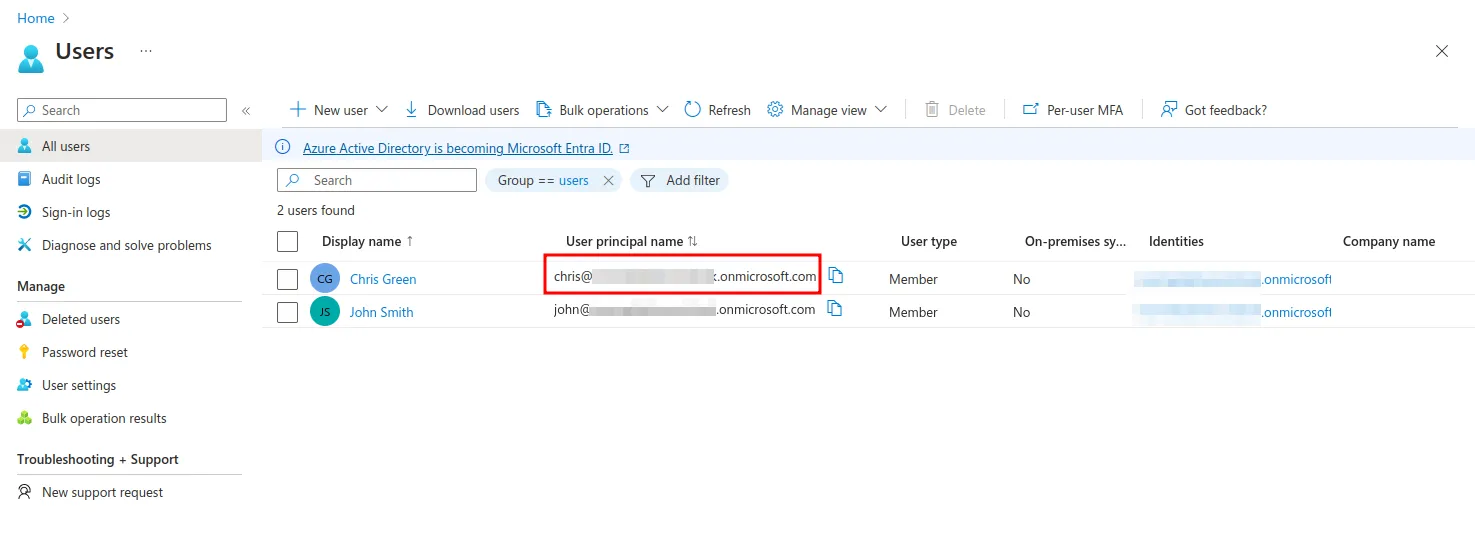
You can sign in with Chris Green by filling in the login username with the entire User principal name of this user. This value can be found under Users in Azure Active Directory:
The first time you sign in with any of the users, you’ll have to enter their temporary password and will be asked to enter a password of your choice.
Handling Permissions
We can sign in with Chris Green or John Smith. However, the React-Admin app does not currently use their roles, so they see the same resources.
Thanks to the groups claim we configured earlier to handle permissions, we can map the group IDs to roles, and then use the roles to restrict access to certain resources.
Map the roles, and implement the getPermissionsFromAccount function in src/authConfig.js:
import { Configuration } from "@azure/msal-browser"; import { Configuration, AccountInfo } from "@azure/msal-browser";
export const msalConfig: Configuration = { auth: { // 'Application (client) ID' of app registration in Azure portal - this value is a GUID clientId: import.meta.env.VITE_MSAL_CLIENT_ID, // Full directory URL, in the form of https://login.microsoftonline.com/<tenant-id> authority: import.meta.env.VITE_MSAL_AUTHORITY, // Full redirect URL, in the form of http://localhost:8080/auth-callback redirectUri: `${import.meta.env.VITE_APP_BASE_URI}/auth-callback`, // We need to disable this feature because it is already handled by react-admin, and would otherwise conflict navigateToLoginRequestUrl: false, }, cache: { cacheLocation: "sessionStorage", // This configures where your cache will be stored storeAuthStateInCookie: false, // Set this to "true" if you are having issues on IE11 or Edge },};
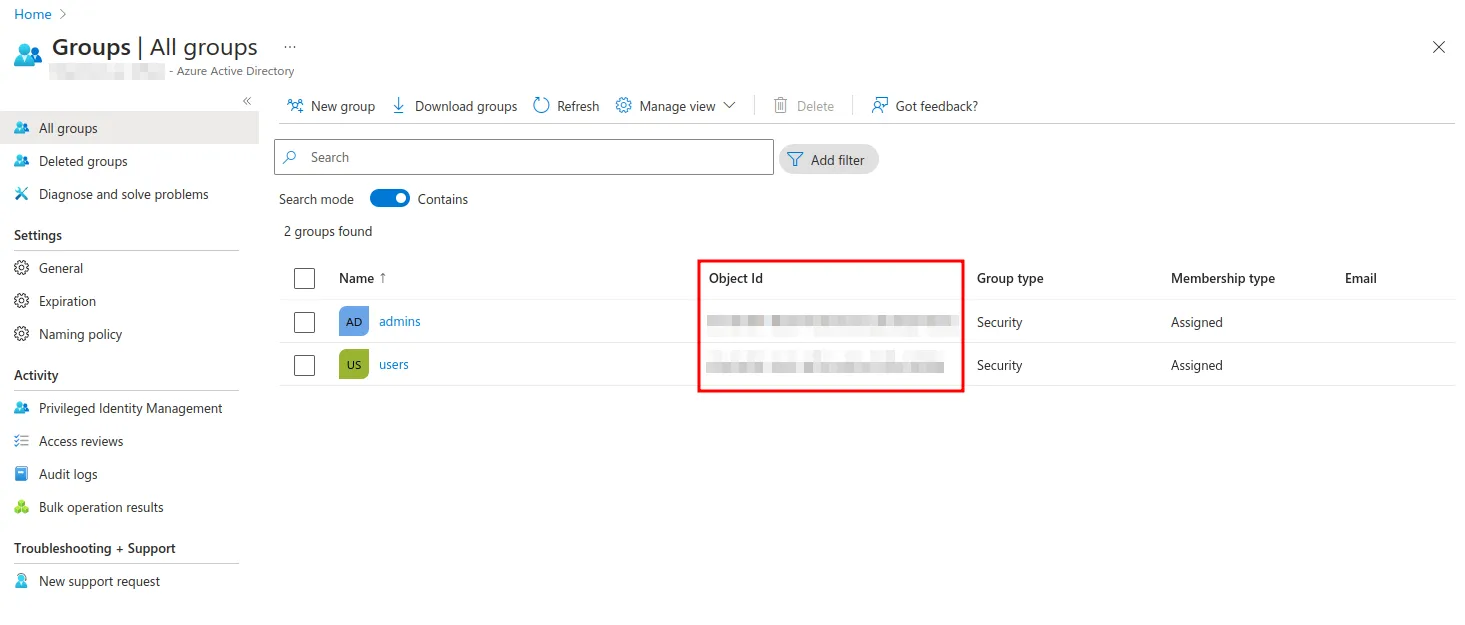
/** * Customize this map to match your own roles and permissions */ const rolesPermissionMap: Record<string, string> = { "12345678-1234-1234-1234-123456789012": "user", "12345678-1234-1234-1234-123456789012": "admin", };
/** * Custom function to map roles to permissions, using the rolesPermissionMap above. * Alternatively, you can use the MS Graph API to get more information about the user's roles and groups. */ export const getPermissionsFromAccount = async (account: AccountInfo) => { const roles = account?.idTokenClaims?.roles ?? []; return roles.map((role) => rolesPermissionMap[role]); };Groups IDs can be found under Groups in Azure Active Directory:
Call the getPermissionsFromAccount implementation in src/authProvider.ts:
import { msalAuthProvider } from "ra-auth-msal";import { PublicClientApplication } from "@azure/msal-browser"; import { msalConfig } from "./authConfig"; import { msalConfig, getPermissionsFromAccount } from "./authConfig";
const myMSALObj = new PublicClientApplication(msalConfig);
 export const authProvider = msalAuthProvider({   msalInstance: myMSALObj,   getPermissionsFromAccount, });
Finally, use the permissions system provided by React-Admin to restrict some Resource in src/App.tsx:
import {  Admin,  Resource,  ListGuesser,  EditGuesser,  ShowGuesser,} from "react-admin";import { BrowserRouter } from "react-router-dom";import { LoginPage } from "ra-auth-msal";
import { dataProvider } from "./dataProvider";import { authProvider } from "./authProvider";
export const App = () => (  <BrowserRouter>    <Admin      dataProvider={dataProvider}      authProvider={authProvider}      loginPage={LoginPage}    >    <Resource        name="posts"        list={ListGuesser}        edit={EditGuesser}        show={ShowGuesser}      />      <Resource        name="comments"        list={ListGuesser}        edit={EditGuesser}        show={ShowGuesser}      />      {(permissions) => (        <>          <Resource            name="posts"            list={ListGuesser}            edit={EditGuesser}            show={ShowGuesser}          />          {permissions.includes("admin") ? (            <Resource              name="comments"              list={ListGuesser}              edit={EditGuesser}              show={ShowGuesser}            />          ) : null}        </>      )}    </Admin>  </BrowserRouter>);
Now, signing in with “John Smith” will grant the admin permission, allowing the user to see the Comments resource. Signing in with “Chris Green” will only grant the user permission, and the user will only see the Posts resource.
Conclusion
In this tutorial, we saw how to configure a fresh React-Admin application to use Azure Active Directory as an authentication provider.
You can go further with ra-auth-msal, which allows you to Handle User Identity and also to create Custom Token Requests.
Feel free to read the ra-auth-msal documentation and to take a look at the ra-auth-msal demo.

Authors
Full-stack web developer at marmelab, Adrien was previously working as an instructor in Alsace. He loves music and plays drums.