
Google OAuth in React: A Beginner’s Guide to Authentication

Google Identity Services (GIS) allows users to sign in to a website with their Google account and securely share their profile information with the website editor.
In three steps, this tutorial will show how to configure a React application to use GIS as an authentication provider.
- Create and configure a Google API Project in the Google API Console.
- Build a new React application that uses GIS as the authentication provider.
- Update the backend API to verify the user token.
Registering An API With Google OAuth
First, find your Google API client ID to enable Sign In With Google on your website:
- Open the Credentials page of the Google APIs console, accept the Terms of Service, and create a new project.
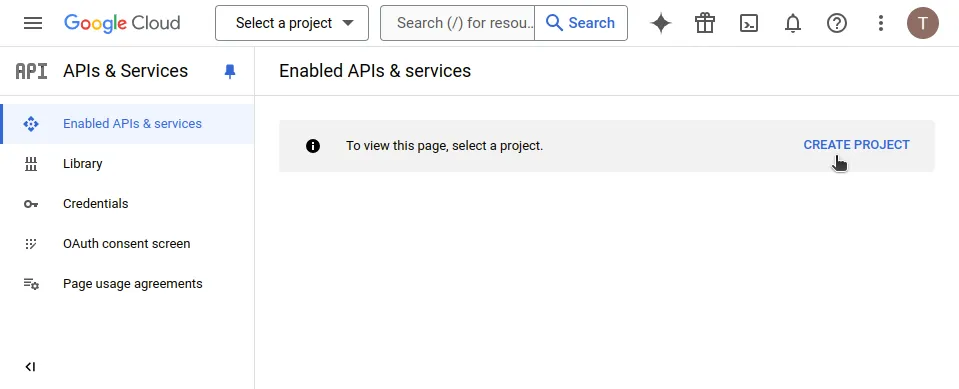
- Enter a Project Name for your application and choose your Google Organization (and the Location if needed).
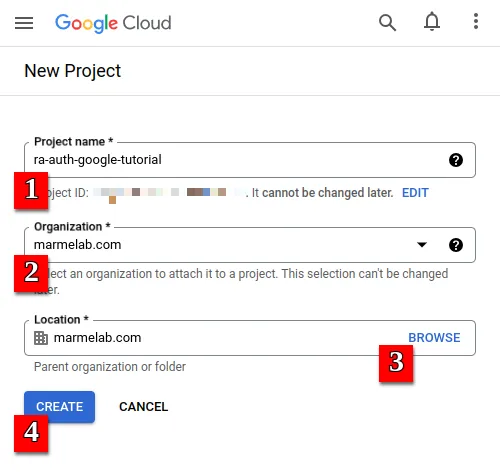
- Your new project is created and selected. Now, restrict your OAuth consent screen to Internal use.
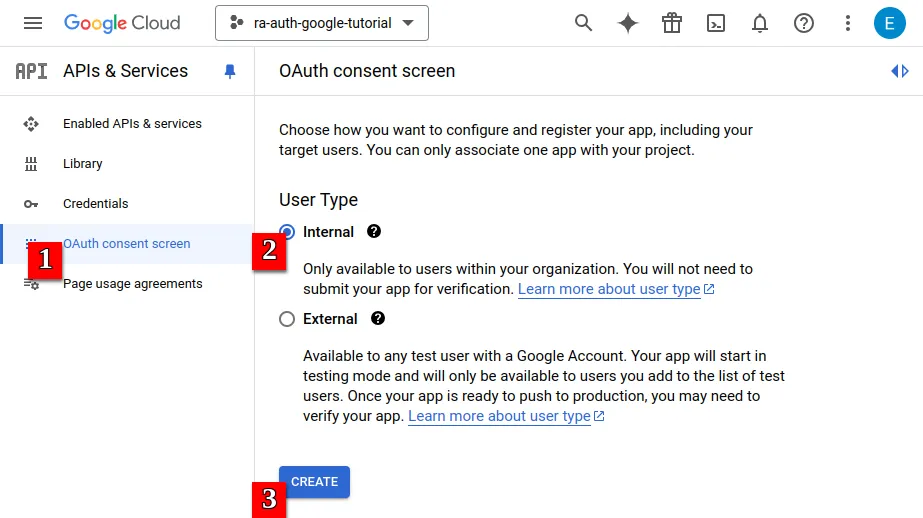
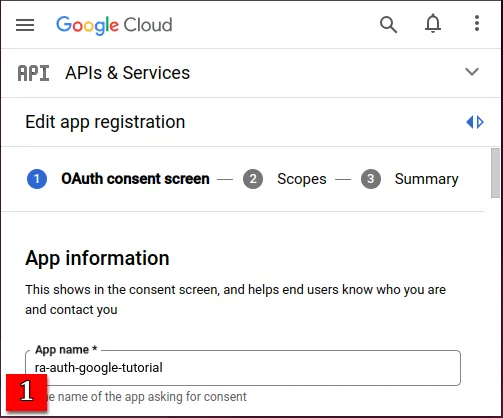
- Fill your App name and your developer Email addresses.
 | 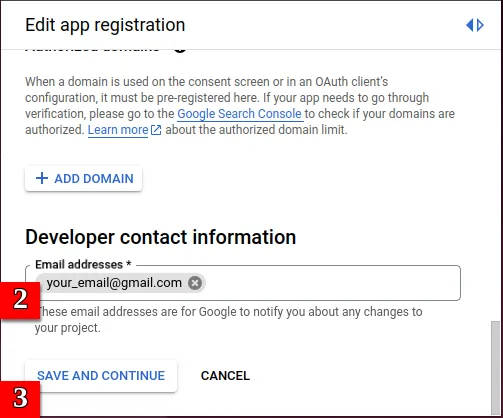 |
|---|
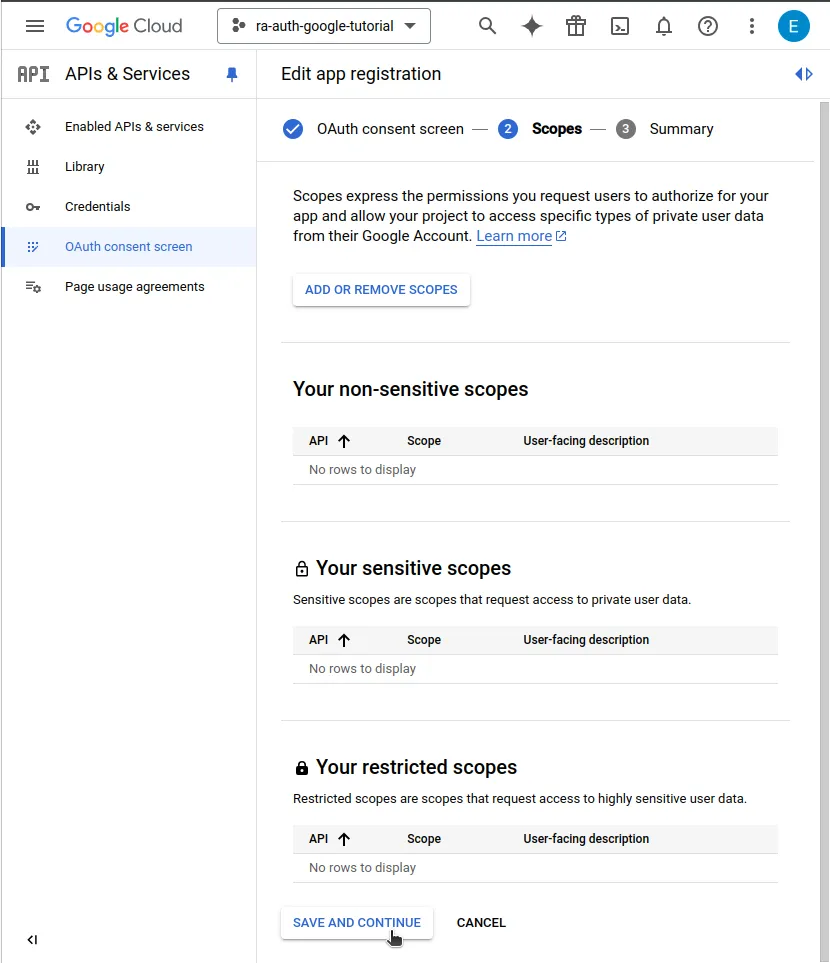
- You can skip the Scopes form and save your consent screen.
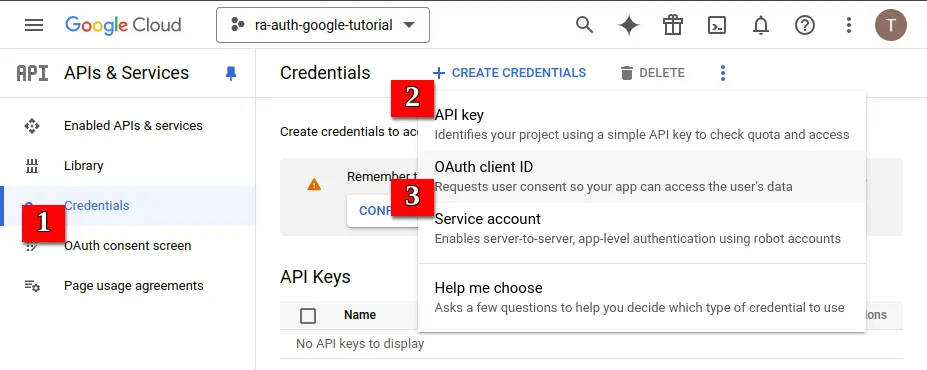
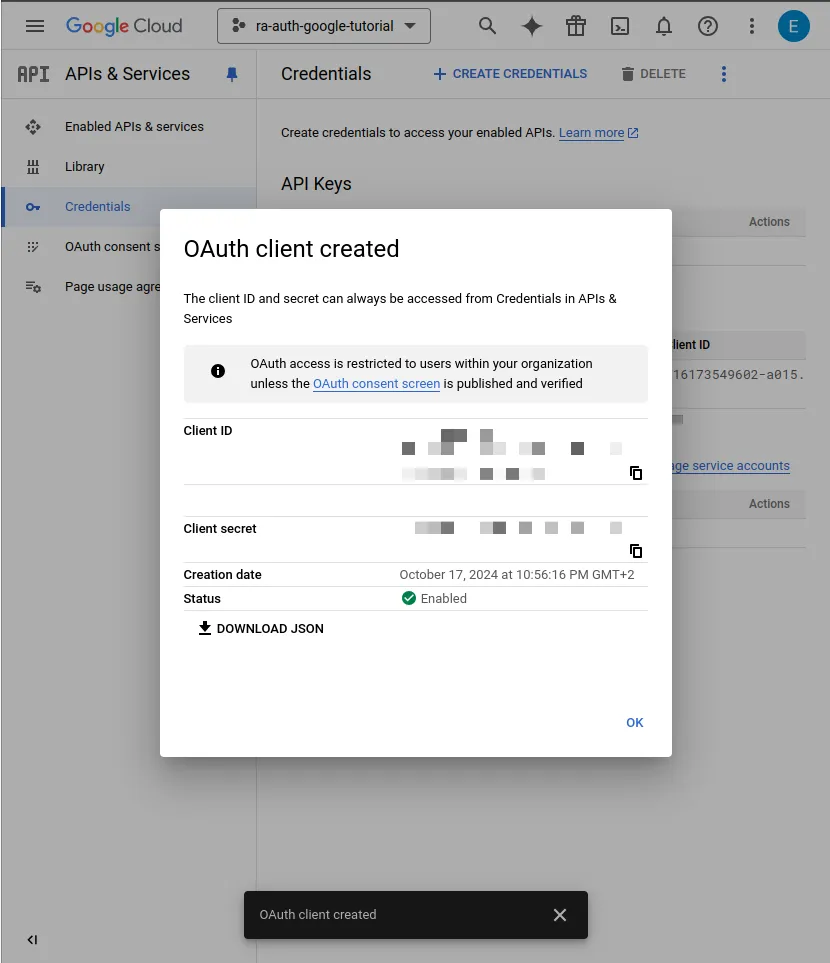
- Open the Credentials menu and under Create credentials, select OAuth client ID.
- Fill in the Application type and Authorized Origins. Your Application type is “Web application.” As for the authorized URIs, you can use
http://localhost:5173andhttp://localhostfor now (but remember to use the production URIs after deployment).
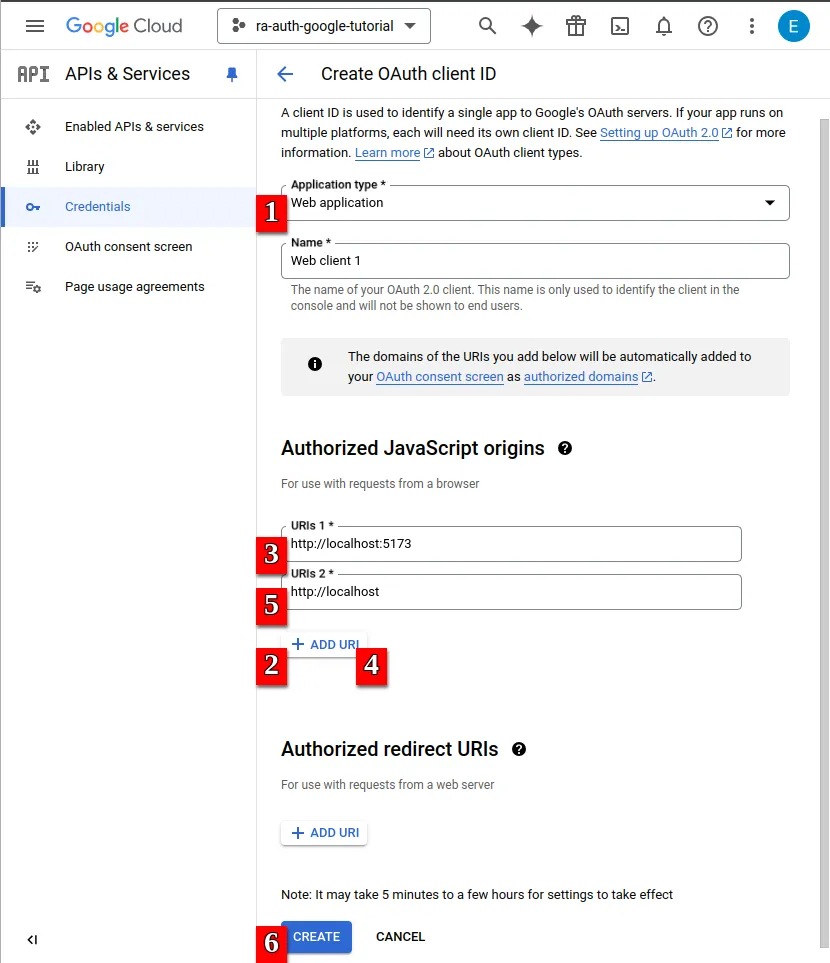
- Remember to save your Client ID and Client secret for later.
Creating a React Application with Google Identity Services
Next, let’s build a new React application. This tutorial uses React-Admin, the open-source React framework for single-page apps. It also uses ra-auth-google, a react-admin plugin, to handle authentication with GIS.
To initialize a new application, navigate to the folder of your choice and run the create-react-admin command in a terminal:
npm create react-admin ra-auth-google-tutorialThis tutorial uses a fake API running on the client side, so choose Fakerest as the data provider. You will add Google authentication manually, so select None as the authentication provider.
Once the installation is complete, open your new project folder.
cd ra-auth-google-tutorialNext, install ra-auth-google, the GIS auth provider for react-admin.
npm add ra-auth-googleTo configure your GIS credentials, create a .env file at the root of the project and fill the variables with the values you noted earlier:
# Enter the Application Client Id hereVITE_GOOGLE_CLIENT_ID="my-application-client-id.apps.googleusercontent.com"In the index.html file, import the Google Identity client script:
<!-- in ra-auth-google-tutorial/index.html --><!DOCTYPE html><html lang="en"> <head> <!-- Add the following line to load the Google Identity Services library --> <script async defer src="https://accounts.google.com/gsi/client"></script> </head> <!-- ... --></html>In the App.tsx file, wrap the <Admin> component with the <GoogleAuthContextProvider> to expose the gsiParams to child components (like the “Log in with Google” button):
// in ra-auth-google-tutorial/src/App.tsximport {  Admin,  Resource,  ListGuesser,  EditGuesser,  ShowGuesser,} from "react-admin";import { Layout } from "./Layout";import { dataProvider } from "./dataProvider";import { GoogleAuthContextProvider, useGoogleAuthProvider,} from "ra-auth-google";
export const App = () => { const { gsiParams } = useGoogleAuthProvider({   client_id: import.meta.env.VITE_GOOGLE_CLIENT_ID, });  return (   <GoogleAuthContextProvider value={gsiParams}>      <Admin layout={Layout} dataProvider={dataProvider}>        <Resource          name="posts"          list={ListGuesser}          edit={EditGuesser}          show={ShowGuesser}        />        <Resource          name="comments"          list={ListGuesser}          edit={EditGuesser}          show={ShowGuesser}        />      </Admin>   </GoogleAuthContextProvider>  );};
The next step integrates the “Log in with Google” button in a custom login page. You will use react-admin’s <Login> component as a base, setting ra-auth-google’s <LoginButton> as the page content.
// in ra-auth-google-tutorial/src/App.tsximport {  Admin,  Resource,  ListGuesser,  EditGuesser,  ShowGuesser, Login,} from "react-admin";import { Layout } from "./Layout";import { dataProvider } from "./dataProvider";import {  GoogleAuthContextProvider, LoginButton,  useGoogleAuthProvider,} from "ra-auth-google";
export const App = () => {  const { gsiParams } = useGoogleAuthProvider({    client_id: import.meta.env.VITE_GOOGLE_CLIENT_ID,  });
 const LoginPage = () => (   <Login>     <LoginButton theme="filled_black" />   </Login> );
  return (    <GoogleAuthContextProvider value={gsiParams}>     <Admin layout={Layout} dataProvider={dataProvider}>     <Admin layout={Layout} dataProvider={dataProvider} loginPage={LoginPage}>          .. ///
Finally, use the authProvider returned by the useGoogleAuthProvider hook as the application authentication provider:
export const App = () => { const { gsiParams } = useGoogleAuthProvider({ const { authProvider, gsiParams } = useGoogleAuthProvider({    client_id: import.meta.env.VITE_GOOGLE_CLIENT_ID,  });
  const LoginPage = () => (    <Login>      <LoginButton theme="filled_black" />    </Login>  );  return (    <GoogleAuthContextProvider value={gsiParams}>      <Admin        layout={Layout}        dataProvider={dataProvider}        loginPage={LoginPage}       authProvider={authProvider}      >          // ...
That’s it! You can now use your React app with GIS.
The application will only show the data when the user is authenticated with Google Identity Services. Anonymous users will see the login page with the “Log in with Google” button.
Check the Google Token in a Backend Application
To improve your application security, you should check the GIS credentials server-side.
The current application uses a FakeRest API to simulate a backend. Let’s replace it with a real backend application that will check the GIS token. This tutorial uses Express and jsonServer to create a simple backend application.
Leave the ra-auth-google-tutorial project and create a new directory named api:
mkdir apicd apiNext, init and install the required dependencies:
npm init -ynpm install cors express json-server@0.17.4 google-auth-library dotenvnpm install --save-dev nodemonIn the package.json file, add a start script:
"scripts": { "start": "nodemon index.js"},Copy the mock data generated by Fakerest, located in a file called data.json, into your api folder:
cp YOUR_PATH/ra-auth-google-tutorial/src/data.json YOUR_PATH/api/db.jsonCreate the index file for the backend:
touch index.jsFill it with the following basic server code:
const jsonServer = require("json-server");const cors = require("cors");const server = jsonServer.create();const router = jsonServer.router("db.json");const middlewares = jsonServer.defaults();
server.use(cors());server.use(middlewares);server.use(router);server.listen(3000, () => {  console.log("JSON Server is running");});
You can now start the backend application:
npm run startNow, let’s configure the frontend application to use this new backend. In the ra-auth-google-tutorial folder, install thera-data-json-server data adapter for JSON Server:
npm install ra-data-json-serverIn the frontend app, use this package as the data provider:
import {  Admin,  Resource,  ListGuesser,  EditGuesser,  ShowGuesser,  Login,} from "react-admin";import { Layout } from "./Layout";import { dataProvider } from "./dataProvider";import jsonServerProvider from 'ra-data-json-server';import {  GoogleAuthContextProvider,  LoginButton,  useGoogleAuthProvider,} from "ra-auth-google";
export const App = () => { const { authProvider, gsiParams } = useGoogleAuthProvider({ const { authProvider, gsiParams, httpClient } = useGoogleAuthProvider({    client_id: import.meta.env.VITE_GOOGLE_CLIENT_ID,  });
const dataProvider = jsonServerProvider(  'http://localhost:3000',  httpClient);
  const LoginPage = () => (    <Login>      <LoginButton theme="filled_black" />    </Login>  );
  return (    <GoogleAuthContextProvider value={gsiParams}>      <Admin        layout={Layout}        dataProvider={dataProvider}        loginPage={LoginPage}        authProvider={authProvider}      >        <Resource          name="posts"          list={ListGuesser}          edit={EditGuesser}          show={ShowGuesser}        />        <Resource          name="comments"          list={ListGuesser}          edit={EditGuesser}          show={ShowGuesser}        />      </Admin>    </GoogleAuthContextProvider>  );};
Notice that you need to pass the httpClient to the jsonServerProvider to make authenticated requests to the API.
The frontend application should still work as expected, except it now uses an actual backend.
Now, how do you check that the requests are authenticated on the backend side? You must verify the GIS token.
First, copy the .env file from the frontend app to the api folder:
cp YOUR_PATH/ra-auth-google-tutorial/.env YOUR_PATH/api/.envIn the backend application, add an authentication check middleware:
require('dotenv').config()const { OAuth2Client } = require("google-auth-library");const jsonServer = require("json-server");const cors = require("cors");const server = jsonServer.create();const router = jsonServer.router("db.json");const middlewares = jsonServer.defaults();
const client = new OAuth2Client();
const isAuthorized = async (req) => {  try {    const ticket = await client.verifyIdToken({      idToken: req.headers.authorization.split(" ")[1],      audience: process.env.VITE_GOOGLE_CLIENT_ID,    });    console.log(ticket);    return true;  } catch (error) {    console.error(error);    return false;  }}
server.use(cors());server.use(middlewares);server.use((req, res, next) => {  if (await isAuthorized(req)) {    next();  } else {    res.sendStatus(401);  }});server.use(router);server.listen(3000, () => {  console.log("JSON Server is running");});
That’s it! The entire app is secured with GIS. The backend will refuse unauthenticated requests.
Conclusion
In this tutorial, you saw how to configure a simple React application using Google Identity Services as the authentication provider.
Feel free to read the ra-auth-google documentation and take a look at the ra-auth-google demo.
You can go further with ra-auth-google, which allows you to Configure your OAuth Consent Screen.
You can also use the OneTapButton, customize the sign-in with the Google button, enable auto sign-in, configure the Google Identity Services Library, make authenticated requests to the API, choose the token storage strategy, and more…

Authors

Full-stack web developer currently intern at marmelab, Erwan works with us on Greenframe. He likes to walk, run, climb, and many root sports.