
Bring MCP Support To Your Shadcn Registry

A few weeks ago, we launched Shadcn Admin Kit — an open-source admin library designed to help you build stunning B2B and admin apps with shadcn/ui.

Before the project was even made public, an involved member of our React Admin Discord community shared the following post with us:

They mentioned they were using MCP with Shadcn to automate setup, and would love to see a react-admin equivalent.
At the time we were already experimenting with what it would take to create a Shadcn registry with react-admin components (which eventually became the Shadcn Admin Kit).
The experiment was a success, so a few weeks later we delivered 😎. Below is an example of how you can bootstrap an Admin app using Shadcn Admin Kit and leveraging the power of Cursor to write the code, and even customize the admin to add custom icons for each resource 🤩!
10/10/2025 UPDATE: Since the publication of this post, Shadcn has released a new version of the CLI (3.0) and made the support for MCP Server official.
This new version introduces a few changes to the way registries are declared, but most of the remaining content of this post (like the MCP server declaration, the rules file, etc.) is still valid.
What Is Actually Going On
Let’s step back for a moment. There’s a lot happening in this video, so let’s break it down step by step.
The following instructions are actually taken directly from the Shadcn Admin Kit MCP documentation. Feel free to head there for reference or if you want to give it a try!
First, we declare a new MCP server in Cursor.
We create a file called .cursor/mcp.json and copy the following content into it:
{ "mcpServers": { "shadcn-admin-kit": { "command": "npx", "args": [ "-y", "shadcn@canary", "registry:mcp" ], "env": { "REGISTRY_URL": "https://marmelab.com/shadcn-admin-kit/r/registry.json" } } }}This is declaring a server based on a local command: npx -y shadcn@canary registry:mcp.
This command (only available in the canary builds of the shadcn CLI at the time of writing) is responsible for starting an MCP server, and uses the registry available at https://marmelab.com/shadcn-admin-kit/r/registry.json to know what components and other files are available in this shadcn registry.
This server exposes 4 tools:
init: Initialize a new project using a registry style project structureget_items: List all the available items in the registryget_item: Get an item from the registryadd_item: Add an item from the registry (i.e. actually install it in the project)
The MCP server will be activated by Cursor when appropriate, and will respond with instructions for the LLM.
Example answer for the init tool:
To initialize a new project using the shadcn-admin-kit style,run the following command:
    npx shadcn@canary init https://marmelab.com/shadcn-admin-kit/r/shadcn-admin-kit.json
Example answer for the get_items tool:
The following items are available in the registry:[ "- shadcn-admin-kit-base (registry:block): Shadcn Admin Kit Base Components", "- shadcn-admin-kit (registry:style): undefined"].Example answer for the add_item tool (with parameter: { "name": "shadcn-admin-kit-base" }):
To install the shadcn-admin-kit-base item,run the following command: npx shadcn@canary add https://marmelab.com/shadcn-admin-kit/r/shadcn-admin-kit-base.jsonWe are now ready to write our first prompt to Cursor:
init this project using the registry
The MCP server allows Cursor to determine the correct command to run:
npx shadcn@canary init https://marmelab.com/shadcn-admin-kit/r/shadcn-admin-kit.jsonThis command does the following:
- Validate the current project’s configuration (are we using Next or Vite, is Tailwind installed, etc.)
- Initialize the shadcn configuration (create the
components.jsonfile) - Install the required dependencies
- Install the registry style, and notably, install the Cursor rules file (
.cursor/rules/registry.mdc)
We’ll look at Cursor rules in more detail shortly, but in a nutshell, this file contains a set of rules that tell Cursor how to use components from the registry. It can also include usage examples.
Once this is done, we can start prompting Cursor to create an Admin app for us:
create a new admin and declare 3 resources in it: posts, comments and users
Thanks to both the MCP server and the rule set, Cursor now knows what it needs to do to create and configure the <Admin> component:
First it installs the required components from the registry, using npx shadcn@canary add https://marmelab.com/shadcn-admin-kit/r/shadcn-admin-kit-base.json.
Next, it replaces the App.tsx file with the following content:
import { Admin } from "@/components/admin/admin";import { Resource } from "ra-core";import jsonServerProvider from "ra-data-json-server";import { ListGuesser } from "@/components/admin/list-guesser";import { ShowGuesser } from "@/components/admin/show-guesser";import { EditGuesser } from "@/components/admin/edit-guesser";
const dataProvider = jsonServerProvider(  "https://jsonplaceholder.typicode.com/");
const App = () => (  <Admin dataProvider={dataProvider}>    <Resource name="posts" list={ListGuesser} edit={EditGuesser} show={ShowGuesser} />    <Resource name="comments" list={ListGuesser} edit={EditGuesser} show={ShowGuesser} />    <Resource name="users" list={ListGuesser} edit={EditGuesser} show={ShowGuesser} />  </Admin>);
export default App;
Notice that it figured out how to declare each of our resources: posts, comments, and users.
Then, it realizes it needs to install the ra-data-json-server package:
npm install ra-data-json-serverLastly, it follows the instructions from the rules set, requesting that the TypeScript configuration be tweaked to avoid an issue with class-variance-authority (the verbatimModuleSyntax option in tsconfig.app.json needs to be set to false).
And that’s it! With only two lines of prompting we have an Admin app running, with list, show and edit pages for each of our 3 resources!
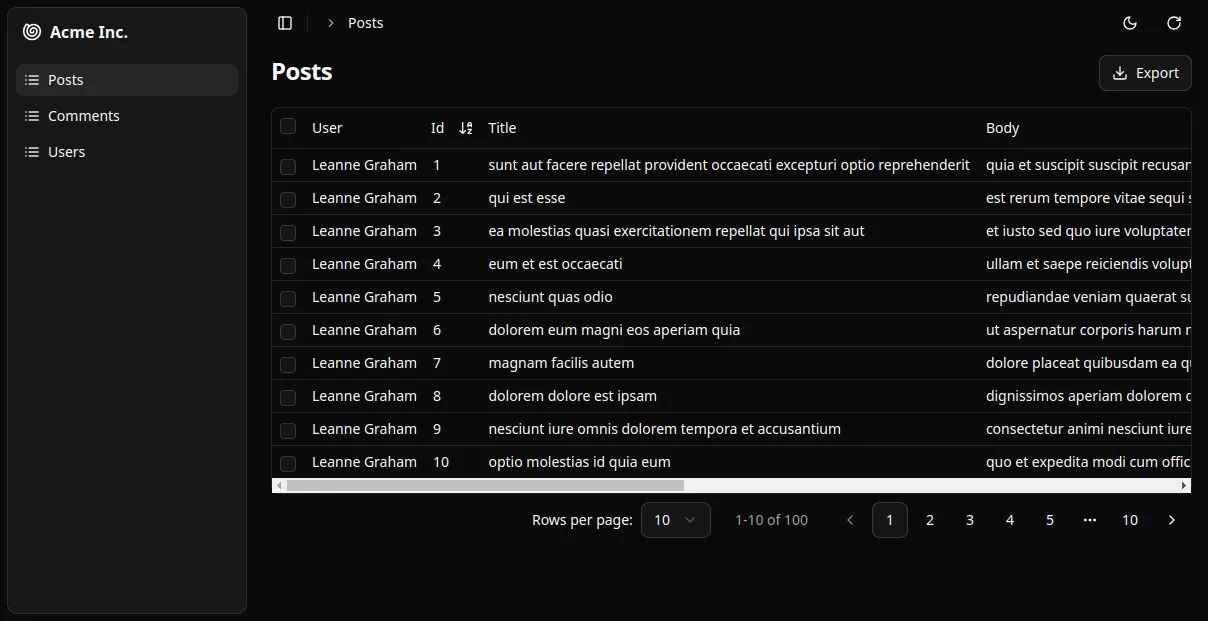
As a bonus, in the demo we used a third prompt, requesting to add an icon next to each resource:
customize each resource to add a matching icon using the lucide library
And just like before, Cursor is able to figure out how to leverage the lucide-react library to find matching icons, and how to pass them to each <Resource> component:
import { Admin } from "@/components/admin/admin";import { Resource } from "ra-core";import jsonServerProvider from "ra-data-json-server";import { ListGuesser } from "@/components/admin/list-guesser";import { ShowGuesser } from "@/components/admin/show-guesser";import { EditGuesser } from "@/components/admin/edit-guesser";import { FileText, MessageCircle, User } from "lucide-react";
const dataProvider = jsonServerProvider(  "https://jsonplaceholder.typicode.com/");
const App = () => (  <Admin dataProvider={dataProvider}>    <Resource      name="posts"      list={ListGuesser}      edit={EditGuesser}      show={ShowGuesser}      icon={FileText}    />    <Resource      name="comments"      list={ListGuesser}      edit={EditGuesser}      show={ShowGuesser}      icon={MessageCircle}    />    <Resource      name="users"      list={ListGuesser}      edit={EditGuesser}      show={ShowGuesser}      icon={User}    />  </Admin>);
export default App;![]()
Impressive!
Make Your Registry MCP-Compatible
As far as I know there is no official documentation (yet) on how to set up and use the shadcn MCP server (which is not surprising since the feature is still in alpha). This means we are pretty much limited to the X/Twitter thread to figure out how to set it up 😅.
Good news, I’ve already done the work of retro-engineering how this example works, so if you’re interested in enabling MCP for your own shadcn registry, read on! 😊
First, we’ll need to leverage the new CLI command shadcn registry:build (only available in canary versions) in replacement for the shadcn build command.
The key difference is that this command, in addition to building the JSON files for all items in your registry (such as blocks, components, hooks, …), also generates a JSON file for the whole registry (very similar to the registry.json file you probably already have in your project if you expose a shadcn registry).
This file will then be available for the MCP server to parse in order to know of all the items available in your registry.
Speaking of which, the next step is logically to document in your repository or website how to setup an MCP server targeting this file.
As we saw earlier, in our case, this meant creating a file called .cursor/mcp.json with the following content:
{ "mcpServers": { "shadcn-admin-kit": { "command": "npx", "args": [ "-y", "shadcn@canary", "registry:mcp" ], "env": { "REGISTRY_URL": "https://marmelab.com/shadcn-admin-kit/r/registry.json" } } }}As you can guess from the name, this file is specific to Cursor, but its content is not! It should be easy to adapt it to other AI powered IDEs like Windsurf or VSCode Copilot.
The only part you need to adapt is the REGISTRY_URL, to have it point to your JSON file instead.
We can see for example on the Alpine registry website how they make these steps known to the user.
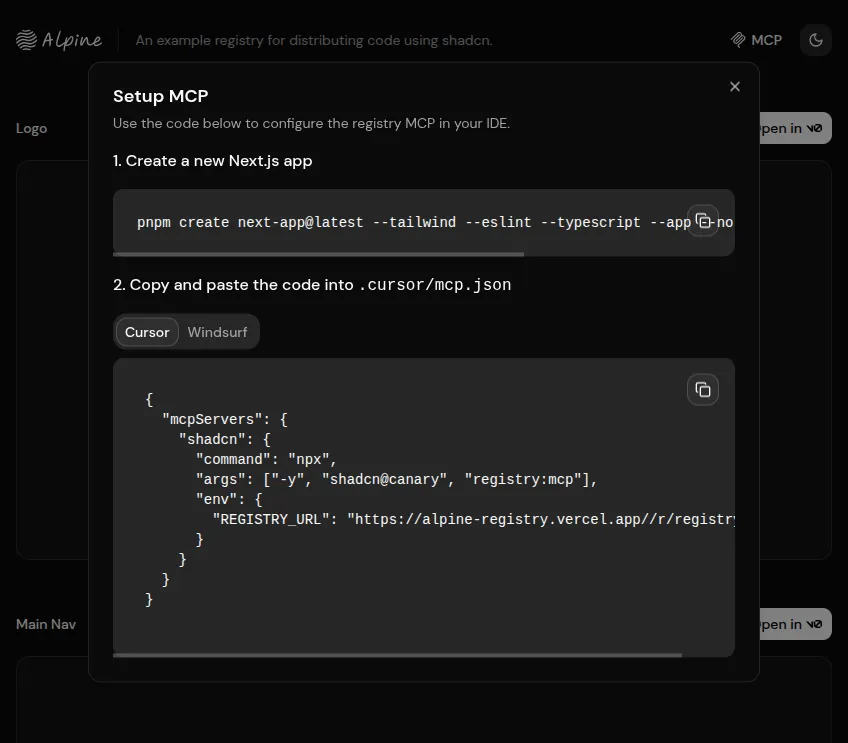
That should be enough for the LLM to know about your components and use them when requested!
Providing Cursor rules
With the MCP properly set up, your AI-powered IDE should now be aware of the components from your registry. But there are two remaining issues that can occur:
- It’s up to the LLM to decide when to use the MCP tools, and often enough you’ll see it try to build components from its own knowledge base, without even attempting to use the registry.
- There might be extra installation instructions that you’d like the LLM to know about, before it tries to use your components.
To solve both issues, it is recommended to also provide a rules file for the LLM. For Cursor, this file is located under .cursor/rules/registry.mdc.
This file uses the MDC file format, which is basically a Markdown file describing some rules for the LLM to apply, in natural language. This file contains frontmatter tags (description, globs and alwaysApply) that the LLM can use to choose when to apply the ruleset and when not to.
Here is an example (inspired by the one used in Shadcn Admin Kit):
---description: Rules for using components from the registryglobs:alwaysApply: true---

## Rules for using components
Here are some rules to follow when using components in this project:
- If using shadcn-admin-kit mcp and a registry url is provided, always check the mcp for components (call get_items) before creating your own.- Only attempt to add items from the registry that actually exist in the registry (call get_items if necessary).- If asked to initialize or create a new Admin, or to customize the resources, use the usage section below as guide to create or edit the Admin component.
## Usage
### Use `<Admin>` As Root Component
The entry point of your application is the `<Admin>` component.
You'll need to specify a Data Provider to let the Admin know how to fetch data from the API.
If no Data Provider was specified, simply use `ra-data-json-server`, and typicode's JSONPlaceholder as endpoint: https://jsonplaceholder.typicode.com/.
You will need to install the `ra-data-json-server` package first:
    ```bash    npm install ra-data-json-server
Here is an example showing how to use it:
import { Admin } from "@/components/admin/admin";import jsonServerProvider from 'ra-data-json-server';
const dataProvider = jsonServerProvider(  "https://jsonplaceholder.typicode.com/");
export const App = () => (  <Admin dataProvider={dataProvider}>    {/* Resources go here */}  </Admin>);
In our case, we use this file to:
- Encourage the LLM to try using our components before building its own
- Provide example usage of the
<Admin>component, so that the LLM knows how to import it, how to use its props and what default dataProvider to use if none was specified - Declare additional post-install instructions, like patching the TS config as we mentioned earlier
How can you distribute this file you ask? Good news! You can include this file in your registry, so that it gets installed automatically as soon as the user starts using it!
To achieve that, you can include this file to your registry’s styles, like so:
// in registry.json{ "$schema": "https://ui.shadcn.com/schema/registry.json", "name": "Shadcn Admin Kit", "homepage": "https://github.com/marmelab/shadcn-admin-kit", "items": [ // ... { "name": "shadcn-admin-kit", "type": "registry:style", "files": [ { "path": "rules/registry.mdc", "type": "registry:file", "target": "~/.cursor/rules/registry.mdc" } ] } ]}Using ~ at the beginning of the path tells the shadcn CLI to install this file at the root of the repository, so that it works with both a Vite project or a a Next project bootstrapped with the --no-src-dir option.
This should be enough for Cursor to pick up your ruleset and use it when appropriate!
Providing Example Components
Another effective way to improve the LLM performances is to directly provide example components in your registry, combined with a rule to tell the LLM about them.
This approach is implemented in the example registry showcased in the X thread — the Alpine registry.
As you can see below, the registry includes several example components that leverage the other components declared in the file. This provides a good basis for the LLM to understand how to use and customize the components to fulfill the user’s request.
// https://alpine-registry.vercel.app/r/registry.json{ "$schema": "https://ui.shadcn.com/schema/registry.json", "name": "alpine", "homepage": "https://alpine-registry.vercel.app", "items": [ // ... { "name": "example-section-listing", "type": "registry:block", "title": "Section with Heading and Listing Grid", "description": "An example section with a heading, subheading, and listing grid.", "files": [ { "path": "registry/alpine/examples/example-section-listing.tsx", "type": "registry:component" } ] }, { "name": "example-hero", "type": "registry:block", "title": "Example Hero Section", "description": "An example hero section with a heading, subheading, and two call to action buttons.", "files": [ { "path": "registry/alpine/examples/example-hero.tsx", "type": "registry:component" } ] }, // ... ]}This approach also requires using a custom rule to have the LLM distinguish between example components and regular components it can use to build its own.
We can for instance see that in the Alpine registry’s rule file registry.mdc. Here is an excerpt:
## Rules for using components
Here are some rules to follow when using components in this project:
- If using shadcn mcp and a registry url is provided, always check the mcp for components before creating your own.- If you are using a component that has a corresponding example, use the example as a guide to create your own component.- Do not install example- components directly, use them as reference to create your components.
I did not use this approach for Shadcn Admin Kit, because I wasn’t fond of the idea of mixing example components with actual components, and instead favored a documentation-driven approach, where I documented how to use the components directly in the registry.mdc file.
Still, there are only so much rules we can put into a single MDC file, so as the project gets bigger, we may need to either split the ruleset into several MDC files, or switch to using the same method as Alpine. We could try and compare both approaches should the need arise.
Conclusion
In this experiment, the two most important challenges were:
- Figuring out how the MCP example was put together by the shadcn team, and replicate it
- Experimenting with the best set of rules allowing the LLM to correctly understand how to set up the project (e.g. TypeScript) and how to use our components
But once this was done, I was quite happy with the results! Having never used Cursor before, I was amazed by the IDE and the development experience it offers. It’s true that empowering LLMs with MCP tools giving them the ability to read source code files from the project, list directory contents, search the internet, and now, make the most of a shadcn registry, significantly augments their ability to generate more complete and accurate code, to match the users request as closely as possible.
For now I’ve mostly focused on easing out the earlier stages of using Shadcn Admin Kit (i.e. setting up the project, choosing where to fetch data from and declaring resources) and the results are already impressive. So I can’t wait to see what the community builds using this new tool! 😃
Authors
Full-stack web developer at marmelab, JB is a Software Engineer with a strong Java experience. He plays the piano and runs fast, and not only because he has long fingers and tall legs.