Building an Admin App with TanStack Start and Shadcn

TanStack Start is a great starter kit for building modern full-stack applications. This tutorial will show you how to quickly build an admin application over a REST API with TanStack Start using TailwindCSS, Shadcn/ui and Shadcn Admin Kit.
Installation
We’ll start by setting up a new project with TanStack Start. We can do that with the following command:
npx @tanstack/cli createThe installer will prompt for the name of the project. We select no toolchain, but choose to install Tailwind CSS, as we’ll use it for Shadcn. The installation looks like this:
$ npx @tanstack/cli create┌  Let's configure your TanStack application│◇  What would you like to name your project?│  shadcn-admin-app│◇  Select toolchain│  None│◇  Would you like to use Tailwind CSS?│  Yes│◇  Initialized git repository│◇  Installed dependencies│▲  Warnings:│  TanStack Start is not yet at 1.0 and may change significantly or not be compatible with other add-ons.│  Migrating to Start might require deleting node_modules and re-installing.│└  Your TanStack app is ready in 'shadcn-admin-app'.
Use the following commands to start your app:% cd shadcn-admin-app% npm run dev
We can now install Shadcn by running the shadcn init command:
npx shadcn@latest initNow that Shadcn is set up, let’s add specialized Shadcn admin blocs from the shadcn-admin-kit package.
npx shadcn@latest add https://marmelab.com/shadcn-admin-kit/r/admin.jsonshadcn-admin-kit requires a specific adapter to work with TanStack Router, the router used in TanStack start, so let’s install it as well:
npm install ra-router-tanstackAnd we’re done! We’re all set to start coding our application.
Setting Up The Admin Application
Let’s start with the initial setup of the admin application, using the <Admin> component. We’ll do it in the root route:
import { createFileRoute } from "@tanstack/react-router";import { tanStackRouterProvider } from "ra-router-tanstack";import { Admin } from "@/components/admin";
export const Route = createFileRoute("/")({ component: App });
export function App() {  return <Admin routerProvider={tanStackRouterProvider}></Admin>;}
We can run the application with npm run dev and navigate to http://localhost:3000, to discover the welcome screen:
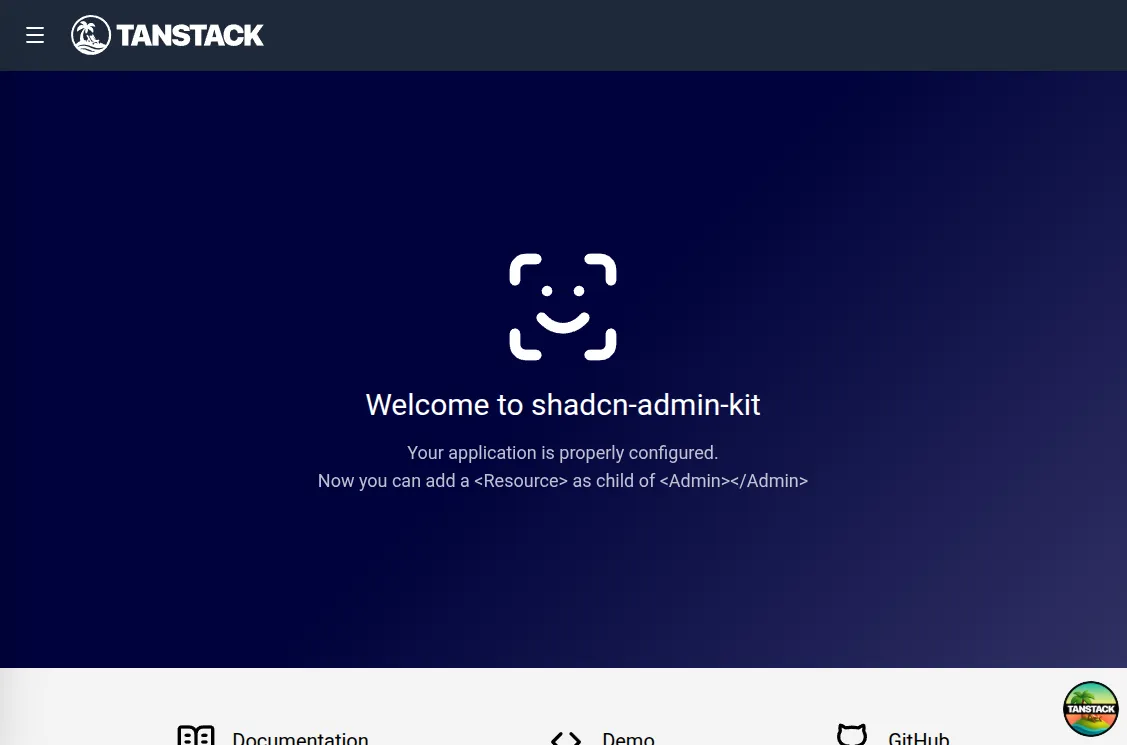
Right on the welcome screen, we notice that it includes a header bar from TanStack Start. We won’t need it there, so let’s remove it:
import { HeadContent, Scripts, createRootRoute } from '@tanstack/react-router'import { TanStackRouterDevtoolsPanel } from '@tanstack/react-router-devtools'import { TanStackDevtools } from '@tanstack/react-devtools'
import Header from '../components/Header'
import appCss from '../styles.css?url'
/*
  ...
*/
function RootDocument({ children }: { children: React.ReactNode }) {  return (    <html lang="en">      <head>        <HeadContent />      </head>      <body>       <Header />        {children}        <TanStackDevtools          config={{            position: 'bottom-right',          }}          plugins={[            {              name: 'Tanstack Router',              render: <TanStackRouterDevtoolsPanel />,            },          ]}        />        <Scripts />      </body>    </html>  )}
Connecting To A Backend API
Now that we’re free of the header bar, we can start connecting our application to a backend. For this tutorial, we’ll use JSONPlaceholder, a fake REST API designed for prototyping and testing. Here is a sample response:
curl https://jsonplaceholder.typicode.com/users/2{ "id": 2, "name": "Ervin Howell", "username": "Antonette", "email": "Shanna@melissa.tv", "address": { "street": "Victor Plains", "suite": "Suite 879", "city": "Wisokyburgh", "zipcode": "90566-7771", "geo": { "lat": "-43.9509", "lng": "-34.4618" } }, "phone": "010-692-6593 x09125", "website": "anastasia.net", "company": { "name": "Deckow-Crist", "catchPhrase": "Proactive didactic contingency", "bs": "synergize scalable supply-chains" }}We’ll use a third-party package called ra-data-json-server to map the JSONPlaceholder API to the shadcn-admin-kit CRUD API. This is just an example, and you’ll probably need to connect to a real API instead. Fortunately, the “data provider” approach used by shadcn-admin-kit allows you to easily switch between different API adapters. There are dozens of data provider packages for popular API backends, and you can create your own in minutes if it’s not supported yet.
For now, let’s make sure the app connects to JSONPlaceholder.
npm install ra-data-json-serverNext, we use this new package to create a data provider instance that the admin can use to fetch data from the API:
import jsonServerProvider from 'ra-data-json-server';
export const dataProvider = jsonServerProvider(  import.meta.env.VITE_JSON_SERVER_URL);
The import.meta.env.VITE_JSON_SERVER_URL expression is a Vite environment variable that must be set in the .env file located at the project root.
VITE_JSON_SERVER_URL="https://jsonplaceholder.typicode.com"Now, we can inject this data provider into the admin application:
import { tanStackRouterProvider } from "ra-router-tanstack";import { createFileRoute } from "@tanstack/react-router";import { Admin } from "@/components/admin";import { dataProvider } from "@/dataProvider.ts";
export const Route = createFileRoute("/")({ component: App });
export function App() {  return (    <Admin      routerProvider={tanStackRouterProvider}      dataProvider={dataProvider}    ></Admin>  );}
Mapping API Endpoints With Resources
The <Admin> component can map CRUD API endpoints to list, detail, creation and edition views. It uses a specialized child component for that called <Resource>. Each resource maps an API endpoint to specialized CRUD views.
We’ll add a resource for the /users endpoint:
import { Resource } from "ra-core";import { tanStackRouterProvider } from "ra-router-tanstack";import { createFileRoute } from "@tanstack/react-router";import { Admin } from "@/components/admin";import { Admin, ListGuesser } from "@/components/admin";import { dataProvider } from "@/dataProvider.ts";
export const Route = createFileRoute("/")({ component: App });
export function App() {  return (    <Admin routerProvider={tanStackRouterProvider} dataProvider={dataProvider}>      <Resource name="users" list={ListGuesser} />    </Admin>  );}
The <Resource name="users" /> line instructs shadcn-admin-kit to fetch “users” from the https://jsonplaceholder.typicode.com/users URL. The <Resource> component also defines which React components to use for each CRUD operation (list, create, edit, and show).
list={ListGuesser} tells shadcn-admin-kit to display the list of users in a datagrid, based on the data returned by the API. It’s a great way to bootstrap an admin with zero configuration.
Now, our app can display a list of users:
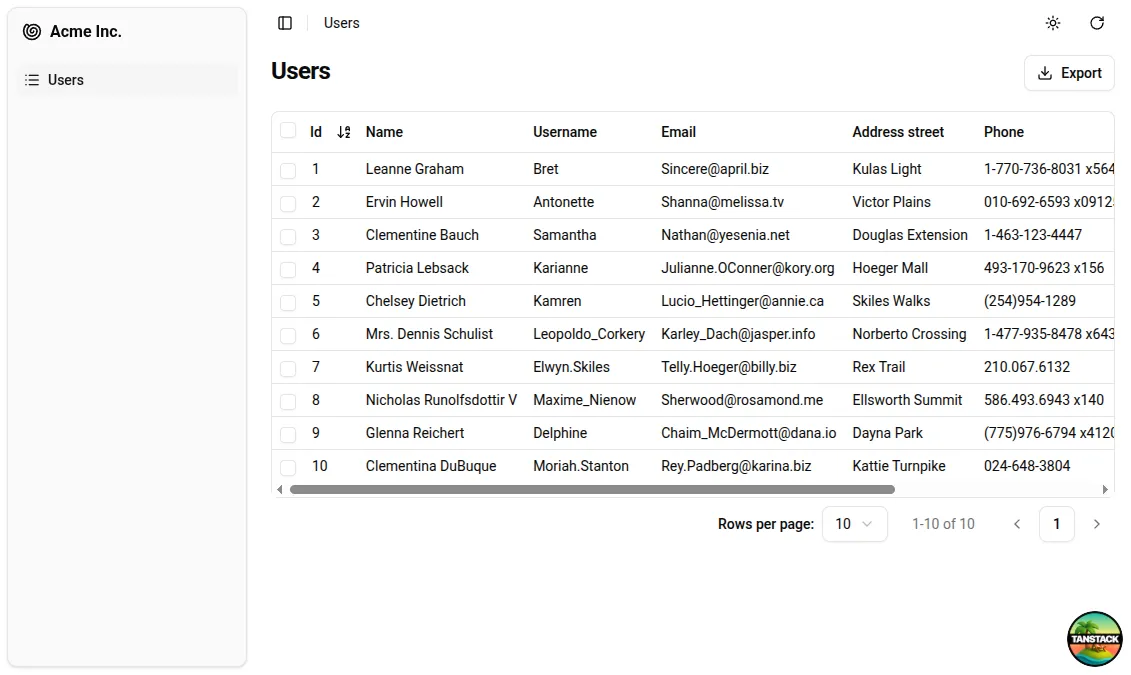
The list is already functional: we can sort it by clicking on the column headers or navigate through pages using the pagination controls.
If you open the network tab in your browser’s developer tools, you’ll see that every user action on the list triggers a corresponding HTTP request to https://jsonplaceholder.typicode.com/users with updated parameters. The data provider handles these requests, translating user actions into API calls that the backend understands.
Customizing The List View
The <ListGuesser> component isn’t meant for production use—it’s just there to help us quickly set up an admin interface. Eventually, we’ll need to replace the ListGuesser in the users resource with a custom React component. Fortunately, ListGuesser provides the guessed list code right in the console:
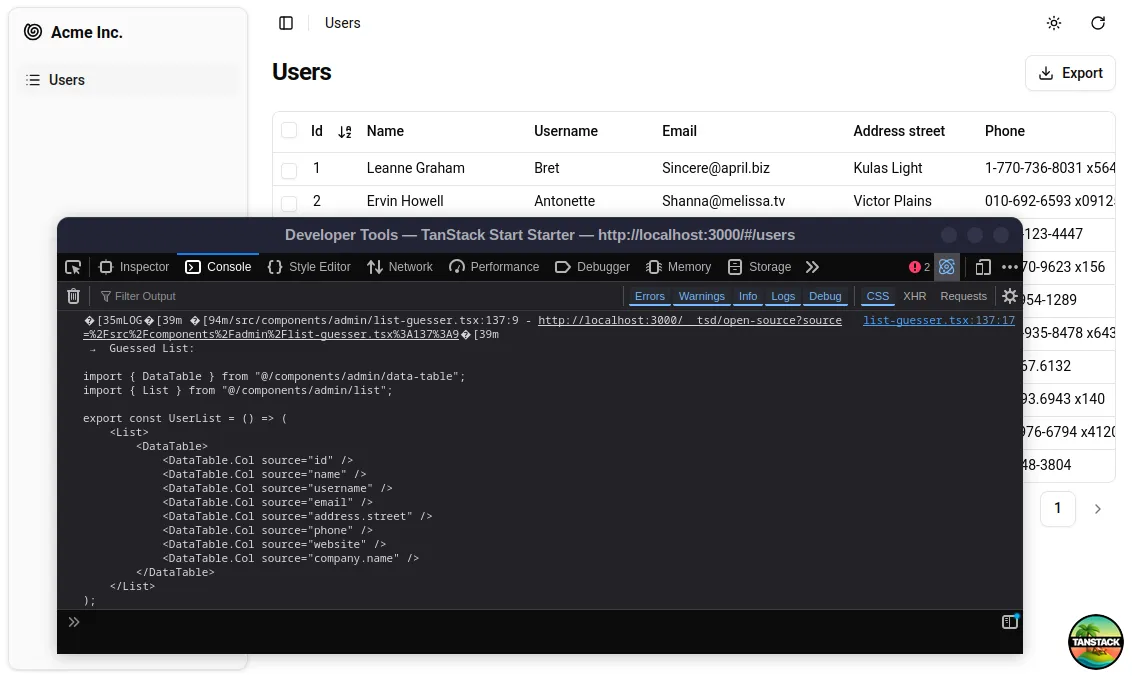
Let’s copy this code and create the UserList component in a new file, src/components/app/users.tsx:
import { DataTable, List } from "@/components/admin";
export const UserList = () => (  <List>    <DataTable>      <DataTable.Col source="id" />      <DataTable.Col source="name" />      <DataTable.Col source="username" />      <DataTable.Col source="email" />      <DataTable.Col source="address.street" />      <DataTable.Col source="phone" />      <DataTable.Col source="website" />      <DataTable.Col source="company.name" />    </DataTable>  </List>);
Now, we can update index.tsx to use this new component instead of ListGuesser:
import { Resource } from "ra-core";import { tanStackRouterProvider } from "ra-router-tanstack";import { createFileRoute } from "@tanstack/react-router";import { Admin, ListGuesser } from "@/components/admin";import { Admin } from "@/components/admin";import { dataProvider } from "@/dataProvider.ts";import { UserList } from "@/components/app/users.tsx";
export const Route = createFileRoute("/")({ component: App });
export function App() {  return (    <Admin routerProvider={tanStackRouterProvider} dataProvider={dataProvider}>      <Resource name={"users"} list={ListGuesser} />      <Resource name={"users"} list={UserList} />    </Admin>  );}
Visually, nothing changes in the browser, but now the app uses a component that we can fully customize. Have a look to the <List> component documentation to learn the available options, like filtering, sorting, and bulk actions!
Adding A Detail View
We have a great list of users, but we can go further and create a more detailed user view. As it was previously mentioned, the <Resource> component accepts a show prop to define a detail view. Let’s use the <ShowGuesser> to help bootstrap it:
import { Resource } from "ra-core";import { tanStackRouterProvider } from "ra-router-tanstack";import { createFileRoute } from "@tanstack/react-router";import { Admin } from "@/components/admin";import { Admin, ShowGuesser } from "@/components/admin";import { dataProvider } from "@/dataProvider.ts";import { UserList } from "@/components/app/users.tsx";
export const Route = createFileRoute("/")({ component: App });
export function App() {  return (    <Admin routerProvider={tanStackRouterProvider} dataProvider={dataProvider}>      <Resource name={"users"} list={UserList} />      <Resource name={"users"} list={UserList} show={ShowGuesser} />    </Admin>  );}
Now we can click on a user in the list to see their details. Just like for other guessed components, we could customize the show view by copying the code logged to the console by the <ShowGuesser> and modifying it to suit our needs.

CRUD Operations Made Easy
An admin interface isn’t just about displaying remote data; it should also allow editing records. shadcn-admin-kit provides an <Edit> component for this purpose. We’re starting to get used to it, let’s use <EditGuesser> to bootstrap it!
import { Resource } from "ra-core";import { tanStackRouterProvider } from "ra-router-tanstack";import { createFileRoute } from "@tanstack/react-router";import { Admin, ShowGuesser } from "@/components/admin";import { Admin, EditGuesser, ShowGuesser } from "@/components/admin";import { dataProvider } from "@/dataProvider.ts";import { UserList } from "@/components/app/users.tsx";
export const Route = createFileRoute("/")({ component: App });
export function App() {  return (    <Admin routerProvider={tanStackRouterProvider} dataProvider={dataProvider}>      <Resource        name={"users"}        list={UserList}        show={ShowGuesser}        edit={EditGuesser}      />    </Admin>  );}
Then by copying the code logged to the console by the <EditGuesser> component, we can customize the edit view to suit our needs. In our case, we’ll just remove the ID field as we don’t want it to be editable:
import {  DataTable,  Edit,  List,  SimpleForm,  TextInput} from "@/components/admin";
export const UserList = () => (  /* ... */);
export const UserEdit = () => (  <Edit>    <SimpleForm>      <TextInput source="name" />      <TextInput source="username" />      <TextInput source="email" />      <TextInput source="address.street" />      <TextInput source="phone" />      <TextInput source="website" />      <TextInput source="company.name" />    </SimpleForm>  </Edit>);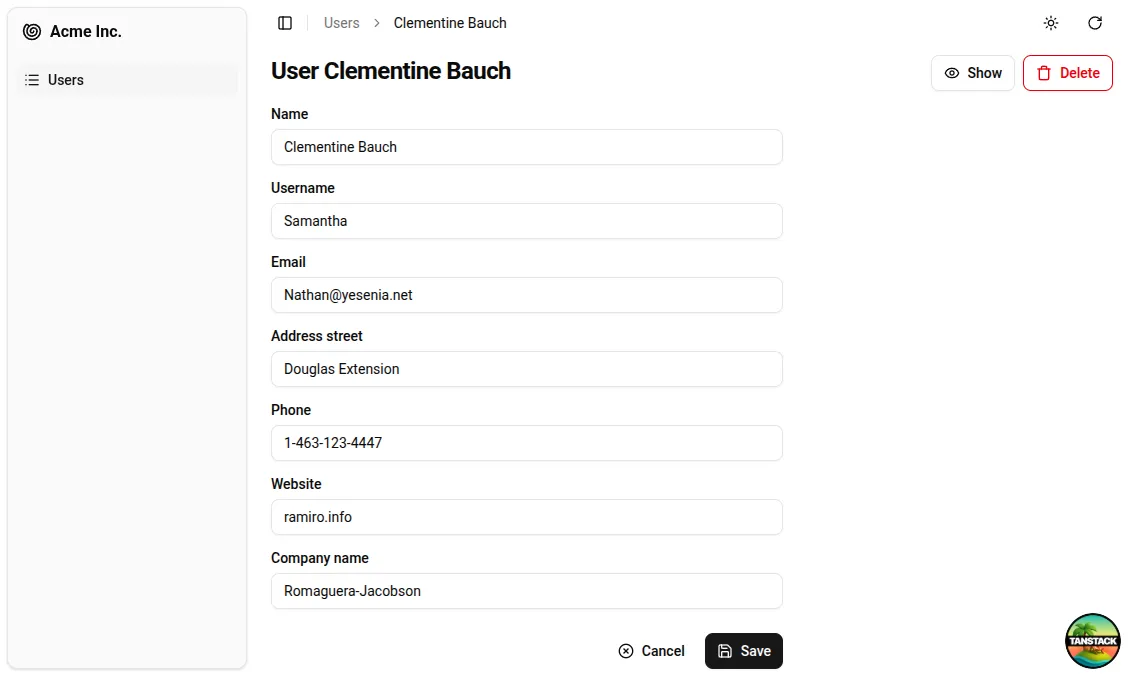
As we also want to allow user creation, let’s copy the UserEdit component and make a UserCreate component:
import {  Create,  DataTable,  Edit,  List,  SimpleForm,  TextInput} from "@/components/admin";
export const UserList = () => (  /* ... */);
export const UserEdit = () => (  /* ... */);
export const UserCreate = () => (  <Create>    <SimpleForm>      <TextInput source="name" />      <TextInput source="username" />      <TextInput source="email" />      <TextInput source="address.street" />      <TextInput source="phone" />      <TextInput source="website" />      <TextInput source="company.name" />    </SimpleForm>  </Create>);
Finally, we can update the index.tsx file to use these new components:
import { Resource } from "ra-core";import { tanStackRouterProvider } from "ra-router-tanstack";import { createFileRoute } from "@tanstack/react-router";import { Admin, EditGuesser, ShowGuesser } from "@/components/admin";import { Admin, ShowGuesser } from "@/components/admin";import { dataProvider } from "@/dataProvider.ts";import { UserList } from "@/components/app/users.tsx";import { UserCreate, UserEdit, UserList } from "@/components/app/users.tsx";
export const Route = createFileRoute("/")({ component: App });
export function App() {  return (    <Admin routerProvider={tanStackRouterProvider} dataProvider={dataProvider}>      <Resource        name={"users"}        list={UserList}        show={ShowGuesser}        edit={EditGuesser}        edit={UserEdit}        create={UserCreate}      />    </Admin>  );}
And we’re done! The create button has automatically been added to the list view, and the edit button to the show view. We even have a delete button in the edit view!
Conclusion
By leveraging TanStack Start, Shadcn/ui and Shadcn Admin Kit, we were able to quickly start building an admin interface for our backend API. But we’ve only scratched the surface of what’s possible. Shadcn Admin Kit offers a wide range of components and features to help you build complex applications with ease, taking advantage of the TanStack ecosystem.
I can only encourage you to explore the documentation to discover all the possibilities, or the full quick start guide to go deeper into the details of building an application with these tools.
Authors
Matthieu is a fullstack web developer at Marmelab. His expertise ranges from Laravel to React.js, with a special taste for strong typing and free software.