Getting More Out of Claude Code in the Terminal

Over the past few months, I’ve been using Claude Code intensively, not just for quick one-off prompts, but as my primary coding environment. I’m on Linux, which means no Claude Desktop app. The terminal is all I have, and it’s all I need. This constraint pushed me to dig deeper into what Claude Code actually offers beyond the basic chat loop. Turns out, there’s a whole set of commands, shortcuts, and customization options hiding in plain sight. Here are the ones that transformed my daily workflow.
Run Shell Commands
I often find myself needing to run a quick command while chatting with Claude. Maybe I want to check the current git branch, run tests, or see running Docker containers. I used to either open a new terminal tab or ask Claude to run the command for me. Both options break my flow. Until I discovered the ! prefix.
You can run any shell command directly from the chat by prefixing it with !:
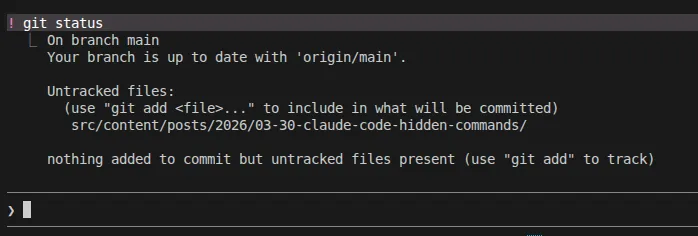
The best part of this is that the output of the command is immediately available in the conversation. You can reference it in your next prompt, and Claude will understand it as if you had copied and pasted the output into the chat. No more context switching between terminal and chat. Everything happens in one place. One use case is running a failing test directly with !, and then asking Claude to debug it using the error output it just generated.
You can press Ctrl+B while a ! command is running to send it to the background. Handy for long-running processes like npm run build.
File Mentions
I use Claude Code through the VS Code terminal. The IDE integration automatically adds the currently open file to the conversation context, which is convenient. But sometimes I need Claude to look at other files too: a related component, a type definition, or a test file. That’s where @ comes in. Type @ and start typing the filename:
@src/components/Auth.tsx can you add error handling here?It triggers file path autocomplete, so you don’t need to type (or remember) the full path.
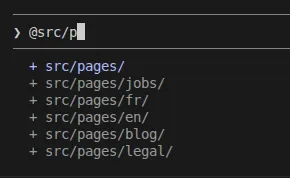
When prefixed with an @, the content of the file is directly injected into the conversation context. This speeds up the exploration (Claude doesn’t need to use the list and read file tools).
Customize The Statusline
One thing I like to have in my terminal is a persistent status bar that gives me key information at a glance. Did you know that you can enable this in Claude Code with a simple command?
Run /statusline and Claude will configure a persistent status bar at the bottom of your terminal. If you already have a customized statusline, let’s say from zsh, Claude will ask you if you want to use it.
For example, instead of running ! git branch --show-current to check your current branch, you can just glance at the statusline. It’s always there. You can add the state of your context window, so you know when you’re getting close to the limit.
You can ask Claude to customize it:
/statusline show model name, current branch, current directory, context percentage with a progress bar and current weather in Nancy

Expand Your Working Context
By default, Claude Code works within the directory where you launched it. But real projects rarely live in a single folder.
I’m currently working on a project with a React frontend and a BFF (Backend For Frontend) in separate repositories. I usually launch Claude Code from the frontend directory, but when I need to add a new API endpoint or understand how the BFF transforms data before sending it to the frontend, I don’t want to close the session and reopen it elsewhere. Instead, I run:
/add-dir ../bffFrom that point on, Claude can read, search, and edit files in both directories. I can ask it to trace a data flow from the React component all the way through the BFF endpoint, or to update both sides when adding a new feature. No need to copy-paste code between two separate sessions.
You can add multiple directories, and they stay active until you close the session.
Be mindful that each added directory increases the scope of what Claude can search and read. This can eat up your context window faster, especially if Claude starts exploring large codebases. Add directories when you need them, and keep an eye on the context bar in your statusline.
Know What You’re Spending
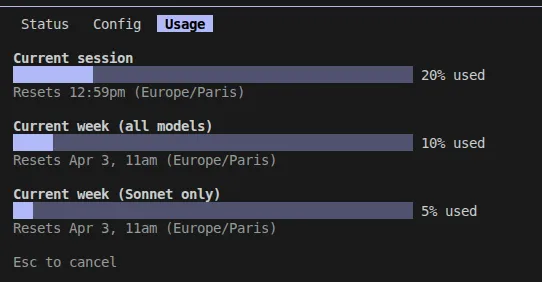
I’m often curious about how many tokens my session has consumed. So I run:
/usageIt shows a detailed breakdown of the token usage: input tokens, output tokens, cache reads and writes, and the total cost. This is useful for keeping an eye on expenses during long sessions, or just understanding how much context different operations consume.
Want this information always visible? Just ask Claude Code to add it to your statusline, for example: /statusline show token usage and cost. It will update the script for you automatically.
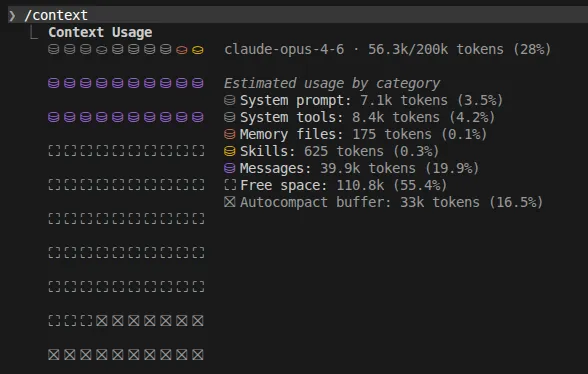
Visualize Your Context Window
When the context fills up, Claude tends to become less accurate. In my experience, this starts at around 200k tokens. In addition, every interaction costs more in terms of token consumption. This problem is exacerbated with Opus 1M, which doesn’t compact automatically until it reaches 950k tokens.
If your context fills up too quickly, it’s a good idea to see the context usage by category:
/contextIt displays a colored grid showing how your context window is being used. You can immediately see if tool outputs or large file reads are eating up space, and decide to compact or adjust your approach.
Compact, Rewind and Clear
However, if your context is almost filled, you’ve already spent too much tokens and produced less-than-ideal code. You should prevent context from filling up in the first place. One way of doing it is to compact the context by running:
/compactClaude does it automatically when it reaches 95% of the context window, but I find that it’s way too high for a 1M model.
As an alternative, if you’ve consumed a lot of context because of a long debugging session, or because you went down the wrong path, press Escape twice to rewind. Claude Code keeps checkpoints, and this shortcut lets you choose what to restore:
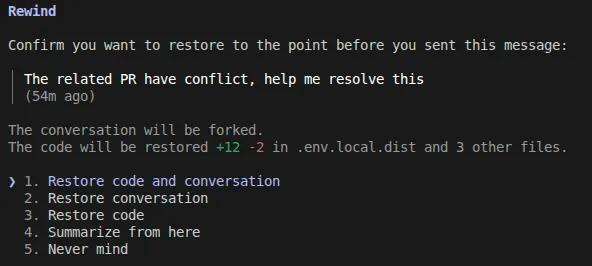
- Restore code only: You asked Claude to migrate a component from class to functional, but the result breaks your tests. You want to revert the files, but keep the conversation. Claude still understands what you’re trying to do and can try a different approach.
- Restore conversation only: Claude read 15 files and ran several commands to investigate a bug, bloating your context window. The one-line fix it applied is correct, but you don’t need all that investigation history eating up context. Rewind the conversation to reclaim space while keeping the code change.
- Restore both: You asked Claude to add caching to your API layer, but halfway through you realize the real bottleneck is the database query, not the API. Rewind everything, code and conversation, and start fresh with the right approach.
compact and rewind require a bit of a discipline. I find myself using a simpler approach for managing context usage with a third command that I use more often:
/clearIt wipes the context and starts a new session. I use it every time I change subject. There is no need to pollute the context with past work about another feature.
compact, rewind and clear provide dramatic improvements to the quality of the code produced by Claude, and they reduce your token bill. Use them liberally to keep your context clean and focused on the task at hand.
By the way…
I often want to start a side conversation while Claude is already working on my last prompt. For example, I might ask for an explanation of a specific line of code while waiting for a larger refactor to complete. Instead of waiting or opening a new session, I can just start typing my new question prefixed with the /btw command:
/btw can you explain what this line does? @src/utils/helpers.ts:42Claude will understand that it’s a separate thread and will answer it without interrupting the ongoing task. But it will still use the previous session context. It’s a great way to multitask without losing the flow of your main conversation.
Use /btw for short-lived side conversations. For longer discussions, create a new session by branching the current one with:
/branchSimplify
After a long coding session with many back-and-forths, the code may contain some leftover comments, TODOs, or just be more complex than it needs to be.
Claude Code has a specialized command for that:
/simplifyIt reads the diff of the last change and tries to simplify it as much as possible, without changing the functionality. If there are unit tests, they should still pass after calling this command. It’s like an automated refactoring that turns the code from correct to elegant. I also like that it helps with readability after a long debugging session that added a lot of temporary code.
Use Claude Opus for this command. I find that Sonnet is more likely to change the code in a way that breaks functionality.
Conclusion
These commands made Claude Code a much smoother experience for me. The ! prefix alone removed a lot of context switching, and the statusline turned my terminal into a proper dashboard. Each of these features addresses a real friction point in the developer experience, and together they make the chat loop feel like a full-fledged coding environment.
While this post covers the commands I use the most, there’s more to explore. Running /help will show you the full list of available commands and shortcuts. If you find features I missed, I’d love to hear about them.
Authors
Full-stack web developer at marmelab, Guillaume can turn complex business logic into an elegant and maintainable program. He brews his own beer, too.