
Handling Relationships in React Admin

One of React Admin’s undeniable strengths is the way it deals with relationships.
Even though React Admin started as an engine to generate CRUD interfaces, following a resource-based architecture, it quickly evolved to include components allowing to work with relational models.
These components offer a convenient way to fetch, render, pick data from or navigate to a related record.
All types of relationships are supported: one-to-many, many-to-one, one-to-one, and even many-to-many.
In this tutorial, we’ll use concrete examples of relational data, to illustrate and dive deeper into what makes React Admin great at visualizing and editing relationships.
The source code resulting from this tutorial can be found on GitHub: https://github.com/marmelab/react-admin-relationships-example
The Data Model
To start, we’ll consider a simple data model with two resources: books and authors.
They are bound together by a one-to-many relationship: a single author can write many books.
┌──────────────┐ ┌────────────────┐│ books │ │ authors ││--------------│ │----------------││ id │ ┌───│ id ││ author_id │╾──┘ │ first_name ││ title │ │ last_name ││ year │ │ date_of_birth │└──────────────┘ └────────────────┘Each book has an author_id field targeting the id of its author.
Sample App
Let’s start by creating a new React Admin app.
We can use the convenient Create React Admin tool for that, which will scaffold a React app using Vite, and automatically configure the project to use React Admin.
npx create-react-admin@latest react-admin-relationships-exampleWhen prompted, we can pick the Fakerest dataProvider, and declare two resources: books and authors.
In the freshly created project react-admin-relationships-example, we can edit data.json to paste in some data following our data model.
{ "books": [ { "id": 1, "title": "War and Peace", "author_id": 1, "year": 1869 } // ... ], "authors": [ { "id": 1, "first_name": "Leo", "last_name": "Tolstoy", "date_of_birth": "1828-09-09" } // ... ]}Then run the app with the following command:
npm run devThanks to React Admin and its built-in guessers, we immediately get a working app, with a List, an Edit, and a Show view for each resource.
The ReferenceField Component
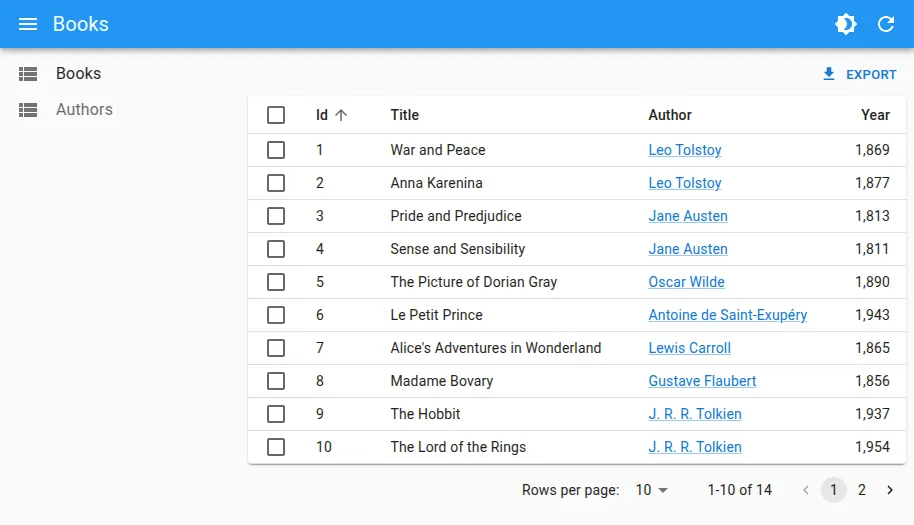
When viewing a book, either from the List view or the Show view, we want to see the related author.
But hey, look! In the generated views for the book resource, there’s already an Author field which seems to point to the author’s id.
Indeed, React Admin guessers are clever enough to have detected the possible relationship from the field’s name (author_id), so React Admin already assumed it should use a <ReferenceField> there.
// Guessed List:import { Datagrid, List, NumberField, ReferenceField, TextField } from 'react-admin';
export const BookList = () => (    <List>        <Datagrid>            <TextField source="id" />            <TextField source="title" />            <ReferenceField source="author_id" reference="authors" />            <NumberField source="year" />        </Datagrid>    </List>);
As the name implies, <ReferenceField> is a component allowing to render a field from a reference record. It can be used for both many-to-one and one-to-one relationships.
It already works great and allows to navigate to the related author with a click.
By default, <ReferenceField> will redirect to the Show view if there is one, or else to the Edit view. Of course, it won’t render a link if none of those views exist.
This behavior can easily be customized via the link prop.
Customizing The Record Representation
However, instead of the author id, it would be better if we could see the author’s name.
The simplest way to do that is to add a recordRepresentation to the author resource.
Defining a recordRepresentation for a resource is a convenient way to tell React Admin how it should render a record of that resource in the UI, for instance when it appears as a reference, or in the AppBar’s title.
So let’s leverage recordRepresentation to tell React Admin it should render an author using their first and last name:
export const App = () => ( <Admin layout={Layout} dataProvider={dataProvider}> <Resource name="books" list={ListGuesser} edit={EditGuesser} show={ShowGuesser} /> <Resource name="authors" list={ListGuesser} edit={EditGuesser} show={ShowGuesser} recordRepresentation={(author) => `${author.first_name} ${author.last_name}`} /> </Admin>);It’s much more convenient to see the author’s name instead of an id!
ReferenceField vs Custom Component
Let’s take a look at what it would take to create our own component to achieve the same functionality.
We’ll create a component called <AuthorField>. It needs to leverage the following hooks and components:
useRecordContextto get the current book’s data and theauthor_iduseGetOneto call the dataProvider to fetch the author’s data from their iduseCreatePath, a React Admin hook allowing to easily create a redirect path to a resource<Link>, areact-routercomponent allowing to render a link
The implementation would be close to the following:
const AuthorField = () => {  const record = useRecordContext();  const {    data: author,    isPending,    error,  } = useGetOne(    "authors",    { id: record?.author_id },    { enabled: !!record?.author_id },  );
  const createPath = useCreatePath();  const authorShowPath = createPath({    resource: "authors",    id: record?.author_id,    type: "show",  });  // to prevent click bubbling in a datagrid with rowClick  const stopPropagation = (e: React.MouseEvent) => e.stopPropagation();
  if (!record || isPending || error || !author) return null;
  return (    <Typography      variant="body2"      component={Link}      to={authorShowPath}      onClick={stopPropagation}      color="primary"    >      {author.first_name} {author.last_name}    </Typography>  );};
As you can see, the code of the <AuthorField> component is quite long. Plus it does not deal with the error and loading states. In a real-world application, we would probably need a more complete implementation.
Fortunately, <ReferenceField> handles these states by default for you.
This puts into perspective how much more convenient it is to replace all this by a single line:
<ReferenceField source="author_id" reference="authors" />
Query Aggregation
As a bonus, using <ReferenceField> offers an additional advantage over the <AuthorField>: it automatically aggregates the API calls to fetch the related authors!
| Before | After |
|---|---|
| |
Reusing ReferenceField In The Book Show View
Of course, we can use the same <ReferenceField> in the Book Show view!
export const BookShow = () => ( <Show> <SimpleShowLayout> <TextField source="id" /> <TextField source="title" /> <ReferenceField source="author_id" reference="authors" /> <NumberField source="year" /> </SimpleShowLayout> </Show>);Here is the result. Notice the loaders, the links, and the usage of the cache when we come back to the list.
Embedding And Prefetching Relationships
Some API backends have a knowledge of the relationships between resources and can embed related records in the response.
If you are using a Data Provider supporting this feature (for instance the JSON Server Data Provider), React Admin can take advantage of it to reduce the amount of API calls.
If you choose to prefetch the related data, then using <ReferenceField> won’t trigger an additional request to the API:
const PostList = () => ( <List queryOptions={{ meta: { prefetch: ["author"] } }}> <Datagrid> <TextField source="title" /> {/** renders without an additional request */} <ReferenceField source="author_id" reference="authors" /> </Datagrid> </List>);If instead you choose to embed the related data in the record, you can avoid using <ReferenceField> altogether:
const PostList = () => ( <List> <List queryOptions={{ meta: { embed: ["author"] } }}> <Datagrid> <TextField source="title" /> <ReferenceField source="author_id" reference="authors> <TextField source="name" /> </ReferenceField> <TextField source="author.name" /> </Datagrid> </List>);However, react-admin works fine even without these optimizations, as it aggregates the API calls to fetch the related data, it doesn’t block the UI while fetching the related data, and it caches the related data for future use.
The ReferenceManyField Component
Now, let’s say we would like to see all books written by an author on the Show page.
This is a one-to-many relationship, and for that, React Admin offers the <ReferenceManyField> component.
We’ll need to pass two props to it:
reference: the name of the reference resource (booksin our case)target: the name of the field of the books resource holding the reference to the author (author_idin our case)
Then, we can use any List component as children of <ReferenceManyField> to render each related book. We can for instance use a <Datagrid>.
const AuthorShow = () => ( <Show> <SimpleShowLayout> <TextField source="id" /> <TextField source="first_name" /> <TextField source="last_name" /> <DateField source="date_of_birth" /> <ReferenceManyField reference="books" target="author_id" label="Books by this author" > <Datagrid bulkActionButtons={false}> <TextField source="id" /> <TextField source="title" /> <ReferenceField source="author_id" reference="authors" link="show" /> <NumberField source="year" /> </Datagrid> </ReferenceManyField> </SimpleShowLayout> </Show>);By default, <Datagrid> adds checkboxes to the start of each row, allowing to perform bulk actions like mass deletion. To disable this functionality, we can simply set the bulkActionButtons={false} prop, as we did in the example above.
ReferenceManyField vs Custom Component
Again, let’s take a moment to think about what it would take to implement such a component ourselves.
We would need the following:
- The
useParamsoruseRecordContexthook, to get the currentauthor_id - The
useGetListhook, to fetch the list of books, filtered by author - The
useListhook to create aListContext - The
<Labeled>component to make the field look nice - To provide our own
<ResourceContext>, otherwise clicking on a row would redirect to the author instead of the book - The same
<Datagrid>as before.
Here is a possible implementation.
export const AuthorShow = () => {  const { id: author_id } = useParams<"id">();  const {    data: books,    error,    isPending,  } = useGetList(    "books",    { filter: { author_id }, pagination: { page: 1, perPage: 100 } },    { enabled: !!author_id },  );  const booksListContext = useList({ data: books, error, isPending });
  return (    <Show>      <SimpleShowLayout>        <TextField source="id" />        <TextField source="first_name" />        <TextField source="last_name" />        <DateField source="date_of_birth" />        <Labeled label="Books by this author" fullWidth>          <ResourceContextProvider value="books">            <ListContextProvider value={booksListContext}>              <Datagrid bulkActionButtons={false} rowClick="show">                <TextField source="id" />                <TextField source="title" />                <ReferenceField                  source="author_id"                  reference="authors"                  link="show"                />                <NumberField source="year" />              </Datagrid>            </ListContextProvider>          </ResourceContextProvider>        </Labeled>      </SimpleShowLayout>    </Show>  );};
Here, we can pass the error and isPending states directly to useList, which makes them available for the child component (<Datagrid>).
We get roughly the same result as before.
But there’s a catch! With this custom implementation, we need to fetch all related books, as subsequent sorting or pagination is applied client-side! This is why we used a high perPage value (perPage: 100).
<ReferenceManyField>, on the other hand, allows to do the pagination server-side! 🎉
To enable pagination, all we have to do is add the pagination prop:
<ReferenceManyField reference="books" target="author_id" label="Books by this author" pagination={<Pagination />}> {/* ... */}</ReferenceManyField>Here is our Author Show page with pagination enabled.
You can use rowsPerPageOptions to change the pagination options as in the video.
The ReferenceInput Component
Now let’s go back to the books for a moment. We can now see any book’s author, but what if we want to change it?
If we look at the Edit view generated by React Admin, we can see that, again, it cleverly guessed the reference and already added a <ReferenceInput> component to the Edit view.
// Guessed Edit:import { Edit, NumberInput, ReferenceInput, SimpleForm, TextInput } from 'react-admin';
export const BookEdit = () => ( <Edit> <SimpleForm> <TextInput source="id" /> <TextInput source="title" /> <ReferenceInput source="author_id" reference="authors" /> <NumberInput source="year" /> </SimpleForm> </Edit>);As you may have guessed, <ReferenceInput> is an input component allowing to edit a field pointing to a reference record.
It renders an <AutocompleteInput> as its default child, which allows to easily pick one of the available options. It offers an autocomplete feature (hence the name), allowing to search among the results, and even supports creating new options on the fly!
<ReferenceInput> only needs to know the source field (holding the reference) and the reference resource name.
<ReferenceInput source="author_id" reference="authors" />If you never implemented a similar component before, you could be surprised by the amount of complexity hidden behind this single line of code.
Indeed, it is responsible of:
- Fetching the list of possible choices
- Fetching the currently selected choice
- Updating the list (i.e. filtering it) each time the autocomplete input value changes
- Debouncing the API calls (to avoid sending too many requests as we type)
ReferenceInput vs Custom Component
If we were to build such an input, here’s what we would need:
- The
useGetListhook to fetch the possible authors - The
<AutocompleteInput>component to pick one of them - Both
useRecordContextanduseGetOnehooks to get the current author’s data (as it may not be present in the filtered list) - A React State holding a
filterthat we can use inuseGetListto filter the authors server-side - To leverage
keepPreviousDatato avoid clearing the input each time the filter changes - To leverage
lodash/debounceto avoid too many calls togetList - Some memoization to avoid losing the input because of a rerender
Here is a possible implementation:
const AuthorAutocompleteInput = () => {  // Fetch the currently selected author's data  const book = useRecordContext();  const {    data: currentAuthor,    error,    isPending,  } = useGetOne(    "authors",    { id: book?.author_id },    { enabled: !!book?.author_id },  );
  // Fetch the (filtered) list of possible authors  const [authorFilter, setAuthorFilter] = useState<string | undefined>(    undefined,  );  const { data: authors } = useGetList(    "authors",    {      pagination: { page: 1, perPage: 100 },      filter: { q: authorFilter },    },    // keep previous data as placeholder data to avoid clearing the input    // each time the filter changes    { placeholderData: keepPreviousData },  );
  // (Debounced) update the filter on input change  const onInputChange = debounce(    (      _event: React.SyntheticEvent,      value: string,      reason: AutocompleteInputChangeReason,    ) => {      if (reason === "input") {        setAuthorFilter(value);      }      if (reason === "reset" || reason === "clear") {        setAuthorFilter(undefined);      }    },    500,  );
  // Add the current author to the list of choices if not already present  const choices = useMemo(() => {    if (!authors) return authors;    if (authors?.some((author) => author.id === currentAuthor?.id)) {      return authors;    }    return [...authors, currentAuthor];  }, [authors, currentAuthor]);
  // Memoized optionText  const optionText = useCallback(    (author) => `${author.first_name} ${author.last_name}`,    [],  );
  if (error || isPending || !authors) return null;  return (    <AutocompleteInput      source="author_id"      choices={choices}      optionText={optionText}      onInputChange={onInputChange}    />  );};
As you can see, this is becoming quite long and complex. 😮
And yet, this implementation still has limitations:
- It does not update
currentAuthorif we select another author - It does not allow to create a new author on the fly
So the TLDR is: <ReferenceInput> will save you a lot of time and effort, while still being very configurable and versatile.
The ReferenceManyInput Component
Now, let’s imagine we want to edit the books from the Author view.
It would require:
- updating books whose data have changed
- creating new books that were added
- deleting books that were removed
…all on a single click on the Save button. Can we even do that?
Good news, we can! 🙂 React Admin offers a component that will perform all these actions for you: <ReferenceManyInput>.
Note: This component is part of the Enterprise Edition of React Admin. Head to the website to learn more about the available features and plans!
Once the ra-relationships package is set up, adding it to the Author Edit view is very simple: just add <ReferenceManyInput>, and pass a <SimpleFormIterator> with some inputs as child, like you would with <ArrayInput>:
const AuthorEdit = () => ( <Edit> <SimpleForm> <TextInput source="id" /> <TextInput source="first_name" /> <TextInput source="last_name" /> <DateInput source="date_of_birth" /> <ReferenceManyInput reference="books" target="author_id"> <SimpleFormIterator inline disableReordering> <TextInput source="title" /> <NumberInput source="year" /> </SimpleFormIterator> </ReferenceManyInput> </SimpleForm> </Edit>);And voilà! You can now edit the related books’ data directly from the Author Edit view.
You may have noticed there is no input for the author_id in our form. And yet, the newly created book is correctly linked to the author.
That’s one of the magic tricks of <ReferenceManyInput>, it automatically sets the author_id for you!
You can confirm that in the DevTools console:
create books {"data":{"title":"Cossacks","author_id":1,"year":1863}}Handling Many-to-many Relationships
Now, let’s imagine we would like to regroup these books into collections. Each book could appear in several collections, so this requires a many-to-many relationship.
This could translate into the following data model:
┌──────────────┐ ┌───────────────────┐ ┌──────────────┐│ books │ │ books_collections │ │ collections ││--------------│ │-------------------│ │--------------││ id │───┐ │ id │ ┌───│ id ││ author_id │ └───│ book_id │ │ │ name ││ title │ │ collection_id │───┘ │ type ││ year │ └───────────────────┘ └──────────────┘└──────────────┘We could, for instance, group the books like so:
By Period:
- 19th Century Literature
- “War and Peace” (1869)
- “Pride and Prejudice” (1813)
- “The Picture of Dorian Gray” (1890)
- “Alice’s Adventures in Wonderland” (1865)
- “Madame Bovary” (1857)
- 20th Century Literature
- “The Little Prince” (1943)
- “The Hobbit” (1937)
- “Harry Potter and the Philosopher’s Stone” (1997)
- “The Alchemist” (1988)
- “A Catcher in the Rye” (1951)
- “Ulysses” (1922)
By Genre:
- Fantasy
- “The Hobbit” (1937)
- “Harry Potter and the Philosopher’s Stone” (1997)
- “The Little Prince” (1943)
- “Alice’s Adventures in Wonderland” (1865)
- Classics
- “War and Peace” (1869)
- “Pride and Prejudice” (1813)
- “The Picture of Dorian Gray” (1890)
- “Madame Bovary” (1857)
- “Ulysses” (1922)
- “A Catcher in the Rye” (1951)
- Philosophical
- “The Alchemist” (1988)
- “The Little Prince” (1943)
- “Ulysses” (1922)
In our <Admin>, we could declare two additional <Resource>: one for collections and one for books_collections.
However, it would be cumbersome to manage collections this way.
Fortunately, React Admin offers two very useful components for such cases.
The ReferenceManyToManyField Component
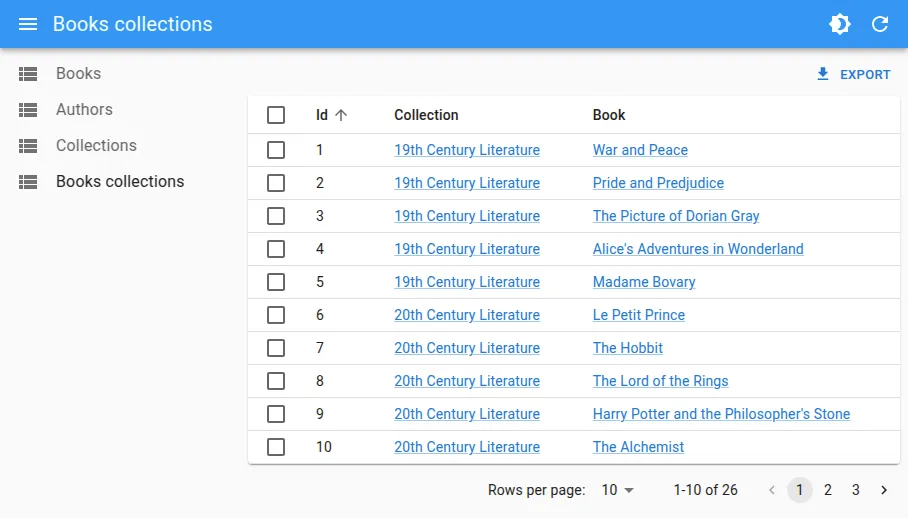
First, we need to list all books that are part of a collection directly in the collection list and show pages.
Seems like a lot of work? It’s actually really easy, leveraging the <ReferenceManyToManyField> component!
To keep a concise UI in the List, we can render each book using a <ChipField>:
export const CollectionList = () => ( <List> <Datagrid> <TextField source="id" /> <TextField source="name" /> <TextField source="type" /> <ReferenceManyToManyField reference="books" through="books_collections" using="collection_id,book_id" label="Books" > <SingleFieldList> <ChipField source="title" /> </SingleFieldList> </ReferenceManyToManyField> </Datagrid> </List>);As you can see, React Admin is able to perform all the requests required to fetch the related data (i.e. first fetching books_collections, then books) and even renders a link redirecting to the book show view.
Now, let’s add a <ReferenceManyToManyField> to the Collection Show view, but this time we can render the books in a <Datagrid> since we have more room.
<ReferenceManyToManyField reference="books" through="books_collections" using="collection_id,book_id" label="Books"> <Datagrid bulkActionButtons={false}> <TextField source="id" /> <TextField source="title" /> <ReferenceField source="author_id" reference="authors" /> <NumberField source="year" /> </Datagrid></ReferenceManyToManyField>Great! It’s so much better to be able to see all the books in our collection!
As you can see, it’s even possible to use a <ReferenceField> inside a <ReferenceManyToManyField>!
Using the same principle, we can also see in which collections a book appears. Let’s add the following to the Book Show view:
<ReferenceManyToManyField reference="collections" through="books_collections" using="book_id,collection_id" label="Collections"> <SingleFieldList linkType="show"> <ChipField source="name" /> </SingleFieldList></ReferenceManyToManyField>Sooo much better! 😌
Plus, as you saw, React Admin handles the loading state, error state, cache update, and navigation links automatically! ✅
The ReferenceManyToManyInput Component
Now, let’s take things up to the highest level, and actually edit the many-to-many relationship. 😎
You probably know the song by now, React Admin already comes with a component for that! What more could you ask for? 🥰
Let’s say we want to be able to edit the collections a book appears in, from the Book Edit page.
We can simply add the <ReferenceManyToManyInput> component like so:
export const BookEdit = () => ( <Edit> <SimpleForm> <TextInput source="id" /> <TextInput source="title" /> <ReferenceInput source="author_id" reference="authors" /> <NumberInput source="year" /> <ReferenceManyToManyInput reference="collections" through="books_collections" using="book_id,collection_id" > <AutocompleteArrayInput label="Collections" optionText="name" /> </ReferenceManyToManyInput> </SimpleForm> </Edit>);And that’s it! We are able to edit the collections. React Admin will take care of triggering the calls to create or deleteMany on the books_collections resource as needed.
As a bonus, let’s use a <DualListInput> to select which books to include in a collection from the Collection Edit view.
<ReferenceManyToManyInput reference="books" through="books_collections" using="collection_id,book_id"> <DualListInput label="Books" optionText="title" /></ReferenceManyToManyInput>Now we have nice and convenient way to edit our many-to-many relationship, all with just a few lines of code!
The ReferenceManyCount Component
As an added bonus, let’s take a quick look at the <ReferenceManyCount> component.
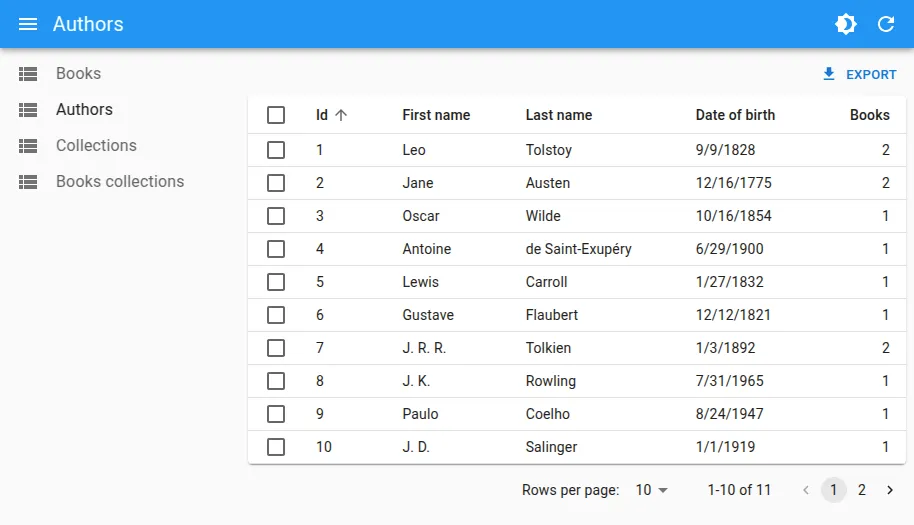
As the name implies, it is useful to display the number of records related to the current one. For instance, we could display the number of books each author has in the Author List. Let’s do that!
We simply need to add the following line to the <Datagrid>:
<ReferenceManyCount reference="books" target="author_id" label="Books" />And that’s it! We get a new column called ‘Books’ with the number of books.
<ReferenceManyCount> requires the same props as <ReferenceManyField>, so that’s easy to set up!
Conclusion
This post was a bit on the long side because we wanted to properly illustrate how much time and code React Admin can save when dealing with relations.
But there are even more components we did not cover here: <ReferenceArrayField>, <ReferenceArrayInput>, <ReferenceOneField>, <ReferenceOneInput> and even <ReferenceNodeInput> (for tree-shaped data).
With the help of this tutorial, and all the reference components listed above, you should have everything you need to quickly and seamlessly manage your relational dataset in React Admin. 🙂
You can find the source code resulting from this tutorial on GitHub: https://github.com/marmelab/react-admin-relationships-example

Authors
Full-stack web developer at marmelab, JB is a Software Engineer with a strong Java experience. He plays the piano and runs fast, and not only because he has long fingers and tall legs.