
Setting Up The Data Provider
<Admin dataProvider>
The first step to use a Data Provider is to pass it to the <Admin> component. You can do so by using the dataProvider prop.
As an example, let’s focus on the Simple REST data provider. It fits REST APIs using simple GET parameters for filters and sorting.
Install the ra-data-simple-rest package to use this provider.
yarn add ra-data-simple-rest
Then, initialize the provider with the REST backend URL, and pass the result to the dataProvider prop of the <Admin> component:
// in src/App.js
import * as React from "react";
import { Admin, Resource } from 'react-admin';
import simpleRestProvider from 'ra-data-simple-rest';

import { PostList } from './posts';

const dataProvider = simpleRestProvider('http://path.to.my.api/');

const App = () => (
    <Admin dataProvider={dataProvider}>
        <Resource name="posts" list={PostList} />
    </Admin>
);

export default App;
That’s enough to make all react-admin components work.
Here is how this Data Provider maps react-admin calls to API calls:
| Method name | API call |
|---|---|
getList |
GET http://my.api.url/posts?sort=["title","ASC"]&range=[0, 24]&filter={"title":"bar"} |
getOne |
GET http://my.api.url/posts/123 |
getMany |
GET http://my.api.url/posts?filter={"ids":[123,456,789]} |
getManyReference |
GET http://my.api.url/posts?filter={"author_id":345} |
create |
POST http://my.api.url/posts |
update |
PUT http://my.api.url/posts/123 |
updateMany |
Multiple calls to PUT http://my.api.url/posts/123 |
delete |
DELETE http://my.api.url/posts/123 |
deleteMany |
Multiple calls to DELETE http://my.api.url/posts/123 |
Note: The simple REST client expects the API to include a Content-Range header in the response to getList calls. The value must be the total number of resources in the collection. This allows react-admin to know how many pages of resources there are in total, and build the pagination controls.
Content-Range: posts 0-24/319
If your API is on another domain as the JS code, you’ll need to whitelist this header with an Access-Control-Expose-Headers CORS header.
Access-Control-Expose-Headers: Content-Range
Enabling Query Logs
React-admin uses react-query to call the dataProvider. You can see all the calls made by react-query in the browser thanks to the react-query devtools.
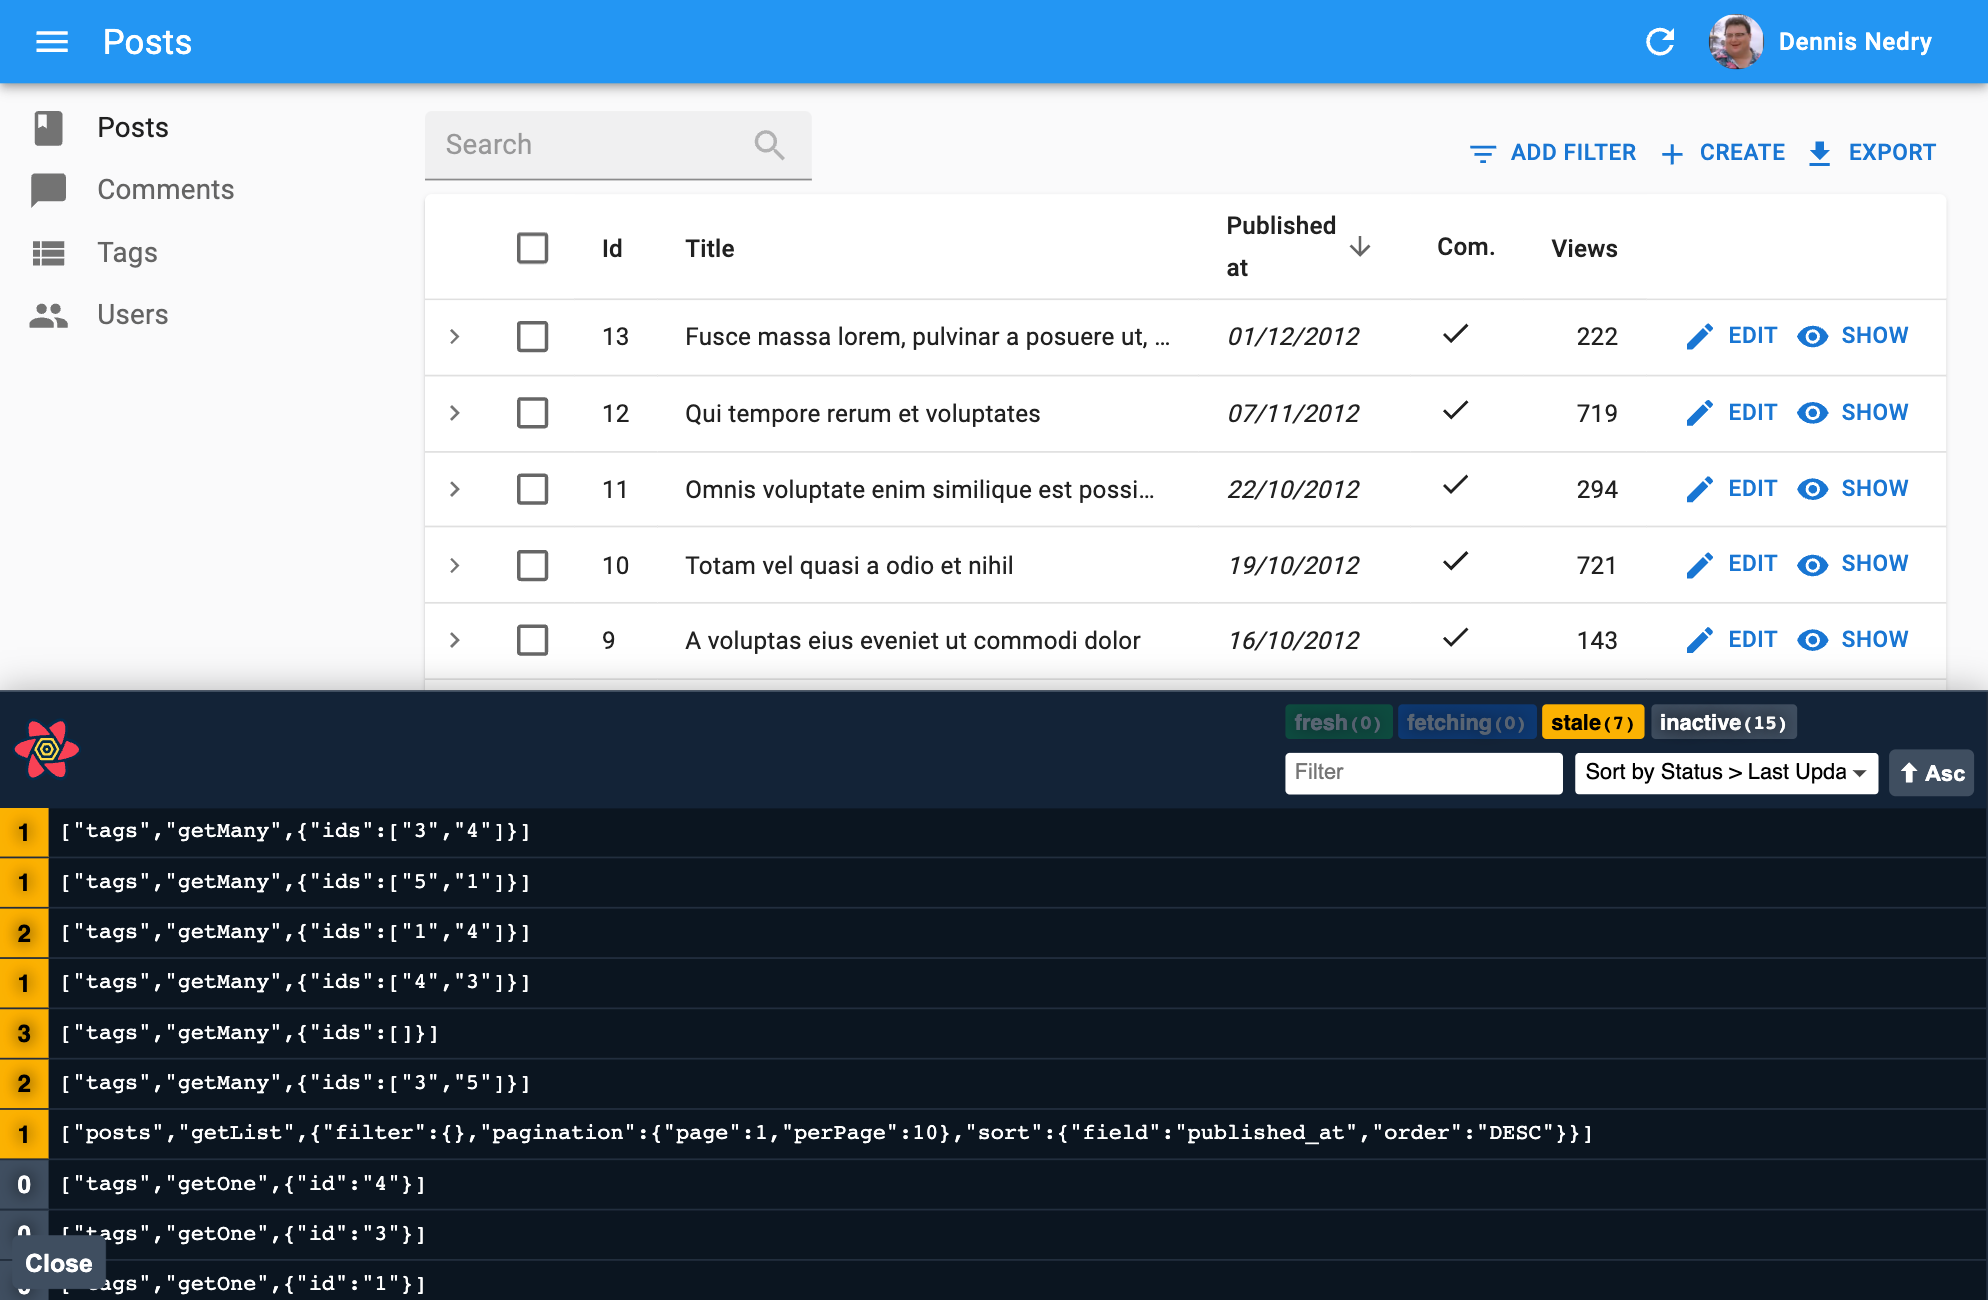
To enable these devtools, add the <ReactQueryDevtools> component to a custom Layout:
import { Layout } from 'react-admin';
import { ReactQueryDevtools } from 'react-query/devtools';

export const MyLayout = props => (
    <>
        <Layout {...props} />
        <ReactQueryDevtools initialIsOpen={false} />
    </>
);
Then use this layout in <Admin>:
import { Admin, Resource } from 'react-admin';

import { dataProvider } from './dataProvider';
import { MyLayout } from './MyLayout';

export const App = () => (
    <Admin dataProvider={dataProvider} layout={MyLayout}>
        <Resource name="posts" list={PostList} />
    </Admin>
);
Tip: By default, React Query Devtools are only included in bundles when process.env.NODE_ENV === 'development', so you don’t need to worry about excluding them during a production build.
Tip: Some Data Providers have their own logging system. Refer to their documentation to learn more. For instance, the ra-data-fakerest package logs all the calls to the REST API in the browser console when you pass true as second argument:
// in src/App.js
import * as React from "react";
import { Admin, Resource } from 'react-admin';
import fakeDataProvider from 'ra-data-fakerest';

const dataProvider = fakeDataProvider({ /* data here */ }, true);

const App = () => (
    <Admin dataProvider={dataProvider}>
        // ...
    </Admin>
);
Handling Authentication
In react-admin, the dataProvider is responsible for fetching data, and the authProvider is responsible for managing authentication. In order to authenticate API requests, you must use info from the authProvider in the queries made by the dataProvider. You can use localStorage for this purpose.
For instance, here is how to use a token returned during the login process to authenticate all requests to the API via a Bearer token, using the Simple REST data provider:
// in authProvider.js
const authProvider = {
    login: ({ username, password }) =>  {
        const request = new Request('https://mydomain.com/authenticate', {
            method: 'POST',
            body: JSON.stringify({ username, password }),
            headers: new Headers({ 'Content-Type': 'application/json' }),
        });
        return fetch(request)
            .then(response => {
                if (response.status < 200 || response.status >= 300) {
                    throw new Error(response.statusText);
                }
                return response.json();
            })
            .then(({ token }) => {
                // store the token in local storage
                localStorage.setItem('token', token);
            })
            .catch(() => {
                throw new Error('Network error')
            });
    },
    // ...
};

// in dataProvider.js
import { fetchUtils } from 'react-admin';
import simpleRestProvider from 'ra-data-simple-rest';

const fetchJson = (url, options = {}) => {
    options.user = {
        authenticated: true,
        // use the token from local storage
        token: localStorage.getItem('token')
    };
    return fetchUtils.fetchJson(url, options);
};
const dataProvider = simpleRestProvider('http://path.to.my.api/', fetchJson);
Now all the requests to the REST API will contain the Authorization: SRTRDFVESGNJYTUKTYTHRG header.
In this example, the simpleRestProvider accepts a second parameter to set authentication. Each Data Provider has its own way of accepting credentials. Refer to the documentation of your Data Provider for details.
Adding Custom Headers
The dataProvider doesn’t “speak” HTTP, so it doesn’t have the notion of HTTP headers. If you need to pass custom headers to the API, the syntax depends on the Data Provider you use.
For instance, the simpleRestProvider function accepts an HTTP client function as its second argument. By default, it uses react-admin’s fetchUtils.fetchJson() function as the HTTP client. It’s similar to the HTML5 fetch(), except it handles JSON decoding and HTTP error codes automatically.
That means that if you need to add custom headers to your requests, you can just wrap the fetchJson() call inside your own function:
import { fetchUtils, Admin, Resource } from 'react-admin';
import simpleRestProvider from 'ra-data-simple-rest';

const fetchJson = (url, options = {}) => {
    if (!options.headers) {
        options.headers = new Headers({ Accept: 'application/json' });
    }
    // add your own headers here
    options.headers.set('X-Custom-Header', 'foobar');
    return fetchUtils.fetchJson(url, options);
}
const dataProvider = simpleRestProvider('http://path.to.my.api/', fetchJson);

const App = () => (
    <Admin dataProvider={dataProvider}>
        <Resource name="posts" list={PostList} />
    </Admin>
);
Tip: For TypeScript users, here is a typed version of the fetchJson function:
const fetchJson = (url: string, options: fetchUtils.Options = {}) => {
    const customHeaders = (options.headers ||
        new Headers({
            Accept: 'application/json',
        })) as Headers;
    // add your own headers here
    customHeaders.set('X-Custom-Header', 'foobar');
    options.headers = customHeaders;
    return fetchUtils.fetchJson(url, options);
}
Now all the requests to the REST API will contain the X-Custom-Header: foobar header.
Tip: Have a look at the fetchJson documentation to learn more about its features.
Warning: If your API is on another domain as the JS code, you’ll need to whitelist this header with an Access-Control-Expose-Headers CORS header.
Access-Control-Expose-Headers: X-Custom-Header
This must be done on the server side.
Adding Lifecycle Callbacks
It often happens that you need specific data logic to be executed before or after a dataProvider call. For instance, you may want to delete the comments related to a post before deleting the post itself. The general advice is to put that code on the server-side. If you can’t, the next best place to put this logic is the dataProvider.
You can, of course, use if statements in the dataProvider methods to execute the logic only for the resources that need it, like so:
const dataProvider = {
    // ...
    delete: async (resource, params) => {
        if (resource === 'posts') {
            // delete all comments related to the post
            // first, fetch the comments
            const { data: comments } = await httpClient(`${apiUrl}/comments?post_id=${params.id}`);
            // then, delete them
            await Promise.all(comments.map(comment => httpClient(`${apiUrl}/comments/${comment.id}`, {
                method: 'DELETE',
            })));
        }
        // fallback to the default implementation
        const { data } = await httpClient(`${apiUrl}/${resource}/${params.id}`, {
            method: 'DELETE',
        });

        return { data };
    },
    // ...
}
But the dataProvider code quickly becomes hard to read and maintain. React-admin provides a helper function to make it easier to add lifecycle callbacks to the dataProvider: withLifecycleCallbacks:
import { withLifecycleCallbacks } from 'react-admin';

const dataProvider = withLifecycleCallbacks(baseDataProvider, [
    {
        resource: 'posts',
        beforeDelete: async (params, dataProvider) => {
            // delete all comments related to the post
            // first, fetch the comments
            const { data: comments } = await dataProvider.getList('comments', {
                filter: { post_id: params.id },
                pagination: { page: 1, perPage: 1000 },
                sort: { field: 'id', order: 'DESC' },
            });
            // then, delete them
            await dataProvider.deleteMany('comments', { ids: comments.map(comment => comment.id) });

            return params;
        },
    },
]);
Check the withLifecycleCallbacks documentation for more details.
Handling File Uploads
You can leverage withLifecycleCallbacks to add support for file upload.
For instance, the following Data Provider extends the ra-data-simple-rest provider, and stores images passed to the dataProvider.update('posts') call as Base64 strings. React-admin offers an <ImageInput /> component that allows image upload:
import { withLifecycleCallbacks } from 'react-admin';
import simpleRestProvider from 'ra-data-simple-rest';

const dataProvider = withLifecycleCallbacks(simpleRestProvider('http://path.to.my.api/'), [
    {
        /**
         * For posts update only, convert uploaded image in base 64 and attach it to
         * the `picture` sent property, with `src` and `title` attributes.
         */
        resource: 'posts',
        beforeUpdate: async (params, dataProvider) => {
            // Freshly dropped pictures are File objects and must be converted to base64 strings
            const newPictures = params.data.pictures.filter(
                p => p.rawFile instanceof File
            );
            const formerPictures = params.data.pictures.filter(
                p => !(p.rawFile instanceof File)
            );

            return Promise.all(newPictures.map(convertFileToBase64))
                .then(base64Pictures =>
                    base64Pictures.map(picture64 => ({
                        src: picture64,
                        title: `${params.data.title}`,
                    }))
                )
                .then(transformedNewPictures =>
                    dataProvider.update(resource, {
                        data: {
                            ...params.data,
                            pictures: [
                                ...transformedNewPictures,
                                ...formerPictures,
                            ],
                        },
                    })
                );
        }
    }
]);

/**
 * Convert a `File` object returned by the upload input into a base 64 string.
 * That's not the most optimized way to store images in production, but it's
 * enough to illustrate the idea of data provider decoration.
 */
const convertFileToBase64 = file =>
    new Promise((resolve, reject) => {
        const reader = new FileReader();
        reader.onload = () => resolve(reader.result);
        reader.onerror = reject;

        reader.readAsDataURL(file.rawFile);
    });

export default myDataProvider;
Tip: use beforeSave instead of beforeUpdate to do the same for both create and update calls.
You can use the same technique to upload images to an object storage service, and then update the record using the URL of that stored object.
Adding Custom Methods
Your API backend may expose non-CRUD endpoints, e.g. for calling RPC endpoints.
For instance, let’s say your API exposes an endpoint to ban a user based on its id:
POST /api/user/123/ban
The react-admin way to expose these endpoints to the app components is to add a custom method in the dataProvider:
import simpleRestDataProvider from 'ra-data-simple-rest';

const baseDataProvider = simpleRestDataProvider('http://path.to.my.api/');

export const dataProvider = {
    ...baseDataProvider,
    banUser: (userId) => {
        return fetch(`/api/user/${userId}/ban`, { method: 'POST' })
            .then(response => response.json());
    },
}
Then you can use react-query’s useMutation hook to call the dataProvider.banUser() method:
import { useDataProvider } from 'react-admin';
import { useMutation } from 'react-query';

const BanUserButton = ({ userId }) => {
    const dataProvider = useDataProvider();
    const { mutate, isLoading } = useMutation(
        () => dataProvider.banUser(userId)
    );
    return <Button label="Ban" onClick={() => mutate()} disabled={isLoading} />;
};
Check the Calling Custom Methods documentation for more details.
Async Initialization
Some Data Providers need an asynchronous initialization phase (e.g. to connect to the API). To use such Data Providers, initialize them before rendering react-admin resources, leveraging React’s useState and useEffect.
For instance, the ra-data-hasura data provider needs to be initialized:
import React, { useState, useEffect } from 'react';
import buildHasuraProvider from 'ra-data-hasura';
import { Admin, Resource } from 'react-admin';

import { PostCreate, PostEdit, PostList } from './posts';

const App = () => {
    // start with an empty data provider
    const [dataProvider, setDataProvider] = useState(null);

    // initialize on mount
    useEffect(() => {
        buildHasuraProvider({ clientOptions: { uri: 'http://localhost:8080/v1/graphql' } })
            .then(() => setDataProvider(() => dataProvider));
    }, []);

    // hide the admin until the data provider is ready
    if (!dataProvider) return <p>Loading...</p>;

    return (
        <Admin dataProvider={dataProvider}>
            <Resource name="Post" list={PostList} edit={PostEdit} create={PostCreate} />
        </Admin>
    );
};

export default App;
Tip: This example uses the function version of setState (setDataProvider(() => dataProvider))) instead of the more classic version (setDataProvider(dataProvider)). This is because some legacy Data Providers are actually functions, and setState would call them immediately on mount.
Default Query Options
If you often need to pass the same query options to the data provider, you can use the <Admin queryClient> prop to set them globally.
import { Admin } from 'react-admin';
import { QueryClient } from 'react-query';

const queryClient = new QueryClient({
    defaultOptions: {
        queries: {
            retry: false,
            staleTime: Infinity,
        },
    }
});

const App = () => (
    <Admin queryClient={queryClient} dataProvider={...}>
        ...
    </Admin>
);
To know which query options you can override, check the Querying the API documentation and the <Admin queryClient> prop documentation.
Combining Data Providers
If you need to build an app relying on more than one API, you may face a problem: the <Admin> component accepts only one dataProvider prop. You can combine multiple data providers into one using the combineDataProviders helper. It expects a function as parameter accepting a resource name and returning a data provider for that resource.
For instance, the following app uses ra-data-simple-rest for the posts and comments resources, and ra-data-local-storage for the user resource:
import buildRestProvider from 'ra-data-simple-rest';
import buildStorageProvider from 'ra-data-local-storage';
import { Admin, Resource, combineDataProviders } from 'react-admin';

const dataProvider1 = buildRestProvider('http://path.to.my.api/');
const dataProvider2 = buildStorageProvider();

const dataProvider = combineDataProviders((resource) => {
    switch (resource) {
        case 'posts':
        case 'comments':
            return dataProvider1;
        case 'users':
            return dataProvider2;
        default:
            throw new Error(`Unknown resource: ${resource}`);
    }
});

export const App = () => (
    <Admin dataProvider={dataProvider}>
        <Resource name="posts" list={PostList} />
        <Resource name="comments" list={CommentList} />
        <Resource name="users" list={UserList} />
    </Admin>
);
If the choice of dataProvider doesn’t only rely on the resource name, or if you want to manipulate the resource name, combine Data Providers manually using a JavaScript Proxy object.
For instance, you can prefix your resource names to facilitate the API selection:
import buildRestProvider from 'ra-data-simple-rest';
import buildStorageProvider from 'ra-data-local-storage';
import { Admin, Resource, defaultDataProvider } from 'react-admin';

const dataProvider1 = buildRestProvider('http://path.to.my.api/');
const dataProvider2 = buildStorageProvider();

const dataProvider = new Proxy(defaultDataProvider, {
    get: (target, name) => {
        return (resource, params) => {
            if (typeof name === 'symbol' || name === 'then') {
                return;
            }
            if (resource.startsWith('api1/')) {
                return dataProvider1[name](resource.substring(5), params);
            }
            if (resource.startsWith('api2/')) {
                return dataProvider2[name](resource.substring(5), params);
            }
        }
    },
});

export const App = () => (
    <Admin dataProvider={dataProvider}>
        <Resource name="api1/posts" list={PostList} />
        <Resource name="api1/comments" list={CommentList} />
        <Resource name="api2/users" list={UserList} />
    </Admin>
);