
<CustomRoutes>
Lets you define custom pages in your react-admin application, using <Route> elements.
Usage
To register your own routes, pass one or several <CustomRoutes> elements as children of <Admin>. Declare as many <Route> as you want inside them.
// in src/App.js
import { Admin, Resource, CustomRoutes } from 'react-admin';
// see below for Route import

import { dataProvider } from './dataProvider';
import posts from './posts';
import comments from './comments';
import { Settings } from './Settings';
import { Profile } from './Profile';

const App = () => (
    <Admin dataProvider={dataProvider}>
        <Resource name="posts" {...posts} />
        <Resource name="comments" {...comments} />
        <CustomRoutes>
            <Route path="/settings" element={<Settings />} />
            <Route path="/profile" element={<Profile />} />
        </CustomRoutes>
    </Admin>
);

export default App;
The Route element depends on the routing library you use (e.g. react-router or tanstack-router):
// for react-router
import { Route } from 'react-router-dom';
// for tanstack-router
import { tanStackRouterProvider } from 'ra-router-tanstack';
const { Route } = tanStackRouterProvider;
Now, when a user browses to /settings or /profile, the components you defined will appear in the main part of the screen.
Tip: Custom routes don’t automatically appear in the menu. You have to manually customize the menu if you want custom routes to be accessible from the menu.
Tip: You can add custom routes as children of Resource elements. They will be available under the resource prefix.
children
children of the <CustomRoutes> component must be <Route> elements, mapping a path with a custom element.
// in src/App.js
import { Admin, Resource, CustomRoutes } from 'react-admin';
import { Route } from "react-router-dom";

import { dataProvider } from './dataProvider';
import { Settings } from './Settings';
import { Profile } from './Profile';

const App = () => (
    <Admin dataProvider={dataProvider}>
        <CustomRoutes>
            <Route path="/settings" element={<Settings />} />
            <Route path="/profile" element={<Profile />} />
        </CustomRoutes>
    </Admin>
);

export default App;
You can learn more about the <Route> element in the react-router documentation.
Tip: React-admin’s router abstraction uses duck-typing to detect Route elements, so you can use any Route component that has path, element, or index props. This works with both react-router and TanStack Router.
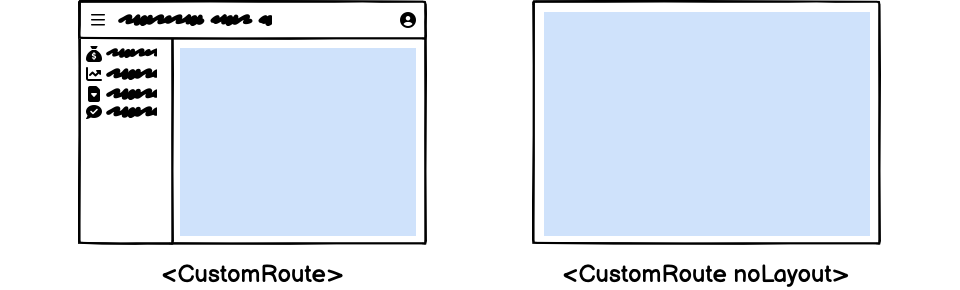
noLayout
By default, custom routes render within the application layout. If you want a custom route to render without the layout, e.g. for registration screens, then provide the noLayout prop on the <CustomRoutes> element.
Here is an example of application configuration mixing custom routes with and without layout:
// in src/App.js
import { Admin, CustomRoutes } from 'react-admin';
import { Route } from "react-router-dom";

import { dataProvider } from './dataProvider';
import { Register } from './Register';
import { Settings } from './Settings';
import { Profile } from './Profile';

const App = () => (
    <Admin dataProvider={dataProvider}>
        <CustomRoutes noLayout>
            <Route path="/register" element={<Register />} />
        </CustomRoutes>
        <CustomRoutes>
            <Route path="/settings" element={<Settings />} />
            <Route path="/profile" element={<Profile />} />
        </CustomRoutes>
    </Admin>
);
As illustrated above, there can be more than one <CustomRoutes> element inside an <Admin> component.
Securing Custom Routes
By default, custom routes can be accessed even by anomymous users. If you want to restrict access to authenticated users, use the <Authenticated> component when defining the route.
// in src/App.js
import { Admin, CustomRoutes, Authenticated } from 'react-admin';
import { Route } from "react-router-dom";

import { dataProvider } from './dataProvider';
import { Settings } from './Settings';

const App = () => (
    <Admin dataProvider={dataProvider}>
        <CustomRoutes>
            <Route path="/settings" element={<Authenticated><Settings /></Authenticated>} />
        </CustomRoutes>
    </Admin>
);
Customizing The Page Title
To define the page title (displayed in the app bar), custom pages should use the <Title> component.

Here is a simple example:
// in src/Settings.js
import * as React from "react";
import { Card, CardContent } from '@mui/material';
import { Title } from 'react-admin';

const Settings = () => (
    <Card>
        <Title title="My Page" />
        <CardContent>
            ...
        </CardContent>
    </Card>
);

export default Settings;
<Title> uses a React Portal, so it doesn’t matter where you put it in your component. The title will always be rendered in the app bar.
Adding Custom Routes to the Menu
To add your custom pages to the navigation menu, you have to replace the default menu by a custom menu with entries for the custom pages.
First, create a custom menu. Make sure to use the same value in the <Menu.Item to> prop as in the <Route path> prop.
// in src/MyMenu.js
import { Menu } from 'react-admin';
import SettingsIcon from '@mui/icons-material/Settings';
import PeopleIcon from '@mui/icons-material/People';

export const MyMenu = () => (
    <Menu>
        <Menu.DashboardItem />
        <Menu.ResourceItems />
        <Menu.Item to="/settings" primaryText="Users" leftIcon={<SettingsIcon />}/>
        <Menu.Item to="/profile" primaryText="Miscellaneous" leftIcon={<PeopleIcon />}/>
    </Menu>
);
Next, pass the custom menu to a custom <Layout> component:
// in src/MyLayout.js
import { Layout } from 'react-admin';
import { MyMenu } from './MyMenu';

export const MyLayout = ({ children }) => (
    <Layout menu={MyMenu}>
        {children}
    </Layout>
);
Finally, pass the custom <Layout> component to <Admin>:
// in src/App.js
import { Admin, Resource, CustomRoutes } from 'react-admin';
import { Route } from "react-router-dom";

import { dataProvider } from './dataProvider';
import { MyLayout } from './MyLayout';
import posts from './posts';
import comments from './comments';
import { Settings } from './Settings';
import { Profile } from './Profile';

const App = () => (
    <Admin dataProvider={dataProvider} layout={MyLayout}>
        <Resource name="posts" {...posts} />
        <CustomRoutes>
            <Route path="/settings" element={<Settings />} />
            <Route path="/profile" element={<Profile />} />
        </CustomRoutes>
    </Admin>
);
To learn more about custom menus, check the <Menu> documentation.
Linking To Custom Routes
You can link to your pages using the LinkBase component from react-admin. Make sure to use the same value in the <LinkBase to> prop as in the <Route path> prop.
import { LinkBase } from 'react-admin';

const SettingsButton = () => (
    <LinkBase to="/settings">
        Settings
    </LinkBase>
);
If you need to use Material UI’s Link component with router functionality, you can combine them:
import { LinkBase } from 'react-admin';
import { Link } from '@mui/material';

const SettingsButton = () => (
    <Link component={LinkBase} to="/settings">
        Settings
    </Link>
);
Combining the Router Link and the MUI Link is so common that react-admin provides a Link component that does exactly this:
import { Link } from 'react-admin';

const SettingsButton = () => (
    <Link to="/settings">
        Settings
    </Link>
);
Sub-Routes
Sometimes you want to add more routes to a resource path. For instance, you may want to add a custom page to the /posts resource, such as /posts/analytics.
To do so, add the <Route> elements as children of the <Resource> element:
import { Admin, Resource } from 'react-admin';
import { Route } from "react-router-dom";

import { dataProvider } from './dataProvider';
import posts from './posts';

const App = () => (
    <Admin dataProvider={dataProvider}>
        <Resource name="posts" {...posts}>
            <Route path="analytics" element={<PostAnalytics/>} />
        </Resource>
    </Admin>
);

// is equivalent to
const App = () => (
    <Admin dataProvider={dataProvider}>
        <Resource name="posts" {...posts} />
        <CustomRoutes>
            <Route path="/posts/analytics" element={<PostAnalytics />} />
        </CustomRoutes>
    </Admin>
);
This is usually useful for nested resources, such as books on authors:
// in src/App.jsx
import { Admin, Resource, ListGuesser, EditGuesser } from 'react-admin';
import { Route } from "react-router-dom";

const App = () => (
    <Admin dataProvider={dataProvider}>
        <Resource name="authors" list={ListGuesser} edit={EditGuesser}>
            <Route path=":authorId/books" element={<BookList />} />
        </Resource>
    </Admin>
);

// in src/BookList.jsx
import { useParams, List, DataTable } from 'react-admin';

const BookList = () => {
    const { authorId } = useParams();
    return (
        <List resource="books" filter={{ authorId }}>
            <DataTable>
                <DataTable.Col source="id" />
                <DataTable.Col source="title" />
                <DataTable.Col source="year" />
            </DataTable>
        </List>
    );
};
Tip: In the above example, the resource="books" prop is required in <List> because the ResourceContext defaults to authors inside the <Resource name="authors">.
Check the <Resource> element documentation for more information.