
Key Concepts
React-admin relies on a several design decisions that structure its codebase.
Single-Page Application
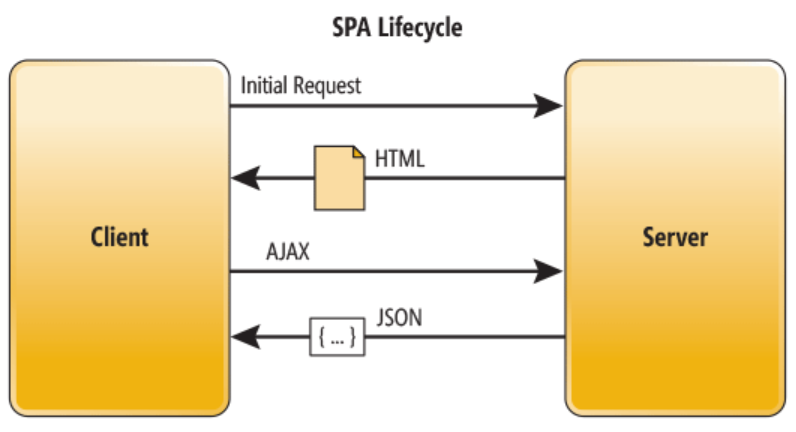
React-admin is specifically designed to build Single-Page Applications (SPA). In a react-admin app, the browser fetches the required HTML, CSS, and JavaScript to render the application only once. Subsequently, data is fetched from APIs through AJAX calls. This is in contrast to traditional web applications, where the browser fetches a new HTML page for each screen.
The SPA architecture ensures that react-admin apps are exceptionally fast, easy to host, and compatible with existing APIs without requiring a dedicated backend.
To achieve this, react-admin utilizes an internal router to display the appropriate screen when the user clicks on a link. By default, this router is powered by react-router, but you can also use TanStack Router through the routerProvider prop. Developers can define routes using the <Resource> component for CRUD routes and the <CustomRoutes> component for other routes.
For example, the following react-admin application:
import { Admin, Resource, CustomRoutes } from 'react-admin';
import { Route } from 'react-router-dom';

export const App = () => (
    <Admin dataProvider={dataProvider}>
        <Resource name="labels" list={LabelList} edit={LabelEdit} show={LabelShow} />
        <Resource label="genres" list={GenreList} />
        <Resource name="artists" list={ArtistList} edit={ArtistDetail} create={ArtistCreate}>
            <Route path=":id/songs" element={<SongList />} />
            <Route path=":id/songs/:songId" element={<SongDetail />} />
        </Resource>
        <CustomRoutes>
            <Route path="/profile" element={<Profile />} />
            <Route path="/organization" element={<Organization />} />
        </CustomRoutes>
    </Admin>
);
Declares the following routes:
/labels:<LabelList>/labels/:id:<LabelEdit>/labels/:id/show:<LabelShow>/genres:<GenreList>/artists:<ArtistList>/artists/:id:<ArtistDetail>/artists/create:<ArtistCreate>/artists/:id/songs:<SongList>/artists/:id/songs/:songId:<SongDetail>/profile:<Profile>/organization:<Organization>
The <Resource> component allows react-admin to automatically link CRUD pages between them, including those for related entities. This approach allows you to think about your application in terms of entities, rather than getting bogged down by managing routes.
Providers
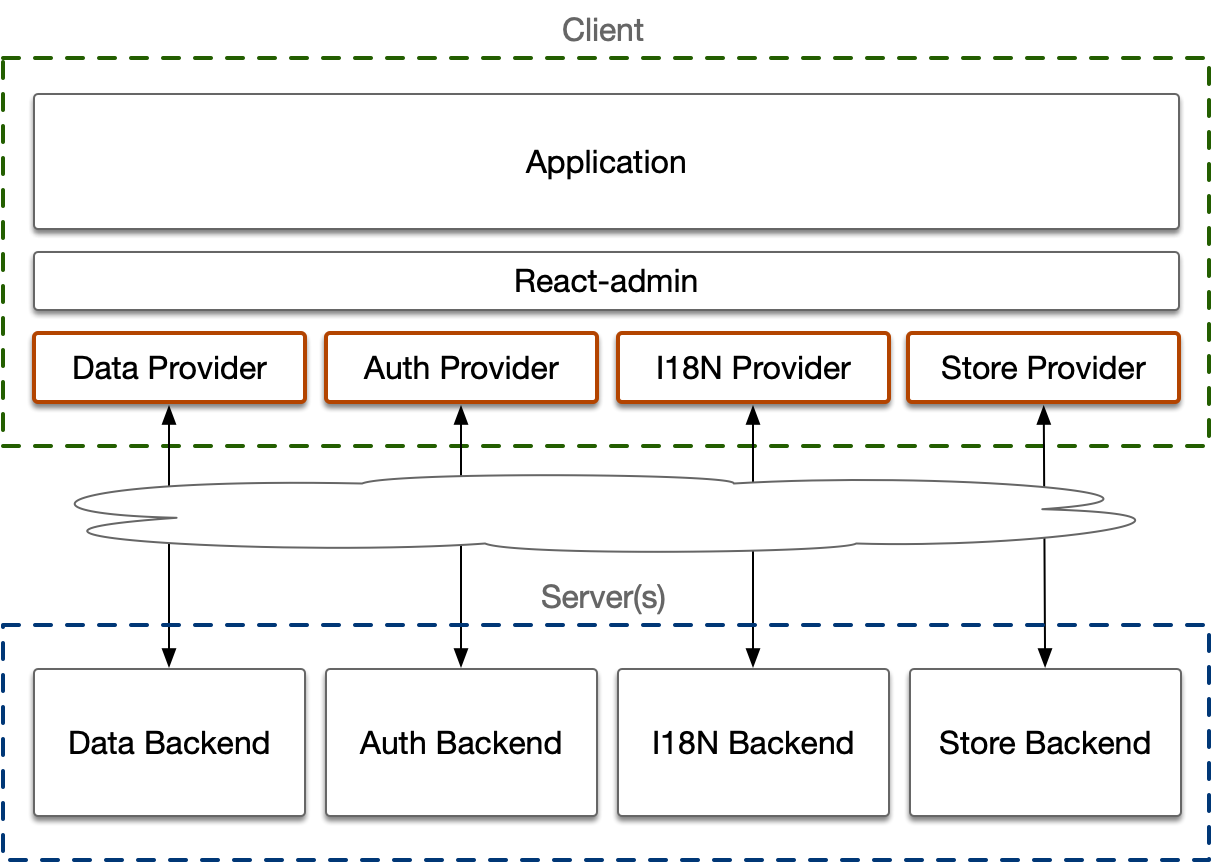
React-admin does not make any assumptions about the specific structure of your API. Instead, it defines its own syntax for data fetching, authentication, internationalization, and preferences. To interact with your API, react-admin relies on adapters called providers.
For example, to fetch a list of records from the API, you would use the dataProvider object as follows:
dataProvider.getList('posts', {
    pagination: { page: 1, perPage: 5 },
    sort: { field: 'title', order: 'ASC' },
    filter: { author_id: 12 },
}).then(response => {
    console.log(response);
});
// {
//     data: [
//         { id: 452, title: "Harry Potter Cast: Where Now?", author_id: 12 },
//         { id: 384, title: "Hermione: A Feminist Icon", author_id: 12 },
//         { id: 496, title: "Marauder's Map Mysteries", author_id: 12 },
//         { id: 123, title: "Real-World Roots of Wizard Spells", author_id: 12 },
//         { id: 189, title: "Your True Hogwarts House Quiz", author_id: 12 },
//     ],
//     total: 27
// }
The dataProvider.getList() method is responsible for translating this request into the appropriate HTTP request to your API. When using the REST data provider, the above code will translate to:
GET http://path.to.my.api/posts?sort=["title","ASC"]&range=[0, 4]&filter={"author_id":12}

HTTP/1.1 200 OK
Content-Type: application/json
Content-Range: posts 0-4/27
[
    { id: 452, title: "Harry Potter Cast: Where Now?", author_id: 12 },
    { id: 384, title: "Hermione: A Feminist Icon", author_id: 12 },
    { id: 496, title: "Marauder's Map Mysteries", author_id: 12 },
    { id: 123, title: "Real-World Roots of Wizard Spells", author_id: 12 },
    { id: 189, title: "Your True Hogwarts House Quiz", author_id: 12 },
]
React-admin comes with more than 50 data providers for various backends, including REST, GraphQL, Firebase, Django REST Framework, API Platform, and more. If these providers do not suit your API, you have the flexibility to develop a custom provider.
This approach is why react-admin components do not call fetch or axios directly. Instead, they rely on the data provider to fetch data from the API. Similarly, it is recommended that your custom components follow the same pattern and utilize data provider hooks, such as useGetList:
import { useGetList } from 'react-admin';

const MyComponent = () => {
    const { data, total, loading, error } = useGetList('posts', {
        pagination: { page: 1, perPage: 5 },
        sort: { field: 'title', order: 'ASC' },
        filter: { author_id: 12 },
    });

    if (loading) return <Loading />;
    if (error) return <Error />;
    return (
        <div>
            <h1>Found {total} posts matching your query</h1>
            <ul>
                {data.map(record => (
                    <li key={record.id}>{record.title}</li>
                ))}
            </ul>
        </div>
    )
};
By using useGetList, you gain various benefits beyond a simple fetch: it handles user credentials, triggers loading indicators, manages loading states, handles errors, caches results for future use, and controls the data shape, among other things.
Whenever you need to communicate with a server, you will use these providers. Since they are specialized for their respective domains and tightly integrated with react-admin, they will save you a significant amount of time and effort.
Smart Components
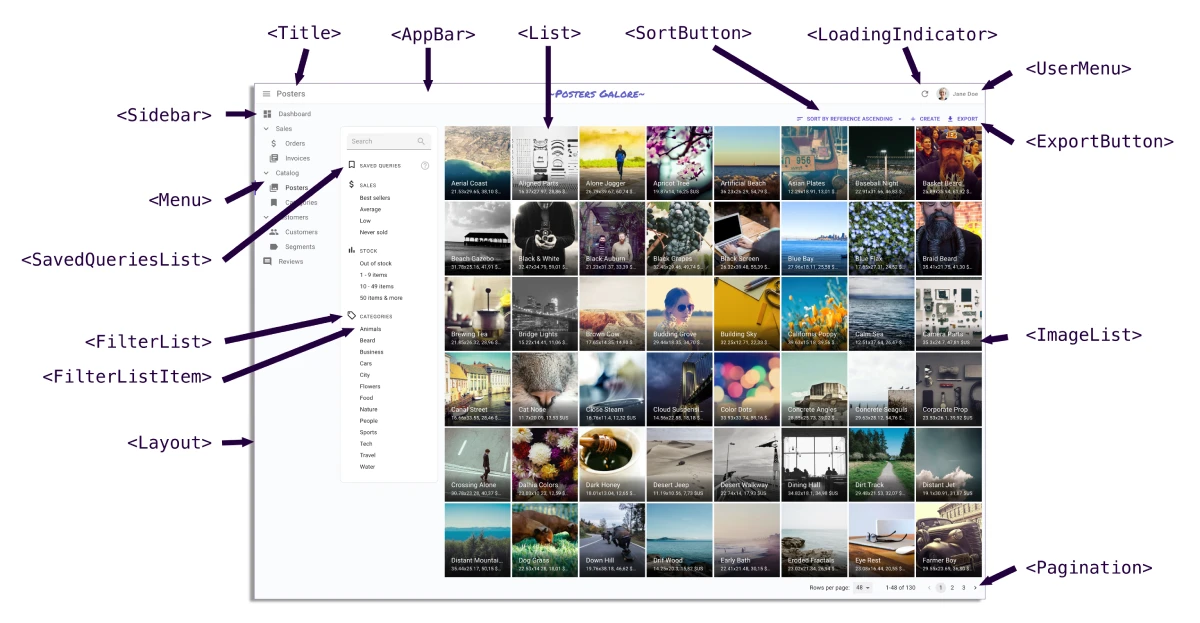
React-admin was built to avoid rewriting the same code and over again, because most web applications use the same basic building blocks. It provides a library of React components (more than 150 components to date). Most of these are smart components as they not only handle rendering HTML but also take care of data fetching, state management, and interaction within the application.
It’s important to note that react-admin is not merely a UI Kit like Material UI or Bootstrap. It goes beyond presentation to offer building blocks specifically tailored for data-driven applications. While it is built on top of Material UI, you don’t need to be familiar with Material UI to use react-admin effectively.
For example, to create a custom menu for your application, you can utilize the <Menu> component:
// in src/MyMenu.js
import { Menu } from 'react-admin';
import LabelIcon from '@mui/icons-material/Label';

export const MyMenu = () => (
    <Menu>
        <Menu.DashboardItem />
        <Menu.ResourceItem name="posts" />
        <Menu.ResourceItem name="comments" />
        <Menu.ResourceItem name="users" />
        <Menu.Item to="/custom-route" primaryText="Miscellaneous" leftIcon={<LabelIcon />}/>
    </Menu>
);
In this example, <Menu.DashboardItem> links to the /dashboard route, <Menu.ResourceItem> links to the list page defined in the resource configuration from the <Resource> component, and <Menu.Item> is a generic component that you can use to link to any route in your application. The <Menu> component automatically responds to changes on the application location and highlights the current route. Additionally, if you use Role-Based Access Control, users will only see the menu items they have access to.
Before creating your custom component, it’s a good practice to check if react-admin already provides a suitable component with a generic name for your purpose. In many cases, react-admin can save you hours, if not days, of development effort.
Some of the other useful react-admin components include those for guided tours, sub-forms, login screens, action buttons, calendars, and much more. Each react-admin component can be customized using props, children, and theme to fit your application’s specific needs.
Composition
React-admin avoids components that accept an overwhelming number of props, which are often referred to as “God Components.” Instead, react-admin encourages the use of composition, where components accept subcomponents (either through children or specific props) to handle a share of the logic.
For example, while you cannot directly pass a list of actions to the <Edit> component, you can achieve the same result by passing an actions component:
import { Button } from '@mui/material';
import { TopToolbar, ShowButton } from 'react-admin';

export const PostEdit = () => (
    <Edit actions={<PostEditActions />}>
        ...
    </Edit>
);

const PostEditActions = () => (
    <TopToolbar>
        <ShowButton />
        <Button color="primary" onClick={customAction}>Custom Action</Button>
    </TopToolbar>
);
This approach enables you to override specific parts of the logic of a component by composing it with another component.
The trade-off with this approach is that sometimes react-admin may require you to override several components just to enable one specific feature. For instance, to override the Menu, you must first create a custom layout using your menu as the <Layout menu> prop, then pass it as the <Admin layout> prop:
// in src/MyLayout.js
import { Layout } from 'react-admin';
import { Menu } from './Menu';

export const MyLayout = ({ children }) => (
    <Layout menu={Menu}>
        {children}
    </Layout>
);

// in src/App.js
import { Admin } from 'react-admin';
import { MyLayout }  from './MyLayout';

const App = () => (
    <Admin layout={MyLayout} dataProvider={...}>
        // ...
    </Admin>
);
Although this drawback exists, we accept it because the use of composition in react-admin makes the components highly extensible, and it significantly improves the readability and maintainability of the code.
Hooks
When you find that you cannot tweak a react-admin component using props, you can always turn to the lower-level API: hooks. In fact, the core of react-admin is a headless library called ra-core, which primarily consists of hooks. These hooks hide the framework’s implementation details, allowing you to focus on your business logic. It’s perfectly normal to use react-admin hooks in your own components if the default UI doesn’t meet your specific requirements.
For example, the <DeleteButton> button used in pessimistic mode renders a confirmation dialog when clicked and then calls the dataProvider.delete() method for the current record. If you want the same feature but with a different UI, you can use the useDeleteWithConfirmController hook:
const DeleteButton = () => {
    const resource = useResourceContext();
    const record = useRecordContext();
    const {
        open,
        isPending,
        handleDialogOpen,
        handleDialogClose,
        handleDelete,
    } = useDeleteWithConfirmController({ redirect: 'list' });

    return (
        <Fragment>
            <Button onClick={handleDialogOpen} label="ra.action.delete">
                {icon}
            </Button>
            <Confirm
                isOpen={open}
                loading={isPending}
                title="ra.message.delete_title"
                content="ra.message.delete_content"
                titleTranslateOptions={{
                    name: resource,
                    id: record.id,
                }}
                contentTranslateOptions={{
                    name: resource,
                    id: record.id,
                }}
                onConfirm={handleDelete}
                onClose={handleDialogClose}
            />
        </Fragment>
    );
};
The fact that hook names often end with Controller is intentional and reflects the use of the Model-View-Controller (MVC) pattern for complex components in react-admin.
- The Controller logic is handled by React hooks (e.g.
useListController). - The view logic is managed by React components (e.g.
<List>). - The model logic is left to the developer, and react-admin simply defines the interface that the model must expose through its Providers.
React-admin exposes dozens of hooks to assist you in building your own components. You can even construct an entire react-admin application without relying on the Material UI components and use a different UI kit if desired (see for instance shadcn-admin-kit, a library for building admin apps with Shadcn UI). This flexibility allows you to tailor the application to your specific needs and preferences.
Context: Pull, Don’t Push
Communication between components can be challenging, especially in large React applications, where passing props down several levels can become cumbersome. React-admin addresses this issue using a pull model, where components expose props to their descendants via a context, and descendants can consume these props using custom hooks.
Whenever a react-admin component fetches data or defines a callback, it creates a context and places the data and callback in it.
For instance, the <Admin> component creates an I18NProviderContext, which exposes the translate function. All components in the application can utilize the useTranslate hook, which reads the I18NProviderContext, for translating labels and messages.
import { useTranslate } from 'react-admin';

export const MyHelloButton = ({ handleClick }) => {
    const translate = useTranslate();
    return (
        <button onClick={handleClick}>{translate('root.hello.world')}</button>
    );
};
Similarly, the <Show> component fetches a record and exposes it via a RecordContext. Inside the <Show> component, you can use the useRecordContext hook to access the record data. For example, you can use it to display a map of the record’s location.
import { useRecordContext } from 'react-admin';
import { MapContainer, TileLayer, Marker } from 'react-leaflet';
const LocationField = ({ source }) => {
const record = useRecordContext(props); // use the RecordContext created by <Show>
if (!record) return null;
return (
<MapContainer center={record[source]} zoom={13} scrollWheelZoom={false}>
<TileLayer
attribution='© <a href="https://www.openstreetmap.org/copyright">OpenStreetMap</a> contributors'
url="https://{s}.tile.openstreetmap.org/{z}/{x}/{y}.png"
/>
<Marker position={record[source]} />
</MapContainer>
);
};
const StoreShowPage = () => (
<Show> {/* create a RecordContext */}
<SimpleShowLayout>
<TextField source="name" />
<LocationField source="location" />
</SimpleShowLayout>
</Show>
)
This approach eliminates the need for a dependency injection system and provides an elegant solution to access data and callbacks from higher levels in the render tree.
So when you write a component that needs to access data or callbacks defined higher in the render tree, you can always find a context to get it.
Contexts are fundamental concepts in React Admin. If you are not familiar with them, don’t hesitate to read the React documentation on Context. Understanding contexts will greatly enhance your understanding of how react-admin leverages them to create a powerful and flexible framework.
Batteries Included But Removable
React-admin allows you to build sophisticated web applications using only its built-in components, assuming that its design choices align with your needs. However, if you find that a component’s existing capabilities don’t meet your specific requirements, you’re free to replace it with a custom component.
For example, if <SimpleShowLayout> doesn’t allow you to arrange the details of a contact as depicted in the image below:
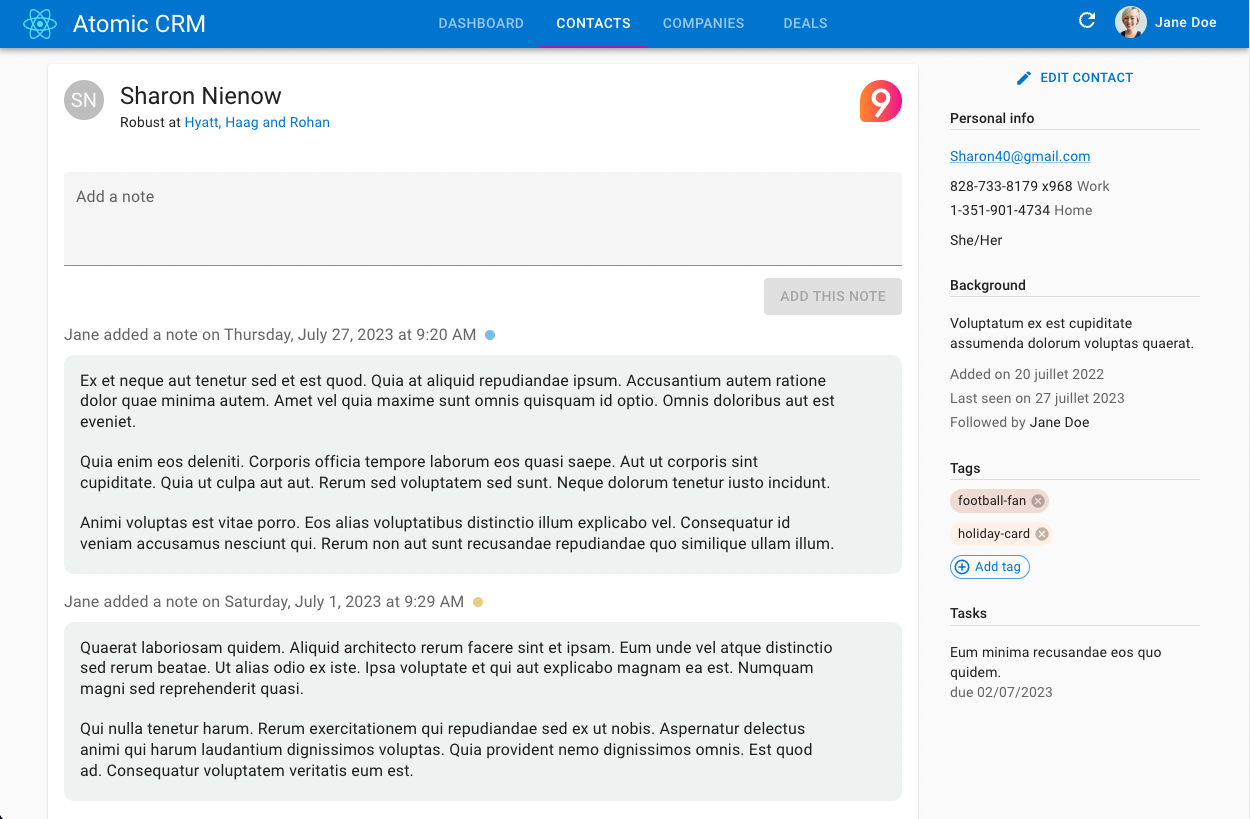
You can create and use your own layout component:
export const ContactShow = () => (
    <ShowBase>
        <ContactShowContent />
    </ShowBase>
);

const ContactShowContent = () => {
    const { record, isPending } = useShowContext<Contact>();
    if (isPending || !record) return null;
    return (
        <Box sx={{ mt: 2, display: "flex" }}>
            <Box sx={{ flex: "1" }}>
                <Card>
                    <CardContent>
                        <Box sx={{ display: "flex" }}>
                            <Avatar />
                            <Box sx={{ ml: 2, flex: "1" }}>
                                <Typography variant="h5">
                                    {record.first_name} {record.last_name}
                                </Typography>
                                <Typography variant="body2">
                                    {record.title} at{' '}
                                    <ReferenceField
                                        source="company_id"
                                        reference="companies"
                                        link="show"
                                    >
                                        <TextField source="name" />
                                    </ReferenceField>
                                </Typography>
                            </Box>
                            <Box>
                                <ReferenceField
                                    source="company_id"
                                    reference="companies"
                                    link="show"
                                >
                                    <LogoField />
                                </ReferenceField>
                            </Box>
                        </Box>
                        <ReferenceManyField
                            target="contact_id"
                            reference="contactNotes"
                            sort={{ field: 'date', order: 'DESC' }}
                        >
                            <NotesIterator showStatus reference="contacts" />
                        </ReferenceManyField>
                    </CardContent>
                </Card>
            </Box>
            <ContactAside />
        </Box>
    );
};
This particular example is sourced from Atomic CRM, one of the many demo applications available for react-admin.
Never hesitate to replace a react-admin component with one of your own design. React-admin does not aim to cover all possible use cases, instead, it provides hooks for incorporating custom components. After all, “It’s just React”™.
With react-admin, you’ll never find yourself backed into a corner.
Awesome Developer Experience
With react-admin, developers assemble application components without having to worry about low-level details. They need less code for the same result, and they can focus on the business logic of their app.
We’ve crafted the API of react-admin’s components and hooks to be as intuitive as possible. The react-admin core team uses react-admin every day, and we’re always looking for ways to improve the developer experience.
React-admin provides the best-in-class documentation, demo apps, and support. Error messages are clear and actionable. Thanks to extensive TypeScript types and JSDoc, it’s easy to use react-admin in any IDE. The API is stable and breaking changes are very rare. You can debug your app with the query and form developer tools, and inspect the react-admin code right in your browser.
That probably explains why more than 3,000 new apps are published every month using react-admin.
So react-admin is not just the assembly of React Query, react-hook-form, react-router, Material UI, and Emotion. It’s a framework made to speed up and facilitate the development of single-page apps in React.